Overview: Wondering how to edit Canon C300 Mark II 4K MXF files in Magix Video Pro X? Come here to get a workable solution.  Hot search: Merge MXF Files for Using in Magix Video Pro X | DJI Phantom 2 Vision+ Video to Magix Video Pro X Canon C300 Mark II is a hot camcorder on the market, since it released it has attracted great attention due to its excellent hardware equipment. It features a Super 35mm CMOS sensor, which will help you to record 4K, 1920*1080 60/50i, 23.98/25p True 24p videos. With C300 Mark II you can record high quality videos, it delivers the highest image quality with its XF Codec–the same codec used by other Canon XF professional camcorders. Though Canon C300 Mark II camcorder can help you to record high quality 4K MXF footages, but usually it can make video editing a real nightmare. "I’ve got a ton of Canon C300 Mark II footage that I’m trying to import the C300 Mark II 4K MXF files to Magix Video Pro X. Since the files come out natively as MXF, it has been presenting issues." Afterwards, when you got a pile of 4K MXF files from Canon C300 Mark II, there’s no luck Magix Video Pro X can support all of your media. To fix the problem, the easy option is to convert C300 Mark II 4K MXF to Magix Video Pro X supported file format like MPEG-4 MP4. Actually, it's not as difficult as you imagine. What's need is just a common video converter like Pavtube MXF MultiMixer, which can help you transcode MXF to MPEG-4 MP4 with maximum editing quality and efficiency when working with Magix Video Pro X under Windows operating system.
 Other Download: - Pavtube old official address: http://www.pavtube.com/mxf-multimixer/ - Amazon Download: http://www.amazon.com/Pavtube-Studio-MXF-MultiMixer-Download/dp/B00QI35ELI - Cnet Download: http://download.cnet.com/Pavtube-MXF-MultiMixer/3000-2194_4-76171745.html How to edit Canon C300 Mark II 4K MXF files in Magix Video Pro X? Step 1: Launch the MXF MultiMixer on your PC, and then click the "Add video" button to import your MXF files directly. In order to import several files at one time, you can click "Add from folder" button.
 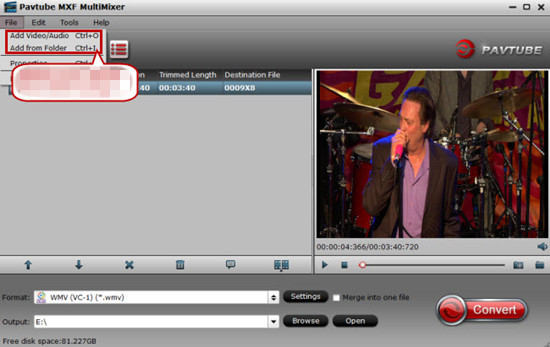 Step 2: Click the "Format" bar to get the drop-down menu and you can get "HD Video", here we suggest you to choose "MPEG-4 HD Video (*.mp4)" as the best output format for editing in Magix Video Pro X.
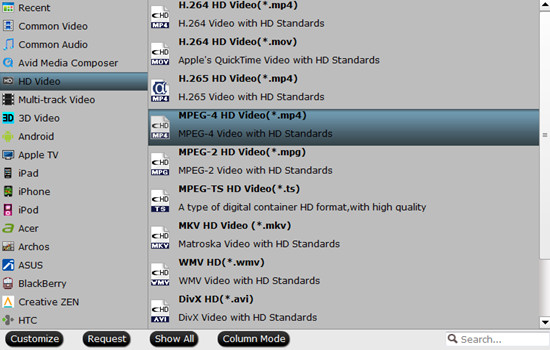 Step 3: Click "Settings" button to customize the output video and audio settings by yourself. But if you are not good at it, you’d better use the default parameters, they will ensure you a good balance between file size and image quality basically. You can change the resolution, bit rate, frame rate as you need. Step 4: When everything is done, click "Convert" button to start conversion work. Conclusion: As soon as the conversion is complete, you can click "Open Folder" button to get the generated files. Later, transfer the converted MXF files to Magix Video Pro X for editing. More related tips:
Good News: Never miss to get Saving up to $44.1, MXF/MTS/M2TS/MKV/FLV/MOV Converter.etc at Pavtube Bundles Deals, such as: HD Video Converter for Mac($35) + DVD Creator for Mac($35) = $39.9, Save $30.1 Source: http://mxfworld.jimdo.com/2015/08/21/edit-c300-mark-ii-4k-mxf-in-magix-video-pro-x/
Step 3: Click "Settings" button to customize the output video and audio settings by yourself. But if you are not good at it, you’d better use the default parameters, they will ensure you a good balance between file size and image quality basically. You can change the resolution, bit rate, frame rate as you need. Step 4: When everything is done, click "Convert" button to start conversion work. Conclusion: As soon as the conversion is complete, you can click "Open Folder" button to get the generated files. Later, transfer the converted MXF files to Magix Video Pro X for editing. More related tips:
Good News: Never miss to get Saving up to $44.1, MXF/MTS/M2TS/MKV/FLV/MOV Converter.etc at Pavtube Bundles Deals, such as: HD Video Converter for Mac($35) + DVD Creator for Mac($35) = $39.9, Save $30.1 Source: http://mxfworld.jimdo.com/2015/08/21/edit-c300-mark-ii-4k-mxf-in-magix-video-pro-x/
Summary: If your video converter is not working and you need to convert Sony HDR-PJ440 AVCHD to Avid Media Composer for editing, there is a user-friendly converter for your choice.  Hot search: Sony RX100 IV 4K XAVC S to Avid MC | 4K MTS to Avid MC | H.265 to Avid MC One of my friends has a Sony HDR-PJ440, which is the best camcorder as he thought. He captured many videos with his PJ440 like 1080/60p AVCHD, XAVC S, and he wants to edit the AVCHD recordings with Avid Media Composer thus he can share the videos with us and upload video on the website. But while he trying to import MTS clips from Sony HDR-PJ440 to Avid MC, the program can’t be compatible well with these AVCHD files. As far as we know AVCHD format is a delivery codec not for editing, so it is not compatible with many editing software, such as Avid Media Composer. That is to say, Avid MC doesn't supports Sony PJ440 AVCHD well, it takes much time to render. If you want to smoothly import and edit Sony HDR-PJ440 AVCHD video with Avid MC, you should convert Sony HDR-PJ440 AVCHD to MOV format encoded with DNxHD codec, that is best supported by Avid Media Composer. Based on our testing, you can get a professional video tool like Pavtube MTS/M2TS Converter for Mac (review) to finish the conversion task. It can easily convert Sony HDR-PJ440 MTS files to DNxHD MOV for Avid Media Composer on Mac OS X without quality loss. It can generate best editing format/codec for filmmakers and video enthusiasts to use in different NLE apps, such as Final Cut Pro 6/7/X, Adobe Premiere Pro CS4/CS5/CS6/CC, Adobe After Effects, iMovie, Final Cut Express, and more.
 Other Download: - Pavtube old official address: http://www.pavtube.com/mts-converter-mac/ - Amazon Download: http://www.amazon.com/Pavtube-MTS-M2TS-Converter-Download/dp/B00QIE3U0Y - Cnet Download: http://download.cnet.com/Pavtube-MTS-M2TS-Converter/3000-2194_4-76177029.html
How to work Sony HDR-PJ440 AVCHD videos with Avid Media Composer? Step 1: Drag and drop source Sony HDR-PJ440 AVCHD videos to the main interface. Or click “Add Video” button to import videos.  Step 2: Set up output format for Sony HDR-PJ440 AVCHD to Avid Media Composer. From format list, choose “Avid Media Composer>>Avid DNxHD (*.mov)” for output.
  Step 3: This program offers some editing functions. You can tick “Merge into one file” under the preview window. And click “Edit” button, you can make changes to the video effects as you wish. In the editing window, you can trim your favorite part from the video, crop the frame size, adjust the visual effects, or add watermarks or subtitles. If you want to change the video parameters, go back to the main interface and click “Settings” button, you can select the video encoder, resolution, audio channel and more. This function is something worth trying. You can get the work done splendidly. Step 4: Press the “Convert” button to start Sony HDR-PJ440 AVCHD MTS to DNxHD .mov conversion. Conclusion: Once finished, click “Open” to get converted videos. Then you could transfer them to Avid Media Composer for editing. More related tips:
Source: http://handycameratips.jimdo.com/2015/08/19/edit-pj440-avchd-in-avid-mc/
Step 3: This program offers some editing functions. You can tick “Merge into one file” under the preview window. And click “Edit” button, you can make changes to the video effects as you wish. In the editing window, you can trim your favorite part from the video, crop the frame size, adjust the visual effects, or add watermarks or subtitles. If you want to change the video parameters, go back to the main interface and click “Settings” button, you can select the video encoder, resolution, audio channel and more. This function is something worth trying. You can get the work done splendidly. Step 4: Press the “Convert” button to start Sony HDR-PJ440 AVCHD MTS to DNxHD .mov conversion. Conclusion: Once finished, click “Open” to get converted videos. Then you could transfer them to Avid Media Composer for editing. More related tips:
Source: http://handycameratips.jimdo.com/2015/08/19/edit-pj440-avchd-in-avid-mc/
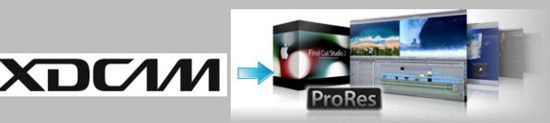
Summary: Facing issues when encoding XDCAM to Apple ProRes on Mac? Fortunately, an easy guide is offered here to you to fix the issue.
 Hot search: XDCAM MXF to FCP Preserving Multi-audio Channels | XDCAM EX BPAV to DaVinci Resolve | XDCAM to Sony Vegas
XDCAM, introduced by Sony in 2003, has four different products lines- the XDCAM SD, XDCAM HD, XDCAM EX and XDCAM HD422, which differ in encoder, frame size, container and recording media. Designed for heavy-duty field acquisition, Sony XDCAM camcorders provide the excellent picture quality, operability and reliability. Besides that, Sony XDCAM camcorders offer a wide range of innovative features that maximize the benefits of nonlinear disc media.
Sony XDCAM camcorders usually record MXF and MP4 format video, and it usually use MPEG2 codec, this codec is not good for editing in FCP X, and you will encounter importing and codec problems when you try to import Sony XDCAM footage to Final Cut Pro.
“I've been looking through the postings and there are many comments about how to transcode from XDCAM to ProRes. I've run into ‘general error’ messages batching from FCP 7 so now I'm using compressor (tried MPEG stream clip but it lost the timecode reference). So my question is, coming from a U1 is there any intermediary device that I can plug into that will encode to ProRes in real time?”
To fulfill your need, a video converter app is needed. Pavtube HD Video Converter for Mac is the tool highly recommended. The program comes with several optimized format for Final Cut Pro, which enables you to transcode XDCAM to ProRes 422, ProRes 422 HQ, ProRes 422 LT, ProRes 4444 for using in Final Cut Pro X/7/6 directly. Besides converting XDCAM to Apple ProRes, this program also enables you to convert many other videos files like AVI/MKV/MP4/MPG to ProRes on Mac with the best quality.
Other Download:
- Pavtube old official address: http://www.pavtube.com/hd-video-converter-mac/
- Amazon Store Download: http://www.amazon.com/Pavtube-Video-Converter-Mac-Download/dp/B00QI9GNZS
- AppStore Download: https://itunes.apple.com/de/app/pavtube-hd-video-converter/id502792488?mt=12
- Cnet Download: http://download.cnet.com/Pavtube-HD-Video-Converter/3000-2194_4-76177786.html
How to encode XDCAM to Apple ProRes on Mac?
Step 1: Launch the HD Video Converter on your Mac, and then click the “Add video” button to import your source files directly. In order to import several files at one time, you can click “Add from folder” button.
Hot search: XDCAM MXF to FCP Preserving Multi-audio Channels | XDCAM EX BPAV to DaVinci Resolve | XDCAM to Sony Vegas
XDCAM, introduced by Sony in 2003, has four different products lines- the XDCAM SD, XDCAM HD, XDCAM EX and XDCAM HD422, which differ in encoder, frame size, container and recording media. Designed for heavy-duty field acquisition, Sony XDCAM camcorders provide the excellent picture quality, operability and reliability. Besides that, Sony XDCAM camcorders offer a wide range of innovative features that maximize the benefits of nonlinear disc media.
Sony XDCAM camcorders usually record MXF and MP4 format video, and it usually use MPEG2 codec, this codec is not good for editing in FCP X, and you will encounter importing and codec problems when you try to import Sony XDCAM footage to Final Cut Pro.
“I've been looking through the postings and there are many comments about how to transcode from XDCAM to ProRes. I've run into ‘general error’ messages batching from FCP 7 so now I'm using compressor (tried MPEG stream clip but it lost the timecode reference). So my question is, coming from a U1 is there any intermediary device that I can plug into that will encode to ProRes in real time?”
To fulfill your need, a video converter app is needed. Pavtube HD Video Converter for Mac is the tool highly recommended. The program comes with several optimized format for Final Cut Pro, which enables you to transcode XDCAM to ProRes 422, ProRes 422 HQ, ProRes 422 LT, ProRes 4444 for using in Final Cut Pro X/7/6 directly. Besides converting XDCAM to Apple ProRes, this program also enables you to convert many other videos files like AVI/MKV/MP4/MPG to ProRes on Mac with the best quality.
Other Download:
- Pavtube old official address: http://www.pavtube.com/hd-video-converter-mac/
- Amazon Store Download: http://www.amazon.com/Pavtube-Video-Converter-Mac-Download/dp/B00QI9GNZS
- AppStore Download: https://itunes.apple.com/de/app/pavtube-hd-video-converter/id502792488?mt=12
- Cnet Download: http://download.cnet.com/Pavtube-HD-Video-Converter/3000-2194_4-76177786.html
How to encode XDCAM to Apple ProRes on Mac?
Step 1: Launch the HD Video Converter on your Mac, and then click the “Add video” button to import your source files directly. In order to import several files at one time, you can click “Add from folder” button.
 Step 2: Click the “Format” bar to get the drop-down menu and you can get “Final Cut Pro>>Apple ProRes codec”, including ProRes 422, ProRes 422 (HQ), ProRes 422 (LT), ProRes 422 (Proxy) and ProRes 4444. Choose the proper one you want. Here, we suggest you to choose Apple ProRes 422 .mov as the best output format.
 Step 3: Click “Settings” button to customize the output video and audio settings by yourself. But if you are not good at it, you’d better use the default parameters, they will ensure you a good balance between file size and image quality basically. You can change the resolution, bit rate, frame rate as you need.
Step 4: Now, click "Convert" and let it go.
Conclusion: The program supports batch conversion. So if you have lots of files to convert, check “Shut down computer after conversion” and you can go away without keeping an eye on it. Once the conversion process shows in 100%, click “Open” to get the output videos.
More related tips:
If You Want to Get Our Weekend Pavtube Special offer,You can Click Here: http://bit.ly/1hmOn34
Source: http://file-editing-tips.over-blog.com/encode-xdcam-to-apple-prores-on-mac
Step 3: Click “Settings” button to customize the output video and audio settings by yourself. But if you are not good at it, you’d better use the default parameters, they will ensure you a good balance between file size and image quality basically. You can change the resolution, bit rate, frame rate as you need.
Step 4: Now, click "Convert" and let it go.
Conclusion: The program supports batch conversion. So if you have lots of files to convert, check “Shut down computer after conversion” and you can go away without keeping an eye on it. Once the conversion process shows in 100%, click “Open” to get the output videos.
More related tips:
If You Want to Get Our Weekend Pavtube Special offer,You can Click Here: http://bit.ly/1hmOn34
Source: http://file-editing-tips.over-blog.com/encode-xdcam-to-apple-prores-on-mac
Summary: iMovie is not the friendly application when it comes to editing Panasonic FZ1000 4K videos. So if you want to import FZ1000 4K videos to iMovie, you have to ask for a third-party tool.  Hot search: upload iMovie videos to YouTube | MKV to iMovie | XAVC to iMovie | Panasonic HC-X1000 4k to iMovie | Panasonic MXF to EDIUS Pro 7 workflow | Panasonic GH4 4K Footage into iMovie Panasonic FZ1000 is one of the hottest 4K cameras in this Summer. The headline feature of the Panasonic GH4 is that it’s a Micro Four Thirds camera that can shoot 4K video (in MP4, MOV format) for under $2000, capturing either Quad HD (3840*2160) at up to 29.97p or "Cinema 4K" (4096*2160) at up to 24p. If you recorded some videos by Panasonic FZ1000, you may like editing the 4K videos in iMovie. "Hi, all, does anyone have any experience of Panasonic Lumix FZ1000 and iMovie workflow? I have just received my Panasonic FZ1000 camera the day before yesterday and everything is performing as expected, except there is no go when I importing FZ1000 4K video to iMovie for basic editing. And yes I have other more robust video editing programs but I like the simplicity of iMovie so would like to use it. Does anyone know how to get around this and make iMovie read FZ1000 footage flawlessly? I don’t even mind paying for third party software." iMovie won't open and import Panasonic FZ1000 4K footage correctly. Question is, what's causing the issues? According to my experience, it may due to the high video resolution and the video codec incompatibility. Since Apple InterMediate Codec is the best editing video codec for iMovie, so we can convert Panasonic FZ1000 4K video to AIC .mov (1080p would be the best settings.) with a top 4K Video Converter, which will save you both time and trouble, and all you need is to drag the result videos for prompt editing. Here Pavtube Video Converter for Mac is highly recommended. It does a good job in converting Panasonic FZ1000 4K video to iMovie most compatible format with least quality loss. Plus, it supports encoding camera shootings in different formats (MTS/M2TS, MP4, MXF, XAVC, etc.) to video editing software compatible file types, i.e. MPEG-2 for Premiere Pro, DNxHD for Avid Media Composer, Apple ProRes for Final Cut Pro to meet your different needs. Other Download: - Pavtube old official address: http://www.pavtube.com/video-converter-mac/ - Amazon Store Download: http://www.amazon.com/Pavtube-Video-Converter-Mac-Download/dp/B00QIBK0TQ - Cnet Download: http://download.cnet.com/Pavtube-Video-Converter/3000-2194_4-76179460.html How to import Panasonic FZ1000 4K video to iMovie for editing? Step 1: Download and have a quick installation. The trial version will have a watermark on your converted files. Except for that, there are no time limitation, no virus, and no unnecessary bundle apps while downloading. After that, click "Add Video" button to load your source files. You can load several files at once thanks to "Add from folder" button.
  Step 2: Click the "Format" bar to get the drop-down menu and you can get "iMovie and Final Cut Express". Choose "Apple InterMediate Codec (AIC) (*.mov)" as best output format.
  Step 3: Click "Settings" button to customize the output video and audio settings by yourself. But if you are not good at it, you’d better use the default parameters, they will ensure you a good balance between file size and image quality basically. You can change the resolution, bit rate, frame rate as you need. Step 4: When everything is done, you can take a preview by hitting "Play" button. If you are satisfied with the final result, you can click "Convert" button to finish the conversion work. Conclusion: When the conversion is done, you can click "Open" to get your generated files. Now, you can edit Panasonic FZ1000 4K video in iMovie without any hassles. Further Reading:
If You Want to Get Our Weekend Pavtube Special offer,You can Click Here: http://bit.ly/1hmOn34 Source: http://file-editing-tips.over-blog.com/import-fz1000-4k-video-to-imovie
Step 3: Click "Settings" button to customize the output video and audio settings by yourself. But if you are not good at it, you’d better use the default parameters, they will ensure you a good balance between file size and image quality basically. You can change the resolution, bit rate, frame rate as you need. Step 4: When everything is done, you can take a preview by hitting "Play" button. If you are satisfied with the final result, you can click "Convert" button to finish the conversion work. Conclusion: When the conversion is done, you can click "Open" to get your generated files. Now, you can edit Panasonic FZ1000 4K video in iMovie without any hassles. Further Reading:
If You Want to Get Our Weekend Pavtube Special offer,You can Click Here: http://bit.ly/1hmOn34 Source: http://file-editing-tips.over-blog.com/import-fz1000-4k-video-to-imovie
Overview: Have a creative idea to watch MXF on Zeiss VR One with iPhone 6? If so, you need a smart and professional converter for help. A German company Carl Zeiss just announced VR One, a virtual reality headset for use with a smartphone to give you access to immersive 3D videos, games and augmented reality. The Zeiss VR One offers a Cinema app to enable you to enjoy your movies save in your iPhone in an immersive environment with the lights off. The VR One Cinema app can play .mov, .mp4 file formats. It also can play a side-by-side 3D formatted 3D video.  Hot search: Panasonic DVCPro HD MXF to EDIUS Pro 7 | MXF to DNxHD mov | Canon XF105/XF100 MXF to iMovie | Sony PXW-X70 XAVC MXF to MOV | Canon XC10 XF-AVC MXF to WMM | MXF to Media Player 12 The Material eXchange Format (MXF) is an open file format, targeted at the interchange of audio-visual material with associated data and metadata. It has been designed and implemented with the aim of improving file-based interoperability between servers, workstations and other content-creation devices. These improvements should result in improved workflows and in more efficient working practices than is possible with today's mixed and proprietary file formats. MXF is a "container" or "wrapper" format which supports a number of different streams of coded "essence", encoded with any of a variety of codecs, together with a metadata wrapper which describes the material contained within the MXF file. In order to watch MXF on Zeiss VR One with iPhone 6, or solve MKV/AVI/FLV/WMV to Zeiss VR One issues, you just need a right program and convert them to 3D MP4 for smoothly playing on Zeiss VR One via iPhone 6. Here Pavtube Video Converter is highly recommended, you can get this job done perfectly. With the latest version 4.8.6.5, this program adds Apple ProRes as output, supports encoding to H.265 MKV and is compatible with Sony/LG/Samsung/Panasonic TVs. If you are running on Mac operating system, you can refer to the equivalent version- Pavtube Video Converter for Mac (review). It works well even on the latest Mac OS X El Capitan. Other Download: - Pavtube old official address: http://www.pavtube.com/video_converter/ - Amazon Download: http://download.cnet.com/Pavtube-Video-Converter/3000-2194_4-75734821.html - Cnet Download: http://download.cnet.com/Pavtube-Video-Converter/3000-2194_4-75734821.html How to convert MXF for watching on Zeiss VR One with iPhone 6? Step 1: Download, install and run the corresponding program. Click "Add Video" or "Add from folder" to load your MXF files.
  Step 2: Click the "Format" bar and select "3D Video>>MP4 Side-by-Side 3D Video (*.mp4)" as output format.
 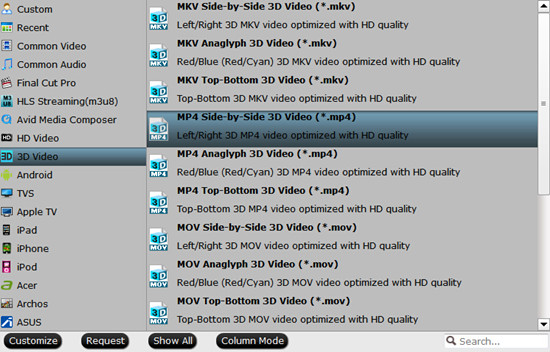 Step 3: Click "Settings" button to customize the output video and audio settings by yourself. But if you are not good at it, you’d better use the default parameters, they will ensure you a good balance between file size and image quality basically. You can change the resolution, bit rate, frame rate as you need. Step 4: Go back to the main interface, hit the big button "Convert" there. Conclusion: There is no need for waiting for a long time. We can receive the best output files nicely. After conversion, you can get the generated files by hitting "Open" button. You can simply add the keyword "SBS" to the file name of the video, and the app will automatically show the correct content for each eye. More related tips:
If You Want to Get Our Weekend Pavtube Special offer,You can Click Here: http://bit.ly/1hmOn34 Source: http://mxfworld.jimdo.com/2015/08/25/watch-mxf-on-zeiss-vr-one-with-iphone-6/
Step 3: Click "Settings" button to customize the output video and audio settings by yourself. But if you are not good at it, you’d better use the default parameters, they will ensure you a good balance between file size and image quality basically. You can change the resolution, bit rate, frame rate as you need. Step 4: Go back to the main interface, hit the big button "Convert" there. Conclusion: There is no need for waiting for a long time. We can receive the best output files nicely. After conversion, you can get the generated files by hitting "Open" button. You can simply add the keyword "SBS" to the file name of the video, and the app will automatically show the correct content for each eye. More related tips:
If You Want to Get Our Weekend Pavtube Special offer,You can Click Here: http://bit.ly/1hmOn34 Source: http://mxfworld.jimdo.com/2015/08/25/watch-mxf-on-zeiss-vr-one-with-iphone-6/
Summary: Do you have any desire to enjoy watching WMV on Zeiss VR One via Samsung S6? If so, just read on to find out solutions. Hot search: WMV to FCP X | H.265 to WMV | Sony PXW-X70 MXF to WMV | Sony 4K XAVC S to WMV | PVR Files to WMV The .wmv (Windows Media Video) is the main format used in all videos processed and saved using the Windows system and its video tools such as Windows Movie Maker. It exists in every computer running a Windows operating system and stands today as one of the most used video formats. While the .wmv format is perfect for Windows Movie Maker, it’s just inevitable to attempt .wmv formats in other usage such as watching WMV on Zeiss VR One with Samsung S6. The Zeiss VR One is a one-of-a-kind device allowing us to take our first steps in the world of virtual reality. Its lightweight design and 100% portability make it the perfect companion for videos, games and augmented reality. Currently, Zeiss VR One is compatible with iPhone 6, Samsung Galaxy S4, S5, S6, Nexus 5, and LG-G3 smartphones. The VR One Cinema app can play .mov, .mp4 file formats. It also can play a side-by-side 3D formatted 3D video. You’ll meet troubles when watching WMV on Zeiss VR One with Samsung S6 cause only MOV/MP4 is accepted by Zeiss VR One. To achieve the goal, here Pavtube Video Converter is highly recommended, you can get this job done perfectly. With the latest version 4.8.6.5, this program adds Apple ProRes as output, supports encoding to H.265 MKV and is compatible with Sony/LG/Samsung/Panasonic TVs. If you are running on Mac operating system, you can refer to the equivalent version- Pavtube Video Converter for Mac (review). It works well even on the latest Mac OS X El Capitan. Besides WMV, it also solves MKV/AVI/FLV to Zeiss VR One issues. Other Download: - Pavtube old official address: http://www.pavtube.com/video_converter/ - Amazon Download: http://download.cnet.com/Pavtube-Video-Converter/3000-2194_4-75734821.html - Cnet Download: http://download.cnet.com/Pavtube-Video-Converter/3000-2194_4-75734821.html How to convert WMV to Samsung S6 for playing with Zeiss VR One? Step 1: Download, install and run the corresponding program. Click "Add Video" or "Add from folder" to load your WMV files. Step 2: Click the "Format" bar and select "3D Video>>MP4 Side-by-Side 3D Video (*.mp4)" as output format. Step 3: Click "Settings" button to customize the output video and audio settings by yourself. But if you are not good at it, you’d better use the default parameters, they will ensure you a good balance between file size and image quality basically. You can change the resolution, bit rate, frame rate as you need. Step 4: Go back to the main interface, hit the big button "Convert" there. Conclusion: There is no need for waiting for a long time. We can receive the best output files nicely. After conversion, you can get the generated files by hitting "Open" button. You can simply add the keyword "SBS" to the file name of the video, and the app will automatically show the correct content for each eye. More related tips:
Good News! Pavtube Bundles Dealsare coming! If you want to import/preserve/mix multi-track MXF in MKV/MP4/MOV formats, get multi-track Apple Prores MOV for further editing in Final Cut Pro (X), the following bundled software is your best choice:? --------Video Converter($35) + MXF MultiMixer($45) = $54.9, Save $25.1 (buy link) --------Video Converter for Mac($35) + iMixMXF($45) = $54.9, Save $25.1 (buy link) Go ahead and click the link to get your coupon. Save up to $44.1!Never miss!!! Source: http://digitalmediasolution.altervista.org/blog/watch-wmv-on-zeiss-vr-one/
Summary: This tutorial is a step by step guide on how to convert FLV to iPhone 6 for watching on Zeiss VR One with zero quality loss.  Hot search: iPhone 6 to YouTube/Vimeo | MOV on iPhone | GoPro to iPhone | iPhone to FCP 6/7/X | MKV to 3D SBS MP4 with iPhone 6 Flash Video (FLV) is the name of a file format used to deliver video over the Internet using Adobe Flash Player. The most recent public release of Flash Player supports H.264 video and HE-AAC audio. Flash Video content may also be embedded within SWF files. Notable websites of the Flash Video format include YouTube, Google Video, Yahoo! Video, Reuters.com, Hulu.com, etc. Virtual Reality on iOS has arrived. With the virtual reality headset offered by Zeiss VR One, you can now convert your iPhone 6 into an great 3D experience. The Zeiss VR One offers a Cinema app to enable you to enjoy your movies save in your iPhone in an immersive environment with the lights off. When you see here, do you have any desire to enjoy your wonderful FLV/MKV videos on Zeiss VR One via iPhone 6? Or enjoy your AVI files on Zeiss VR One via Galaxy S4/S5/S6? If so, just read on to find out how to achieve it. Zeiss VR One is currently compatible with iPhone 6, Samsung Galaxy S4/S5/S6, Nexus 5, and LG-G3 smartphones and supports MP4 and MOV formats. In order to watch FLV on Zeiss VR One with iPhone 6, you just need a right program and convert FLV to 3D MP4 for smoothly playing on Zeiss VR One via iPhone 6. Here Pavtube Video Converter is highly recommended, you can get this job done perfectly. With the latest version 4.8.6.5, this program adds Apple ProRes as output, supports encoding to H.265 MKV and is compatible with Sony/LG/Samsung/Panasonic TVs. If you are running on Mac operating system, you can refer to the equivalent version- Pavtube Video Converter for Mac (review). It works well even on the latest Mac OS X El Capitan. Other Download: - Pavtube old official address: http://www.pavtube.com/video_converter/ - Amazon Download: http://download.cnet.com/Pavtube-Video-Converter/3000-2194_4-75734821.html - Cnet Download: http://download.cnet.com/Pavtube-Video-Converter/3000-2194_4-75734821.html How to convert FLV to iPhone 6 for watching on Zeiss VR One? Step 1: Download, install and run the corresponding program. Click "Add Video" or "Add from folder" to load your FLV files. Step 2: Click the "Format" bar and select "3D Video>>MP4 Side-by-Side 3D Video (*.mp4)" as output format. Step 3: Click "Settings" button to customize the output video and audio settings by yourself. But if you are not good at it, you’d better use the default parameters, they will ensure you a good balance between file size and image quality basically. You can change the resolution, bit rate, frame rate as you need. Step 4: Go back to the main interface, hit the big button "Convert" there. Conclusion: There is no need for waiting for a long time. We can receive the best output files nicely. After conversion, you can get the generated files by hitting "Open" button. You can simply add the keyword "SBS" to the file name of the video, and the app will automatically show the correct content for each eye. Further Reading:
Facebook Weekend Promotion Here : Learn More: http://bit.ly/1hmOn34 Source: http://bestvideoking.blogspot.com/2015/08/convert-flv-to-iphone-6-for-zeiss-vr-one-watching.html
Hot search: iPhone 6 to YouTube/Vimeo | MOV on iPhone | GoPro to iPhone | iPhone to FCP 6/7/X | MKV to 3D SBS MP4 with iPhone 6 Flash Video (FLV) is the name of a file format used to deliver video over the Internet using Adobe Flash Player. The most recent public release of Flash Player supports H.264 video and HE-AAC audio. Flash Video content may also be embedded within SWF files. Notable websites of the Flash Video format include YouTube, Google Video, Yahoo! Video, Reuters.com, Hulu.com, etc. Virtual Reality on iOS has arrived. With the virtual reality headset offered by Zeiss VR One, you can now convert your iPhone 6 into an great 3D experience. The Zeiss VR One offers a Cinema app to enable you to enjoy your movies save in your iPhone in an immersive environment with the lights off. When you see here, do you have any desire to enjoy your wonderful FLV/MKV videos on Zeiss VR One via iPhone 6? Or enjoy your AVI files on Zeiss VR One via Galaxy S4/S5/S6? If so, just read on to find out how to achieve it. Zeiss VR One is currently compatible with iPhone 6, Samsung Galaxy S4/S5/S6, Nexus 5, and LG-G3 smartphones and supports MP4 and MOV formats. In order to watch FLV on Zeiss VR One with iPhone 6, you just need a right program and convert FLV to 3D MP4 for smoothly playing on Zeiss VR One via iPhone 6. Here Pavtube Video Converter is highly recommended, you can get this job done perfectly. With the latest version 4.8.6.5, this program adds Apple ProRes as output, supports encoding to H.265 MKV and is compatible with Sony/LG/Samsung/Panasonic TVs. If you are running on Mac operating system, you can refer to the equivalent version- Pavtube Video Converter for Mac (review). It works well even on the latest Mac OS X El Capitan. Other Download: - Pavtube old official address: http://www.pavtube.com/video_converter/ - Amazon Download: http://download.cnet.com/Pavtube-Video-Converter/3000-2194_4-75734821.html - Cnet Download: http://download.cnet.com/Pavtube-Video-Converter/3000-2194_4-75734821.html How to convert FLV to iPhone 6 for watching on Zeiss VR One? Step 1: Download, install and run the corresponding program. Click "Add Video" or "Add from folder" to load your FLV files. Step 2: Click the "Format" bar and select "3D Video>>MP4 Side-by-Side 3D Video (*.mp4)" as output format. Step 3: Click "Settings" button to customize the output video and audio settings by yourself. But if you are not good at it, you’d better use the default parameters, they will ensure you a good balance between file size and image quality basically. You can change the resolution, bit rate, frame rate as you need. Step 4: Go back to the main interface, hit the big button "Convert" there. Conclusion: There is no need for waiting for a long time. We can receive the best output files nicely. After conversion, you can get the generated files by hitting "Open" button. You can simply add the keyword "SBS" to the file name of the video, and the app will automatically show the correct content for each eye. Further Reading:
Facebook Weekend Promotion Here : Learn More: http://bit.ly/1hmOn34 Source: http://bestvideoking.blogspot.com/2015/08/convert-flv-to-iphone-6-for-zeiss-vr-one-watching.html
Summary: To convert AVI to 3D MP4 is actually a piece of cake. This guide lets you easily enjoy playing AVI on Zeiss VR One with Galaxy S4/S5/S6. Hot search: MKV to 3D SBS MP4 on Zeiss VR One | FLV to iPhone 6 on Zeiss VR One | WMV to Samsung S6 with Zeiss VR One | MXF for Watching on Zeiss VR One with iPhone 6 AVI, Audio Video Interleave video file format is developed by Microsoft mainly for Windows operating systems. Audio and video can be played in synchronous format without any halt in the video. AVI file format can be played with various media players like AVI media player, Media player classic, Plex and many others. If you have AVI files at hands, how can you put them to Samsung Galaxy S4/S5/S6 to watch on Zeiss VR One? Awesome 3D Virtual Reality Glasses/Headsets in 2015 has a new member- Zeiss VR One. Just like Samsung Gear VR and Oculus Rift, Zeiss VR One Cinema app enables you to enjoy your movies in an immersive environment with the lights off. It’s currently compatible with Samsung Galaxy S4/S5/S6, iPhone 6, Nexus 5, and LG-G3 smartphones and supports MP4 and MOV formats. In order to watch AVI on Zeiss VR One with Galaxy S4/S5/S6, you just need a right program and convert AVI to 3D MP4 for smoothly playing on Zeiss VR One via Galaxy S4/S5/S6. Here Pavtube Video Converter is highly recommended, you can get this job done perfectly. With the latest version 4.8.6.5, this program adds Apple ProRes as output, supports encoding to H.265 MKV and is compatible with Sony/LG/Samsung/Panasonic TVs. If you are running on Mac operating system, you can refer to the equivalent version- Pavtube Video Converter for Mac (review). It works well even on the latest Mac OS X El Capitan. Other Download: - Pavtube old official address: http://www.pavtube.com/video_converter/ - Amazon Download: http://download.cnet.com/Pavtube-Video-Converter/3000-2194_4-75734821.html - Cnet Download: http://download.cnet.com/Pavtube-Video-Converter/3000-2194_4-75734821.html How to convert AVI to 3D MP4 for playing on Zeiss VR One with Galaxy S4/S5/S6? Step 1: Download, install and run the corresponding program. Click "Add Video" or "Add from folder" to load your AVI files. Step 2: Click the "Format" bar and select "3D Video>>MP4 Side-by-Side 3D Video (*.mp4)" as output format. Step 3: Click "Settings" button to customize the output video and audio settings by yourself. But if you are not good at it, you’d better use the default parameters, they will ensure you a good balance between file size and image quality basically. You can change the resolution, bit rate, frame rate as you need. Step 4: Go back to the main interface, hit the big button "Convert" there. Conclusion: There is no need for waiting for a long time. We can receive the best output files nicely. After conversion, you can get the generated files by hitting "Open" button. You can simply add the keyword "SBS" to the file name of the video, and the app will automatically show the correct content for each eye. Further Reading:
Good News! Pavtube Bundles Dealsare coming! If you want to import/preserve/mix multi-track MXF in MKV/MP4/MOV formats, get multi-track Apple Prores MOV for further editing in Final Cut Pro (X), the following bundled software is your best choice:? --------Video Converter($35) + MXF MultiMixer($45) = $54.9, Save $25.1 (buy link) --------Video Converter for Mac($35) + iMixMXF($45) = $54.9, Save $25.1 (buy link) Go ahead and click the link to get your coupon. Save up to $44.1!Never miss!!! Source: http://1080p-video-tool.blogspot.com/2015/08/play-avi-on-zeiss-vr-one.html
Summary: I need to convert Canon XF100 MXF files to Apple ProRes 422 to be ingested Canon XF into FCP X. So far, however, Final Cut Pro X sees only the audio portion. How do I get video in there, too? if you have Pavtube HD Video Converter for Mac, the problem will easy to solve. 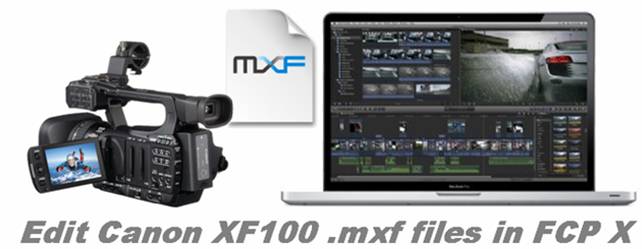 Hot search: Canon XF100 MXF to iMovie | Canon XF100 MXF to Adobe Premiere Pro | Canon XF to FCP X | Canon T6i/750D MP4 to iMovie/FCE | Canon EOS 5DS MOV with FCP The Pavtube Canon XF to FCP X Converter for Mac software supports Apple ProRes encoding to help you quickly transcode Canon XF MXF to ProRes 422 for FCP X in a short time without quality loss. Other Download: - Pavtube old official address: http://www.pavtube.com/hd-video-converter-mac/ - Amazon Store Download: http://www.amazon.com/Pavtube-Video-Converter-Mac-Download/dp/B00QI9GNZS - AppStore Download: https://itunes.apple.com/de/app/pavtube-hd-video-converter/id502792488?mt=12 - Cnet Download: http://download.cnet.com/Pavtube-HD-Video-Converter/3000-2194_4-76177786.html Below is the guide on how to convert Canon XF100 MXF to ProRes 422 and into Final Cut Pro X. Step 1: Connect Canon XF100 to Mac, run Pavtube HD Video Converter for Mac as the Mac Canon XF to FCP X Converter ( Pavtube HD Video Converter for Mac ), and add Canon XF 100 MXF files you want to transcode for Final Cut Pro into this program.
  Step 2: Choose Apple ProRes 422 .mov format for conversion. Click on "Format" drop-down list and choose "Final Cut Pro" catogory to select the appropriate ProRes format for Final Cut Pro X. Useful tip I: If you want to convert video to a ProRes format with a nice balance between image quality and file size, you’d better choose the Apple ProRes 422 (LT) (*.mov) format. Useful tip II: If you are editing video offline with Final Cut Server, the Apple ProRes 422 (Proxy) is recommended here. Useful tip III: If you hope to retain the maximum possible quality of your HD or SD, the Apple ProRes 4444 (*.mov)is the ideal format. Step 3: Click "Convert" button to start Convert MXF to Apple ProRes 422 for Final Cut Pro X. Based on its multi-threading technology and advanced video/audio sync technology, you will get theconverted Apple ProRes 422 .mov files in perfect sync of video and audio with super fast speed. Once getting the ProRes 422 (*.mov) QuickTime video files via the best Video to Final Cut Pro X Converter on your Mac OS X, what you need to do is to import the converted Canon XF MXF to Final Cut Pro X for editing to meet your requirement. How to import Canon XF MXF to Final Cut Pro X for editing?
  Step 1: Run Final Cut Pro X, the layout of the editing software interface will pop up. Step 2: Choose "Import Canon XF Series Camcorders, Canon Cinema EOS Cameras, Canon EOS Digital SLR, Canon PowerShot Cameras, Canon VIXIA Cameras and more, Click here: http://www.pavtube.com/canon-camera-file-transcode.html Be Sociable, Share! More related tips:
Source: http://mts-to-aic-converter.com/canon-xf-to-fcp-x-convert-canon-xf100-mxf-to-prores-422-for-fcp-x-editing-on-mac/
Step 1: Run Final Cut Pro X, the layout of the editing software interface will pop up. Step 2: Choose "Import Canon XF Series Camcorders, Canon Cinema EOS Cameras, Canon EOS Digital SLR, Canon PowerShot Cameras, Canon VIXIA Cameras and more, Click here: http://www.pavtube.com/canon-camera-file-transcode.html Be Sociable, Share! More related tips:
Source: http://mts-to-aic-converter.com/canon-xf-to-fcp-x-convert-canon-xf100-mxf-to-prores-422-for-fcp-x-editing-on-mac/
Summary: Stop worrying about format incompatibility issue when importing AVCHD to EDIUS 6. Find out how to convert AVCHD to EDIUS 6. EDIUS Pro provides a simple alternatives to the industry leaders, but it has all of the tools that other professional video editing software has such as powerful tools, enhanced timeline, advanced multicam support, 64-bit processing. One peculiarity that sets EDIUS Pro apart from others is that it doesn't utilize GPU acceleration for rendering, transcoding and exporting videos. And this is a big advantage over other applications that require time and processing capacity to render footage.  Hot search: MKV to EDIUS Pro 8 | GoPro MP4 to EDIUS Pro 7 | AVI to EDIUS 7/7.01 | Panasonic DVCPro HD MXF to EDIUS Pro 7 | H.265/HEVC to EDIUS 5/6/7/8 "Hello everyone, the past 3 months I tried to collect some money to buy a new camera the Sony a58 which records in AVCHD, long story short I want to know the best project settings and render format in order to edit them in EDIUS 6 and get the best quality out of my videos. Any suggestions about converting AVCHD to EDIUS 6 is appreciated!" EDIUS Pro supported format for file import:
 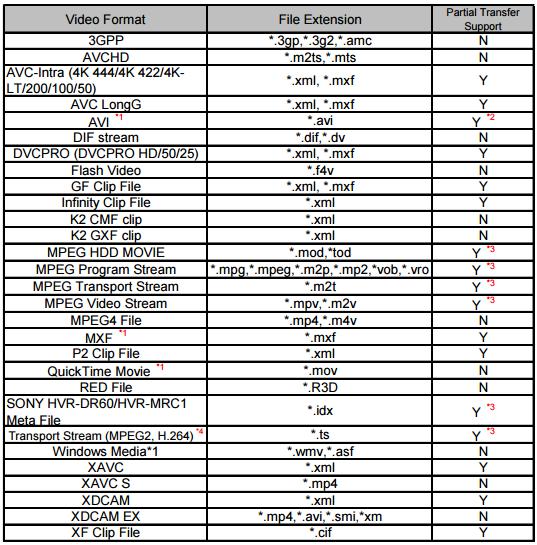 Since EDIUS lacks GPU acceleration for transcoding AVCHD video files, you will need to employ a third-party application to perform the video codec transcoding process for you. After multiple testing, I foundPavtube Video Converter is the best option. It is able to convert AVCHD to EDIUS 6 friendly format easily with the best video quality. Besides AVCHD, this video convert program can also help to convert between any popular video and audio formats as you need. Plus, with the built-in video editing feature of the program, you can trim, crop, add watermark and more to your video files. Other Download: - Pavtube old official address: http://www.pavtube.com/video_converter/ - Amazon Download: http://download.cnet.com/Pavtube-Video-Converter/3000-2194_4-75734821.html - Cnet Download: http://download.cnet.com/Pavtube-Video-Converter/3000-2194_4-75734821.html How to import AVCHD to EDIUS 6? Step 1: As soon as you download and install the program, launch it and when the main interface pops up in front of us, just click the "Add Video" or "Add from Folder" to let in.
 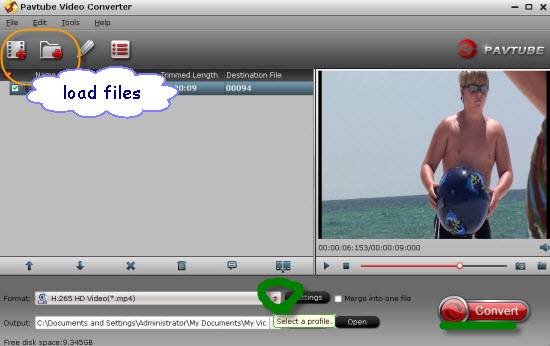 Step 2: Click the drop-down list in the format line to get the format box. Then choose "Adobe Premiere/Sony Vegas>>MPEG-2 (*.mpg)" as output format.
  Step 3: Click "Settings" button to customize the output video and audio settings by yourself. But if you are not good at it, you’d better use the default parameters, they will ensure you a good balance between file size and image quality basically. You can change the resolution, bit rate, frame rate as you need.
Step 4: After that, click "Convert" to start AVCHD to MPEG-2 conversion. Conclusion: After conversion, you can get the generated files by clicking "Open" button. Now, you’ll get no troubles in editing AVCHD files in EDIUS 6. More related tips:
Source: http://mts-to-aic-converter.com/edit-avchd-in-edius-6/