Play/Converter Sony NXCAM 3D MTS/M2TS to SBS MP4 Summary: In a hurry to search for a best way to convert your Sony NXCAM 3D MTS files to Side-by-side MP4 for a playback on Nvidia Nisision Set? Answers are allowed below.  Do you wanna enjoy your 3D MTS recordings on Mac? Before we start the talking, do you know that with the popularity of 3D technology, more and more camera manufactures have produced different kinds of 3D cameras. Sony NXCAM 3D camcorder is such the typical one. However, as most 3D recordings have the special codec, so more measures we should take if we wanna watch such 3D MTS videos on Media Players like Nvidia Nisision Set, etc. Tips: Here are some best 3D cameras introduced to you if you love enjoying 3D video so much. Not a 3D video lover? just convert your MTS files to common videos such as MOV, AVI, etc on mAC. Detailed introduction of Sony NXCAM 3D Camcorder: It has two 12x Sony "G" lenses (10x in 3D mode) Optical Steady Shot image stabilization; a 3.5-inch lenticular LCD display, which allows you to monitor the stereo effect wihout special glasses. But as a single-body handheld 3D camcorder, the professional NX3D1 brings several innovations to the table for this emerging class of camcorders. It was loved by so many Sony lovers. Note: Besides for playing 3D MTS recordings, we may also meet some troubles when importing 3D MTS files to popular editing tools, such as FCP, iMovie/FCE, etc. Play Sony NXCAM 3D MTS videos on Nvidia Nisision Set with SBS MP4 format? In order to enjoying the perfect effects with 3D enjoyment, some users are fond of watching 3D videos on Nevidia Nisision or on the 3DTV. So cause we cannot smoothly import our 3D MTS videos to Nevidia Nisision for a nice playback. We strongly suggest you to convert your 3D MTS to Side by side MP4, which is compatible for this player. Here the Pavtube 3D MTS to SBS MP4 Converter for Mac (Pavtube MTS Converter for Mac) could do you a big favor. Necessary guide on how to convert your 3D MTS to SBS MP4 on Nvidia Nisision Set: As soon as you install the program on your computer, open the main interface and there are two buttons we can click to import our 3D files. 'Add video' and 'Add from folder' can load your files in individual clips or a complete folder. Also, I have to mention here this program can support the batch conversion so do not worry about your batch video clips.
  For the second step, choose the suitable output to fit the 3D media player? Just come to the output list to select the '3D Video'>>'MP4 Side-by-side (*.mov) 3D Video(*.mp4). as the best one we mentioned above.
  Do you wanna a simple advanced editing when enjoying your 3D movies? Come to the 'Settings' button to set your own style. For example: The "Trim" feature allows users to decide where to start and where to end when converting the selected clip, so that unwanted segments will be cut out after conversion. The "Crop" facility enables users to get rid of the black edges and unwanted area of the image. Check Enable, you can add images or videos as 'watermark' onto selected video file. The location can also be set by dragging on the preview screen.
  When you come to the final step, just hit the 'Convert' button on the main interface to get your work started. With the 6X faster speed, it won't take you so much time of waiting. Thanks for reading and we sincerely hope the guide can help you a lot. Related:
Good news! Pavtube Bundles Deals are coming! It's a time for taking a break from work and relaxing. And now you can enjoy your colorful time with good featured products at"Pavtube Bundles Deals". Go ahead and click the link to get your coupon. Save up to $44.1!Never miss!!!
When you come to the final step, just hit the 'Convert' button on the main interface to get your work started. With the 6X faster speed, it won't take you so much time of waiting. Thanks for reading and we sincerely hope the guide can help you a lot. Related:
Good news! Pavtube Bundles Deals are coming! It's a time for taking a break from work and relaxing. And now you can enjoy your colorful time with good featured products at"Pavtube Bundles Deals". Go ahead and click the link to get your coupon. Save up to $44.1!Never miss!!!
- MTS/M2TS Converter for Mac($29) + MXF Converter for Mac($29) = Only $29.9
- MTS/M2TS Converter for Mac($29) + MKV Converter for Mac($29) = Only $29.9
- MTS/M2TS Converter for Mac($29) + FLV/F4V Converter for Mac($29) = Only $29.9
- iMixMXF($45) + HD Video Converter for Mac($35) = Only $54.9 .....
Source: http://bestvideoking.blogspot.com/2014/12/convert-nxcam-3d-mts-to-sbs-mp4.html
Best Sony DCR-SR21E/B MPEG-2 to QuickTime MOV Converter for Mac Summary: Record every moment of your life for posterity with this video player. The Sony DCR-SX21E is a standard definition camcorder that brings together style and technology for a power-packed performance. Ideal for everyday video shooting, the DCR-SX21E has an advanced Hole Accumulation Diode or HAD CCD image sensor that produces videos with dramatic color and life. The Sony imaging processor delivers high speed shooting that will impress your family and friends.  The DCR-SX21E supports MPEG2 file format during video recording, which can even be watched on a laptop or computer. The built-in zoom microphone focuses on the subjects even when they are far off, delivering crystal clear audio tracks to accompany your videos. The electrical SteadyShot image stabilization system ensures that all your videos are always blur-free by compensating for handshake internally. To watch your favorite memories recorded by Sony DCR-SX21E on Mac, the apple QuickTime may be your first choice. AS these files were recorded as MPEG-2 fomrat which is not on the QT support video list. As a result, QuickTime Player will not recognize Sony DCR-SX21E MPEG-2 files and will not import them. You will get an error when importing and if so, how to fix it?
In order to play Sony DCR-SX21E MPEG-2 recordings with QuickTime, the MPEG-2 footage needs to be converted to movie files that is accepted by QuickTime on Mac, among the candidates mov is a nice choice. Software you need: Pavtube HD Video Converter for Mac
The DCR-SX21E supports MPEG2 file format during video recording, which can even be watched on a laptop or computer. The built-in zoom microphone focuses on the subjects even when they are far off, delivering crystal clear audio tracks to accompany your videos. The electrical SteadyShot image stabilization system ensures that all your videos are always blur-free by compensating for handshake internally. To watch your favorite memories recorded by Sony DCR-SX21E on Mac, the apple QuickTime may be your first choice. AS these files were recorded as MPEG-2 fomrat which is not on the QT support video list. As a result, QuickTime Player will not recognize Sony DCR-SX21E MPEG-2 files and will not import them. You will get an error when importing and if so, how to fix it?
In order to play Sony DCR-SX21E MPEG-2 recordings with QuickTime, the MPEG-2 footage needs to be converted to movie files that is accepted by QuickTime on Mac, among the candidates mov is a nice choice. Software you need: Pavtube HD Video Converter for Mac
The best video converter for quicktime to convert Sony DCR-SX21E MPEG-2 video to QuickTime MOV for playback on Mac OS X, Leopard, Snow Leopard, Lion and Mountain Lion. This best workflow is able to keep the file size low and keep the video quality up. Now get the full step-by-step guide below: Step 1. Install and launch the best MPEG-2 to QuickTime Converter for Mac, click top left two icons to load individual videos or load the entire folder. 
- If you want, you can merge several MPEG-2 clips by ticking "Merge into one file" box.
- If the supposed size of the input files is 1GB, then the memory space should be up to 40GB.
Step 2. Click "Format" and choose Common Video> MOV-QuickTime(*.mov) as the best video format for playing Sony MPEG-2 footage on QuickTime.  Tips: Pavtube HD Video Converter for Mac can also convert all kind of video files to FCP, iMovie, FCE, Avid Media Composer, Avid Xpress Pro, Adobe Premiere Pro, Adobe After Effects, DaVinci Resolve or Apple Aperture 3 compatible video format for editing. For FCP and Aperture 3: Click and choose "Final Cut Pro -> Apple ProRes 422(*.mov)" as the output format. FCP 6 only can support ProRes 422 and ProRes 422(HQ) codec.
For iMovie and FCE: Click and choose "iMovie and Final Cut Express -> Apple Intermediate Codec(AIC)(*.mov)" as the output format. For Avid Media Composer and Xpress Pro: Click and choose "Avid Media Composer ->Avid DNxHD(*.mov)" as the best output codec. For Adobe Premiere Pro and After Effects: Click "Adobe Premiere/Sony Vegas", choose "MPEG-2 (*.mov)" or "MOV(AVC)(*mov)" or "WMV (VC-1)(*.wmv)" as the best video format. Step 3. Optional - You can also click "Settings" to change the output video bitrate, frame rate, size, etc. all according to your needs. Step 4. When everything is done, click the "Convert" button at the bottom-right corner to finish the Sony DCR-SX21E MPEG-2 recordings to QuickTime MOV conversion. While you wait, have a coffee or take a nap and let Video Converter do the work in the background. After conversion, you can click "Open" to find the output quicktime mov file, then you can transfer the video files to QuickTime Player for playback smoothly. Read more:
Good News: Never miss to get Saving up to $44.1, MXF/MTS/M2TS/MKV/FLV/MOV Converter.etc at Pavtube Bundles Deals, such as: HD Video Converter for Mac($35) + DVD Creator for Mac($35) = $39.9, Save $30.1
Tips: Pavtube HD Video Converter for Mac can also convert all kind of video files to FCP, iMovie, FCE, Avid Media Composer, Avid Xpress Pro, Adobe Premiere Pro, Adobe After Effects, DaVinci Resolve or Apple Aperture 3 compatible video format for editing. For FCP and Aperture 3: Click and choose "Final Cut Pro -> Apple ProRes 422(*.mov)" as the output format. FCP 6 only can support ProRes 422 and ProRes 422(HQ) codec.
For iMovie and FCE: Click and choose "iMovie and Final Cut Express -> Apple Intermediate Codec(AIC)(*.mov)" as the output format. For Avid Media Composer and Xpress Pro: Click and choose "Avid Media Composer ->Avid DNxHD(*.mov)" as the best output codec. For Adobe Premiere Pro and After Effects: Click "Adobe Premiere/Sony Vegas", choose "MPEG-2 (*.mov)" or "MOV(AVC)(*mov)" or "WMV (VC-1)(*.wmv)" as the best video format. Step 3. Optional - You can also click "Settings" to change the output video bitrate, frame rate, size, etc. all according to your needs. Step 4. When everything is done, click the "Convert" button at the bottom-right corner to finish the Sony DCR-SX21E MPEG-2 recordings to QuickTime MOV conversion. While you wait, have a coffee or take a nap and let Video Converter do the work in the background. After conversion, you can click "Open" to find the output quicktime mov file, then you can transfer the video files to QuickTime Player for playback smoothly. Read more:
Good News: Never miss to get Saving up to $44.1, MXF/MTS/M2TS/MKV/FLV/MOV Converter.etc at Pavtube Bundles Deals, such as: HD Video Converter for Mac($35) + DVD Creator for Mac($35) = $39.9, Save $30.1  Source: http://handycameratips.jimdo.com/2013/08/21/convert-sony-dcr-sr21e-b-mpeg-2-videos-to-quicktime-mov-on-mac/
Stream/Import WAV Files to FCP X Incompatibility Issues Summary: I recently did the switch to Yosemite. I now find some WAV files to be no longer readable through FCP X, Preview App, QuickTime, and etc. But, I can open them through VLC, and also Soundtrack Pro." Any good suggestions there we can take to make FCP X read WAV files on Yosemite?  Most computer multimedia programs play music stored in the WAV file format, which has been around since the early days of personal computing. The Mac comes standard with the FCP X program, which recognizes WAV files as well as several other file formats. In this case, why someone there still ask for the answers to smoothly play WAV files on FCP X on Yosemite? "An FCP X project with this WAV files has already been edited, with multiple cuts (46 to be exact) throughout the 35 minute timeline. The file is still visible on timeline with all cuts but is now silent." "I have a translation track on a WAV file which I previously imported into FCP X and then removed. For some unknown reason to me it will not allow me to reimport it. I've tried both drag and drop and using the "import" menu method. I do not receive any error messages but it does not show up in the events." It is important to understand the various issues that may come up when dealing with different formats. First of all, a WAV file is basically an audio file for Windows used for storing audio on a PC, similar to the AIFF format used on a Mac. WAV is the main format used on Windows systems for raw and typically uncompressed audio. It can hold compressed audio, but the most common WAV format contains uncompressed audio. Even though WAV files are compatible with FCP X in some cases, it is best to convert them to an AIFF format. This will save system resources when FCP X plays the audio files. Otherwise, you may encounter dropped frames or an annoying beeping sound even other incompatible issues while FCP X plays your WAV sequence. So how can we make all WAV files readable flawlessly on FCP X on Yosemite? That's the key point. We here sincerely introduce you the professional audio transcoder- Pavtube Video Converter for Mac, which could also be a strong video converter for any video conversion work. We are glad to tell you how to work this audio transcoder nicely to import WAV files to FCP X on Yosemite with high audio quality preserved.
 How to stream WAV files to FCP X on Yosemite? Step 1:When you download and install the Mac Video Converter, open the main interface and choose the "Add video" to load your WAV audios in. For the multiple audio clips we can hit the "Add from folder" button.
  Step 2:Click the "Format" drop-down list, and choose "Common Audio>>AIFF-Audio Interchange File Format (*.aiff)" as best output format.
  Step 3:Click "Settings" button to customize the output video and audio settings by yourself. But if you are not good at it, you'd better use the default parameters, they will ensure you a good balance between file size and image quality basically. You can change the resolution, bit rate, frame rate as you need. Step 4:Click the "Convert" button under the preview window and the Mac Video Converter starts converting. By the way, you can take a screenshot at your favorite frame. Conclusion:After converting, you can click the "Open" button to find your converted audio files. Now, you can read WAV files on FCP X without any worries! What are you waiting for? Just go ahead and have a try! Enjoy it! Further Reading:
Good News! Pavtube Bundles Dealsare coming! If you want to import/preserve/mix multi-track MXF in MKV/MP4/MOV formats, get multi-track Apple Prores MOV for further editing in Final Cut Pro (X), the following bundled software is your best choice:? --------Video Converter($35) + MXF MultiMixer($45) = $54.9, Save $25.1 (buy link) --------Video Converter for Mac($35) + iMixMXF($45) = $54.9, Save $25.1 (buy link) Go ahead and click the link to get your coupon. Save up to $44.1!Never miss!!! Source: http://pc-mac-compatibility-issues.blogspot.com/2015/04/read-wav-files-on-fcp-x.html
Step 3:Click "Settings" button to customize the output video and audio settings by yourself. But if you are not good at it, you'd better use the default parameters, they will ensure you a good balance between file size and image quality basically. You can change the resolution, bit rate, frame rate as you need. Step 4:Click the "Convert" button under the preview window and the Mac Video Converter starts converting. By the way, you can take a screenshot at your favorite frame. Conclusion:After converting, you can click the "Open" button to find your converted audio files. Now, you can read WAV files on FCP X without any worries! What are you waiting for? Just go ahead and have a try! Enjoy it! Further Reading:
Good News! Pavtube Bundles Dealsare coming! If you want to import/preserve/mix multi-track MXF in MKV/MP4/MOV formats, get multi-track Apple Prores MOV for further editing in Final Cut Pro (X), the following bundled software is your best choice:? --------Video Converter($35) + MXF MultiMixer($45) = $54.9, Save $25.1 (buy link) --------Video Converter for Mac($35) + iMixMXF($45) = $54.9, Save $25.1 (buy link) Go ahead and click the link to get your coupon. Save up to $44.1!Never miss!!! Source: http://pc-mac-compatibility-issues.blogspot.com/2015/04/read-wav-files-on-fcp-x.html
Convert Olympus Stylus SH-2 MOV to YouTube/Vimeo
Summary: Looking for an efficient way of converting and uploading our Olympus Stylus Sh-2 Videos for sharing on YouTube/Vimeo? Just read the following lessons carefully, we are going to tell you how to easily convert the Stylus SH-2 recordings to suitable formats for YouTube and Vimeo without troubles. Let's go!  Further learning of this Olympus Stylus SH-2 camera: Olympus is slated to release the Stylus SH-2, its successor to the Stylus SH-1. Like the SH-1 before it, the SH-2 something of a compact superzoom wunderkind with its 24x optical zoom. Olympus Camera is one of the popular photography equipment to capture image and shot recordings. And generally, all Olympus camera models uses jpg to store the captured image. But they don't save the video footage in the same video formats, some uses MOV/H.264 video formats. Solutions to Olympus Stylus SH-2 and YouTube and Vimeo: If you have enjoyed and uploaded enough videos on Youtube and Video, you may know well about the Video formats for Youtube, right? Unfortunately, recordings from Olympus Stylus SH-2 camera are not included such as MOV with incompatible codec. How wonderful if there is a professional converting tool can solve the issues well? Well, with the strong ability of converting videos, we are glad to tell you thePavtube Video Converter for Windows/Mac can handle this workflow well. Additionally, it can convert such as MXF, XAVC, etc for sharing on YouTube/Vimeo. Following is the example of converting Olympus Camera video files for YouTube/Vimeo: Step 1. Add Olympus video into video converter by clicking “Add File” button on the main interface as soon as you install and launch this professional converter.
  Step 2. Then we suggest you to come to the output list to get more details. Drop it down, in order to make the output formats suitable for YouTube and Vimeo, you can take the 'Flash Video'>>'FLV H.264 (*.flv)' as the best for YouTube like below.
  Another 'HD Video'>>'AVI HD Video (*.avi) for sharing videos on Vimeo.
  Step 3. Make your movies more enjoyable with 'Edit' here. Most of you guys must have the desire of a further editing with your output videos, right? On the main interface, 'Edit' is waiting for you. 'Trim' to decide where to start and where to end, 'Crop' to cut some unwanted clips, 'Subtitles' to add some explanations to your audience. At the end, after you have finished your preparation job, just go back to the main interface to click the 'Convert' button, you can start your conversion job with only several steps. Best wishes to you for enjoying your personal Olympus Stylus SH-2 on YouTube and Vimeo! You may also like:
Good News! Pavtube Bundles Dealsare coming! If you want to import/preserve/mix multi-track MXF in MKV/MP4/MOV formats, get multi-track Apple Prores MOV for further editing in Final Cut Pro (X), the following bundled software is your best choice:? --------Video Converter($35) + MXF MultiMixer($45) = $54.9, Save $25.1 (buy link) --------Video Converter for Mac($35) + iMixMXF($45) = $54.9, Save $25.1 (buy link) Go ahead and click the link to get your coupon. Save up to $44.1!Never miss!!! Source: http://1080p-video-tool.blogspot.com/2015/03/upload-stylus-sh-2-videos-to-youtube.html
Step 3. Make your movies more enjoyable with 'Edit' here. Most of you guys must have the desire of a further editing with your output videos, right? On the main interface, 'Edit' is waiting for you. 'Trim' to decide where to start and where to end, 'Crop' to cut some unwanted clips, 'Subtitles' to add some explanations to your audience. At the end, after you have finished your preparation job, just go back to the main interface to click the 'Convert' button, you can start your conversion job with only several steps. Best wishes to you for enjoying your personal Olympus Stylus SH-2 on YouTube and Vimeo! You may also like:
Good News! Pavtube Bundles Dealsare coming! If you want to import/preserve/mix multi-track MXF in MKV/MP4/MOV formats, get multi-track Apple Prores MOV for further editing in Final Cut Pro (X), the following bundled software is your best choice:? --------Video Converter($35) + MXF MultiMixer($45) = $54.9, Save $25.1 (buy link) --------Video Converter for Mac($35) + iMixMXF($45) = $54.9, Save $25.1 (buy link) Go ahead and click the link to get your coupon. Save up to $44.1!Never miss!!! Source: http://1080p-video-tool.blogspot.com/2015/03/upload-stylus-sh-2-videos-to-youtube.html
News! Pavtube Video Converter for Mac Upgraded Support XAVC/H.265! -----40% OFFSummary: Pavtube has upgraded the Mac video converter to version 4.8.5.0, which will support to decode the H.265/HEVC codec well. Big news for all! Pavtube studio has announced that its hottest product Mac Video Converter has upgraded to latest version 4.8.5.0. According to the official news, this updated product can decode the H.265/HEVC video codec well. In other words, it has become the hottest and comprehensive video converter for all Mac users!  What's new in this upgraded version? H.265/HEVC decode well. Solve the issues well for decoding basic codec Support the VPx series codec perfectly Fix the bug of breakdown when importing MXF and XAVC format. Main features: Convert various video/audios as input and output. So many popular editing tools and media players are available. Easy operation workflow and faster conversion speed. Extra acceleration function for Windows users. Strong ability of setting and editing output vides. What's more, before May 1st, all users can get 40% discount off from the website! Learn More: http://www.multipelife.com/pavtube-video-converter-for-mac-upgrade.html
Best MTS Mac Converter--Convert MTS/AVCHD to Final Cut Pro Summary: Can't import mts files to Final Cut Pro X? Follow the article below, you will get to know the easy way to transcode and deinterlace AVCHD footage to Prores HQ for editing in FCP X editing. AVCHD was jointly established by Sony Corporation and Panasonic Corporation in 2006 for use in their digital tapeless camcorders. MTS files can typically be opened and edited using the software included with Sony, Panasonic and some Canon HD camcorders.  But practically speaking, importing AVCHD to FCP might be tricky, due to the version of FCP, your Mac processor (PowerPC- or older Intel-based Mac don't support AVCHD editing) , and the model of camcorder. Thus, many users report that they can't import AVCHD files into FCP using camera import. I just downloaded a mts Video converter and I'm using it to convert MTS files into Apple HQ prores 422, yet the converted files look damaged. I attached a photo of what the results look like. I must finish this editing project by tomorrow- please advise! As MTS recordings are not the preferred format for Final Cut Studio, if you want to edit AVCHD video with high quality on Mac with Final Cut Pro X, you can convert AVCHD to FCP compatibel Prores .MOV before editing. Here recommend you the top Pavtube MTS/M2TS Converter for Mac which can help you to convert AVCHD to Apple ProRes 422 preserving the original quality that get MTS files to edit in FCP X successfully. Plus, this Mac AVCHD converter also supports converting AVCHD MTS footage to iMovie, Adobe Premiere, Avid Media Composer, Final Cut Express and more to meet your needs. What's more, some easy-to-use editing features like trimming, cropping, adding watermark, deinterlacing, etc are combined with the convert program. Now, follow the step-by-step guide transcoding and deinterlacing MTS video to Final Cut Pro X. Step 1: Free Download and install MTS to FCP Converter to your Mac. It's excellent AVCHD Converter which can convert nearly all Sony/Canon/Panasonic camcorder videos to any formats you need, such as Apple Prores 422 MOV, Apple InterMediate Codec MOV, QuickTime MOV, etc. Then import your AVCHD files.
  Step 2: Click the format bar, and move mouse cursor to "Final Cut Pro > Apple ProRes 422(HQ) (*.mov)" as output format for editing in Final Cut Pro X.
  The Apple ProRes 422 (HQ) codec offers the utmost possible quality for 4:2:2 or 4:2:0 sources (without an alpha channel) and provides the following:
- Target data rate of approximately 220 Mbps (1920 x 1080 at 60i)
- Higher quality than Apple ProRes 422
Tips: 1.You can also select Apple ProRes 422(LT) which will give smaller file size. 2.Learn more Apple ProRes, please refer to Types of Apple ProRes Codecs 3. You can deinterlace and edit the 1080/60i mts videos in this program before converting to other formats on Mac OS. Trim, crop, add watermark or adjust effect as you want. By the way, if you need to remove interlace for the media file, just click on "Edit", you will see a Video Editor panel where you are able to easily edit your 1080i HD video by using several powerful editing functions. Click on "Effect" tab, and check the deinterlace option.  Step 3. Click "Convert" button to start converting/deinterlacing AVCHD videos to FCP X on Mac OS. After a shot conversion, you will be able to import/load mts videos into Final Cut Pro X for editing without rendering. With it, you can also get the mts video to recognized by FCP X. Just have a try. Good luck! Related gudie: Sony AVCHD MTS converter for Premiere How to convert MTS to AVI format for editing and playing? Sony AVCHD MTS Converter for Sony Vegas-AVCHD to Sony Vegas How to Import iPhoto to iMovie on Mac OS X Encode/Decode Samsung NX1 H.265 Videos to WMM Good news! Pavtube Bundles Deals are coming! It's a time for taking a break from work and relaxing. And now you can enjoy your colorful time with good featured products at"Pavtube Bundles Deals". Go ahead and click the link to get your coupon. Save up to $44.1!Never miss!!!
- MTS/M2TS Converter for Mac($29) + MXF Converter for Mac($29) = Only $29.9
- MTS/M2TS Converter for Mac($29) + MKV Converter for Mac($29) = Only $29.9
- MTS/M2TS Converter for Mac($29) + FLV/F4V Converter for Mac($29) = Only $29.9
- iMixMXF($45) + HD Video Converter for Mac($35) = Only $54.9 .....
Source: http://digitalmediasolution.altervista.org/blog/convert-deinterlace-mts-to-fcp-x/
Multi-track MXF Converter- Transcode MXF for FCP X Summary: By transcoding Canon XF300 MXF to multi-track ProRes MOV format, you can easily import & edit XF300 recorded MXF footage in Final Cut Pro X smoothly with multiple audio channels retaining. Just got a Canon XF300, it provide extraordinary image quality. I am wondering how to load my videos from XF300 to FCP X directly? Is MXF a supported format for FCP? If I need to do converting, then how to preserve the multi-track adudio? We usually saw Canon users encounter importing issues when attempting to edit their XF300 MXF files with Final Cut Pro X. In fact, The MXF is a "container" or "wrapper" format which supports a number of different streams of coded "essence". FCP does not support direct editing of Canon XF300 MXF in the timeline. Then solve the the problem when you wanna edit XF300 MXF footages with multi audio channels in Final Cut Pro X? Keep reading for a brief how-to on the process.  If you wanna edit XF300 multi-track MXF footages in Final Cut Pro X, here is the easy way to fix it, namely, converting Canon XF300 MXF to MOV, say, the Apple ProRes encoded MOV format on Mac. If you are interested doing likewise, check out Pavtube iMix MXF, which can help us to convert Canon XF300 MXF to ProRes for FCP X editing with retaining higher quality and keeping multiple audio tracks. Below are some useful tips for you and you will know how to import Canon XF300 MXF to FCP X and retain multiple audio channels. Step 1. Add Canon MXF footage to the Multi-track MXF Converter for Mac. Run Pavtube MXF audio Mixer. Click "Add" to load the source Canon MXF files. When the Canon XF300 MXF files are loaded to the MXF Converter, you can view the videos from the Preview window.
 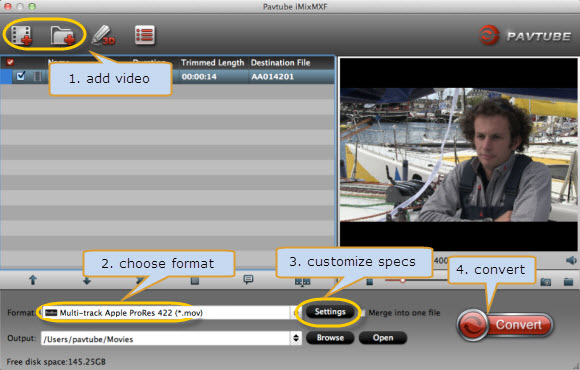 Step 2. Set Multi-track Prores MOV as output format for Canon MXF to FCP conversion. Click on "Format", and select output format from the drop-down list. Follow "Multi-track Video>Multi-track Apple ProRes 422(*.mov) for editng XF300 multi-track MXF files in Final Cut Pro X.
 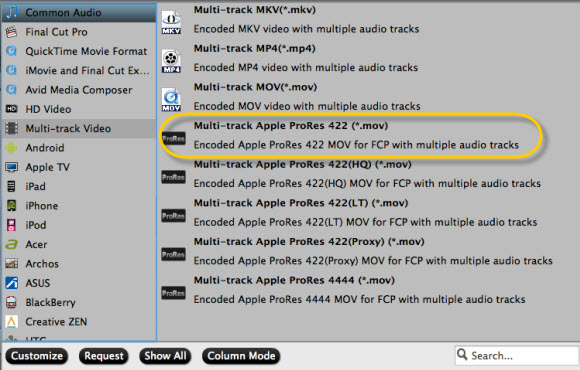 When set output folder, or click the icon folder in Output box and browse to the destination folder. Step 3. You can click settings button to adjust the output video's parameters, such as resolution, bitrate, codec and frame rate, etc. Step 4. Convert Canon XF300 MXF files with multi audio channels to Prores 422 for importing to Final Cut Pro X. Click "Convert" button and the selected Canon XF300 MXF files will be converted to Prores 422 .MOV. You may check the converting progress and set auto shutdown in the convert window. After conversion, click "Open" folder to find converted footage for importing to FCP X. The importing steps reference here:
Tips: If you don't want to get multi-track videos or your videos has less that two audio track to be converted, the latest version of Pavtube MXF Converter for Mac is designed to output each audio/video track separately, support the latest Mac Mountain Lion 10.8 and Mavericks 10.9. Learn more: Import Canon XF100/XF105/XF300/XF305 MXF to Sony Vegas Pro 11 Edit Canon MXF video to Cyberlink PowerDirector Convert Canon MXF to Apple Intermediate Codec for FCE Encode Canon C300 MXF to Sony Vegas, Pinnacle Studio, Adobe After Effects Canon MXF and Avid Media Composer workflow Good news! Pavtube Bundles Deals are coming! It's a time for taking a break from work and relaxing. And now you can enjoy your colorful time with good featured products at"Pavtube Bundles Deals". Go ahead and click the link to get your coupon. Save up to $44.1!Never miss!!!
When set output folder, or click the icon folder in Output box and browse to the destination folder. Step 3. You can click settings button to adjust the output video's parameters, such as resolution, bitrate, codec and frame rate, etc. Step 4. Convert Canon XF300 MXF files with multi audio channels to Prores 422 for importing to Final Cut Pro X. Click "Convert" button and the selected Canon XF300 MXF files will be converted to Prores 422 .MOV. You may check the converting progress and set auto shutdown in the convert window. After conversion, click "Open" folder to find converted footage for importing to FCP X. The importing steps reference here:
Tips: If you don't want to get multi-track videos or your videos has less that two audio track to be converted, the latest version of Pavtube MXF Converter for Mac is designed to output each audio/video track separately, support the latest Mac Mountain Lion 10.8 and Mavericks 10.9. Learn more: Import Canon XF100/XF105/XF300/XF305 MXF to Sony Vegas Pro 11 Edit Canon MXF video to Cyberlink PowerDirector Convert Canon MXF to Apple Intermediate Codec for FCE Encode Canon C300 MXF to Sony Vegas, Pinnacle Studio, Adobe After Effects Canon MXF and Avid Media Composer workflow Good news! Pavtube Bundles Deals are coming! It's a time for taking a break from work and relaxing. And now you can enjoy your colorful time with good featured products at"Pavtube Bundles Deals". Go ahead and click the link to get your coupon. Save up to $44.1!Never miss!!!
- iMixMXF($45) + HD Video Converter for Mac($35) = Only $54.9 .....
Source: http://digitalmediasolution.altervista.org/blog/transcode-xf300-mxf-to-multi-track-prores/
Convert/Transcode MTS files to DV-AVI/MOV files Summary: I'm probably taking the plunge into an HD camcorder in the near future. However, I'm still using Premiere Pro 2.0 for editing, and upgrading that, my computer system will cost a bit. So I'm wondering about converting AVCHD MTS to DV-AVI so I can edit it (or try to edit it) with my current rig, until I spring for a new one. What are the tradeoffs-- I mean, other than massive files on my hard drive?  Have you ever meet the troubles like above? I'm sure most of you are fond of recording the HD videos no matter in your gathering parties or some significant moments, right? In order to make the recordings more beautiful and meaningful for a nice sharing or memory, we are interested in editing those HD movies like MTS or M2TS in some popular NLEs, just like FCP, Adobe Premiere Pro, etc, and the upload MTS/M2TS to YouTube/Vimeo for nice sharing? That's really cool! However, you may be failed in importing them directly in these popular editing tools because they usually can only handle footages from DV, MP4, and MOV etc. not give good support for MTS files. Compared with MP4, MOV (encoded with inter-frames), DV provides videos with intra-frames, with each frame having being a self-contained picture. So could we easily convert our MTS/M2TS files to DV AVI/MOV as the suitable formats for these editing software? That's really the hot topic. In order to successfully transcoding MTS/M2TS to DV AVI/MOV, this tutorial provides a simple workaround to convert MTS to DV quickly and easily with professional and intuitive Pavtube MTS/M2TS Converter for Mac. It's a professional MTS/M2TS converting assistant that can additionally edit and adjust your output videos in a nice way. More related reviews? Several steps we should know clearly for converting MTS/M2TS to DV-AVI/MOV for editing. Step 1.Add MTS/M2TS to this MTS to DV Converter If you have downloaded and installed this program on your computer, Click "File">"Add Media Files" to load the MTS videos you want to convert.
  Step 2.Choose the best output AVI for editing Come to the output list by clicking the 'Format' bar on the left of the preview window, we suggest you to select the 'HD Video'>>'AVI HD Video (*.avi)'as the best one. For other NLEs? You can also choose one as your favorite.
  Step 3. Start your conversion of MTS/M2TS to DV AVI Once you confirm everything goes as you plan, just click "Convert". The progress bar will show you the conversion processing. With such as easy workflow, we can transcode MTS/M2TS to DV AVI for editing, is that cool? Further reading:
Good news! Pavtube Bundles Deals are coming! It's a time for taking a break from work and relaxing. And now you can enjoy your colorful time with good featured products at"Pavtube Bundles Deals". Go ahead and click the link to get your coupon. Save up to $44.1!Never miss!!!
Step 3. Start your conversion of MTS/M2TS to DV AVI Once you confirm everything goes as you plan, just click "Convert". The progress bar will show you the conversion processing. With such as easy workflow, we can transcode MTS/M2TS to DV AVI for editing, is that cool? Further reading:
Good news! Pavtube Bundles Deals are coming! It's a time for taking a break from work and relaxing. And now you can enjoy your colorful time with good featured products at"Pavtube Bundles Deals". Go ahead and click the link to get your coupon. Save up to $44.1!Never miss!!!
- MTS/M2TS Converter for Mac($29) + MXF Converter for Mac($29) = Only $29.9
- MTS/M2TS Converter for Mac($29) + MKV Converter for Mac($29) = Only $29.9
- MTS/M2TS Converter for Mac($29) + FLV/F4V Converter for Mac($29) = Only $29.9
Source: http://www.bestvideoking.blogspot.com/2015/02/convert-mts-m2ts-to-dv-avi-for-editing.html
Convert MKV to mov on QuickTime or iTunes Mac If you have no ideas on how to watch your MKV files on Mac with QuickTime or iTunes, why not move on to know more details below. Several main solutions are offered below which we can take as reference for watching MKV movies smoothly on Mac. When you tried to open WMV files on your Mac QuickTime, something wrong would happen there along the lines of 'This is not a movie file' This gets really annoying if you come across a MKV files for a playback on Mac, right? As an open source container format developed by Matroska, MKV can hold different types and unlimited number of video, audio, picture or subtitle tracks in one file. However, it is not associated with the QuickTime player or some other NELs. Or even enjoy MKV movies on Apple TV? Fortunately, some good solutions are offered here:  Solution1.Perian---A nice plugin for playing MKV on QuickTime Perian is a free, open source QuickTime component that adds native support for many popular video formats like the MKV. When you've had Perian installed, you have to quit QuickTime completely and then restart it. Note that you don't just close the QuickTime Window; in fact, it's still running in the background. To do this, QuickTime can update its format and encoding library. Note: If the Perian plugin is no longer working in your Mountain lion or Mavericks, there is another doable workaround. You can take this article for a reference about how to watch MKV on Mac Yosemite and Maverricks. Solution 2.VLC Media Player---Play MKV well on Mac As one of the best free MKV players on Mac, it can also play various other regular video/audio formats, including AVI, WMV, MP4, MOV, FLV, MPEG, etc. and even DVDs and CDs. With it, you don't need to install any codecs or filters to play MKV videos on Mac
  Solution 3. MPlayer OS X---Handle MKV files well Media Player Classic is another great free MKV video player for all the Mac users. This player emerged out of the Google Codes project as an attempt to create an all-round player. MPlayer OSX is a simple but powerful video player designed specifically for Mac and can handle MKV playback. To play MKV files with it, you need to first install the updated Matroska Pack: run Media Player Classic and click View > Options to disable Matroska and then install the latest Pack. After that, you can add the MKV videos to it and start playing them on your Mac without any troubles. In addition to MKV, MPlayer OS X can also play AVI, MOV, RM, MPEG, DVD, etc. files.
  Another Popular Solution: Pavtube Video Converter for Mac Good News! Pavtube --------Video Converter for Mac ($35, Now $21 ) (buy link) Save up to $14! End on 2015.5.1. Never miss!!! If you don't want to install so many different media players on Mac, have you ever thought of converting your MKV files to MOV or MP4 as the compatible formats for QuickTime or iTunes? This program can easily help you convert MKV to MOV,MP4, M4V, AVI, WMV, ASF, FLV, etc. popular video formats on Mac while keeping the video quality. After the conversion, you ca easily play MKV using QuickTime on Mac for another way. Free download and install this program with general ways. Open it and when the main interface pops up there, just click the 'Add video' and 'Add from folder', we can easily import out original MKV files. For QuickTime, we can choose the 'Common Video'>>'MOV QuickTime (*.mov)' as the best one.
  While for iTunes, maybe we should change with another way, as we all know iTunes supports the MP4 for the best as we here suggest the 'HD Video'>>'H.264 HD Video (*.mp4) to be the most suitable one.
  Of course you can here click the 'Convert' button to get your work started or we can also take around the 'Settings' or 'Edit' for advanced adjustments. Additionally, if you have no ideas on how to import files to iTunes, here we have the related guide offered for you. For more?
Source: http://www.bestvideoking.blogspot.com/2014/12/play-mkv-on-mac-quicktme-itunes.html
Of course you can here click the 'Convert' button to get your work started or we can also take around the 'Settings' or 'Edit' for advanced adjustments. Additionally, if you have no ideas on how to import files to iTunes, here we have the related guide offered for you. For more?
Source: http://www.bestvideoking.blogspot.com/2014/12/play-mkv-on-mac-quicktme-itunes.html
Guide for Convert/Import VOB to MP4 on mac Summary : As a container format in DVD-Video media, VOB contains the actual Video, Audio, Subtitle, and Menu contents. While there are so many VOB related questions mentioned online. For example: 'Errors why we often meet when import VOB files from DVD media folder to iTunes on Mac?' Today here we are suggested to introduce the best way for adding VOB to iTunes on Mac successfully.  Suggestions on why and how convert VOB files to iTunes on Mac: VOB is based on MPEG-2 program stream format, but with additional limitations and specifications. At present, its playback on applications and devices is quite limited: only VLC, Mplayer such universal players, or Windows Media Player (but not in Windows 8) and the regular DVD players. If you get used to the iTunes feature and want to import your VOB files to iTunes, there is also a smart solution: converting your VOB files to iTunes friendly format, i.e. M4V, MOV or MP4. Get the best VOB to iTunes converter for Mac to work well with VOB files In order to add VOB to iTunes for Mac, you need use a .vob converter to encode videos and create iTunes compatible files (MP4, QuickTime MOV, and M4V) prior to transferring. There are several converters in the market and one of our favorite cames out pretty good---Pavtube Video Converter for Mac, it converts everything to everything smoothly, including VOB to iTunes, and produce high-quality video. Besides, The program has a good range of pre-configured options to convert videos with the correct resolution for the popular device. Why not free download it and have a try? Necessary process of converting VOB files to iTunes: Step 1.Launch the converter, the program is light on system resources with a basically empty and easy to use interface. Click "Add File" button to locate the VOB files into the software.
  Step 2. Next, choose your preferred format for conversion. iTunes by default supports MP4, MOV, M4V video format. When you come to the output list, we here highly suggest you to choose the 'HD Video'>>'H.264 HD Video (*.mp4)' as the typical one
  For advanced functions? Click the "Effect" button to open the Video Edit window to achieve editing MP4 like trim, crop, image, watermark, effect, subtitles and rotate and etc in the corresponding editing pane. Click the "Setting…" button to open the Advanced Settings window to adjust the output video codec, resolution, bitrates, frame rate, aspect ratio, audio codec, channel, volume and etc in the advanced tab. Now that you've got everything set up how you want, to start converting files from VOB to iTunes compatible files, simply press the "Convert" button to begin the encoding. You'll see an increased percentage of the track in a blue status bar. When Total Progress shows 100%, you will have compatible version of your video(s) for iTunes, just drag them into your iTunes library and have a fun! Further reading:
Good News! Pavtube Bundles Dealsare coming! If you want to import/preserve/mix multi-track MXF in MKV/MP4/MOV formats, get multi-track Apple Prores MOV for further editing in Final Cut Pro (X), the following bundled software is your best choice:? --------Video Converter($35) + MXF MultiMixer($45) = $54.9, Save $25.1 (buy link) --------Video Converter for Mac($35) + iMixMXF($45) = $54.9, Save $25.1 (buy link) Go ahead and click the link to get your coupon. Save up to $44.1!Never miss!!! Source: http://mediaconverting.blogspot.com.es/2015/04/add-vob-to-itunes-on-mac.html
For advanced functions? Click the "Effect" button to open the Video Edit window to achieve editing MP4 like trim, crop, image, watermark, effect, subtitles and rotate and etc in the corresponding editing pane. Click the "Setting…" button to open the Advanced Settings window to adjust the output video codec, resolution, bitrates, frame rate, aspect ratio, audio codec, channel, volume and etc in the advanced tab. Now that you've got everything set up how you want, to start converting files from VOB to iTunes compatible files, simply press the "Convert" button to begin the encoding. You'll see an increased percentage of the track in a blue status bar. When Total Progress shows 100%, you will have compatible version of your video(s) for iTunes, just drag them into your iTunes library and have a fun! Further reading:
Good News! Pavtube Bundles Dealsare coming! If you want to import/preserve/mix multi-track MXF in MKV/MP4/MOV formats, get multi-track Apple Prores MOV for further editing in Final Cut Pro (X), the following bundled software is your best choice:? --------Video Converter($35) + MXF MultiMixer($45) = $54.9, Save $25.1 (buy link) --------Video Converter for Mac($35) + iMixMXF($45) = $54.9, Save $25.1 (buy link) Go ahead and click the link to get your coupon. Save up to $44.1!Never miss!!! Source: http://mediaconverting.blogspot.com.es/2015/04/add-vob-to-itunes-on-mac.html
MXF to MOV---How to Convert MXF to MOV with No Quality Summary: To make Canon XC10 XF-AVC MXF footage edited or played well on PC and Mac, we need to convert the 4K MXF to common MOV or with multi-tracks preserved. Do you have any related issues with that? This post will show you an quick guide on rewrapping Canon XC10 4K MXF files for Windows and Mac in common MOV.  What videos can Canon XC10 4K camcorder shoot and bring to us? Canon has recently announced the development of XF-AVC, a new proprietary video format for the efficient recording of high-image-quality 4K, 2K and HD video footage. On the other hand, Canon XC10 uses XF-AVC movie recording format, employs the MPEG-4 AVC/H.264 video compression format, and stores shootings in an MXF wrapper, which seems not so compatible for Windows and Mac. What's the useful MXF tips? s examples below. 'Hey it's so cool I got the latest Canon 4K camcorder---XC10 XF-AVC as soon as it released out. You know it is indeed can shoot the videos with higher resolutions and flexible personal settings, I love it so much. But it always tells me the 'errors' when I import them on Mac. Why these MXF recordings cannot be added to PC? I'm now seeking a professional video transcoder to convert the files nicely.' Hot Search: MXF to VLC | MXF to WMP | MXF to Sony Vegas | MXF to QuickTime | MXF to iMovie How to rewrap Canon XC10 XF-AVC MXF footage to MOV for PC/Mac? Pavtube iMixMXF/MXF MultiMixer can convert all the original MXF videos to any others formats with multi-track audios for both Windows/Mac users. As the professional MXF importer, transcoder or editor, it can do all work well for MXF files. Of course including the workflow of converting Canon XC10 XF-AVC MXF files to common MOV or multi-track MOV on PC/Mac. What's more, so many output media players and editing tools are also listed there for other choices. More converting details are listed below. Easiest guide on converting Canon XC10 XF-AVC MXF to MOV on PC/Mac: Step 1: Start up multi-track MXF Video Converter as a professional Canon XC10 MXF Converter for Windows/Mac. When its main interface pops up, click 'Add File' to input your source media. Directly drag files in is also available.
  Step 2. Select suitable MOV as you need for Windows/Mac. If you are seeking the common ones, just go to the 'HD Video' to find the MOV as the output. While for those advanced users who wanna trancode the MXF files with multi-tracks preserved, we suggest you to choose the 'Multi-track Video'>>'Multi-track MOV (*.mov)' as the best one.
  Step 3: Custom video and audio settings If necessary, you can click 'Settings' button and go to 'Profiles Settings' panel to modify video and audio settings like video encoder, resolution, video bit rate, frame rate, aspect ratio, audio encoder, sample rate, audio bit rate, and audio channels.
  When you get ready for all preparation work, click 'Convert' to start format conversion. As soon as the conversion is complete, you can click 'Open Folder' button to get the exported MOV files for Window/Mac. No matter for editing or playing your Canon XC10 XF-AVC MXF recordings, this program will not make us disappointed. Further reading:
Good News! Pavtube Bundles Dealsare coming! If you want to import/preserve/mix multi-track MXF in MKV/MP4/MOV formats, get multi-track Apple Prores MOV for further editing in Final Cut Pro (X), the following bundled software is your best choice:? --------Video Converter($35) + MXF MultiMixer($45) = $54.9, Save $25.1 (buy link) --------Video Converter for Mac($35) + iMixMXF($45) = $54.9, Save $25.1 (buy link) Go ahead and click the link to get your coupon. Save up to $44.1!Never miss!!! Source: http://mediaconverting.blogspot.com.es/2015/04/convert-xc10-mxf-to-mov-with-multi-tracks.html
When you get ready for all preparation work, click 'Convert' to start format conversion. As soon as the conversion is complete, you can click 'Open Folder' button to get the exported MOV files for Window/Mac. No matter for editing or playing your Canon XC10 XF-AVC MXF recordings, this program will not make us disappointed. Further reading:
Good News! Pavtube Bundles Dealsare coming! If you want to import/preserve/mix multi-track MXF in MKV/MP4/MOV formats, get multi-track Apple Prores MOV for further editing in Final Cut Pro (X), the following bundled software is your best choice:? --------Video Converter($35) + MXF MultiMixer($45) = $54.9, Save $25.1 (buy link) --------Video Converter for Mac($35) + iMixMXF($45) = $54.9, Save $25.1 (buy link) Go ahead and click the link to get your coupon. Save up to $44.1!Never miss!!! Source: http://mediaconverting.blogspot.com.es/2015/04/convert-xc10-mxf-to-mov-with-multi-tracks.html
Convert Panasonic AG-AC90 AVCHD to AIC MOV "I am looking for a product to convert my Panasonic AG-AC90 1080p 60p .MTS files to a format to edit in iMovie 11. Do you have a product that will allow me to do this?" How to easily work Panasonic AG-AC90 60p AVCHD with iMovie/FCE without any issues? That's the quite important point that we should learn to solve the questions mentioned above. Panasonic AG-AC90 is a professional AVCCAM HD camcorder, combining the high image quality, advanced functions and easy operation in a stylish, easy-to-handle design. While for editing in iMovie and FCE, why not get more details on the best supported formats for iMovie/FCE?  On the other hand, as we all know that the iMovie is popular video authoring tool to edit video clips from camcorder on Mac. iMovie 11 is the latest version, with it you can import video clips from external devices or from anywhere else. The problem is you often get errors from iMovie when importing some raw MTS files to iMovie as same as others likeMXF or MP4 etc. Any good solutions to make the Panasonic AG-AC90 60p AVCHD MTS recordings to iMovie and FCE? Of course! Here luckily we have the Pavtube MTS/M2TS Converter for Mac, which is especially designed for AVCHD MTS files. Additionally, here are several steps on converting AVCHD MTS to AIC MOV for editing in iMovie and FCE. Let;s take a look below: 1. Launch the AVCHD to iMovie/FCE Converter; click "Add" button to import the .mts, .m2ts files you want to work with on the main interface.
  2. Then go to the output list and choose the right format. Here we suggest you to select "iMovie/Final Cut Express" and then "Apple InterMedia Codec (AIC) (*.mov)" as output format.
  3. Set audio and video profile? Set audio and video profile in your Panasonic AG-AC90 1080p/60p MTS, you will get the output compatible AIC MOV according to your needs for post-production in iMovie adn FCE by clicking the 'Settings' button there. The proper Frame Rate, Bitrate, Size and other settings setted by default to keep high quality of your audio and video. At last, click the "Convert" icon to start converting Panasonic AG-AC90 1080p/60p MTS to iMovie. As usual, then we just need to transfer files into iMovie, we can enjoy editing the recordings there. More gudies:
Never miss to get Saving up to $44.1, MXF/MTS/M2TS/MKV/FLV/MOV Converter.etc at Pavtube Bundles Deals! Source: http://digitalmediasolution.altervista.org/blog/work-ac90-avchd-with-imovie-fce/
3. Set audio and video profile? Set audio and video profile in your Panasonic AG-AC90 1080p/60p MTS, you will get the output compatible AIC MOV according to your needs for post-production in iMovie adn FCE by clicking the 'Settings' button there. The proper Frame Rate, Bitrate, Size and other settings setted by default to keep high quality of your audio and video. At last, click the "Convert" icon to start converting Panasonic AG-AC90 1080p/60p MTS to iMovie. As usual, then we just need to transfer files into iMovie, we can enjoy editing the recordings there. More gudies:
Never miss to get Saving up to $44.1, MXF/MTS/M2TS/MKV/FLV/MOV Converter.etc at Pavtube Bundles Deals! Source: http://digitalmediasolution.altervista.org/blog/work-ac90-avchd-with-imovie-fce/