Summary: This step-by-step tutorial shows you how to convert MKV to Sony TV best accepted format with MKV to Sony TV Converter.  The MKV is an open standard free container format, a file format that can hold an unlimited number of audio, video, subtitle tracks or picture in one file. This format offers a richer media experience than any other current format, this makes MKV a popular choice for making back-ups of DVD and Blu-ray discs that you could also play on a computer connected to a TV. "I have bought a brand new Sony TV. The problem is that it does not recognize MKV video files. I’m able play AVI and MP4 formats, but not MKV videos. Can anyone help?" According to Sony's official site, Sony TV support MKV format. However, in most cases, you'll find your MKV files can't be played on Sony TV. It's so strange, isn't it? There is a strong possibility that your MKV files contains DTS audio (Different MKV files are with different audio codecs). Sony TV has poor compatibility with DTS audio. In a case like this, you have to make audio stream in MKV files compatible with Sony TV. It sounds a bit complicated. Actually, it's very easy as long as you have a professional MKV to Sony TV converter. Here, you can turn to Pavtube Video Converter, which is just the top MKV to Sony TV converter to convert MKV to Sony TV format. It can also convert other videos like MOV, FLV, Xvid, AVI, RMVB, RM, TS, VOB, 3GP, 3G2, OGV, MVC, DV, MXF, and etc to Sony TV. If you are running on Mac operating system, you can refer to the equivalent version-Pavtube Video Converter for Mac. This program ensures maximum editing quality and efficiency. What’s more, the additional video editor enables you to personalize videos before conversion.
 Other Download: - Pavtube old official address: http://www.pavtube.com/video_converter/ - Amazon Download: http://download.cnet.com/Pavtube-Video-Converter/3000-2194_4-75734821.html - Cnet Download: http://download.cnet.com/Pavtube-Video-Converter/3000-2194_4-75734821.html How to watch MKV files on Sony TV? Step 1: Download and have a quick installation. The trial version will have a watermark on your converted files. Except for that, there are no time limitation, no virus, and no unnecessary bundle apps while downloading. After that, click "Add Video" button to load MKV files. You can load several files at once thanks to "Add from folder" button.
  Step 2: Here, you need to choose what you want the output to be. Click "Format" drop-down list, and then select output video format from the powerful converter. Here, you’d better choose "TVS>>SONY TV (*.mp4)".
  Step 3: Adjust video and audio parameters, including the bit rate of video and audio, the codec of video and audio, video size, sample rate, frame rate, audio channels, etc., in the Profile Settings by hitting "Settings" button. Step 4: Click "Convert" button to start the conversion work. You can get the generated files by clicking "Open" button. Conclusion: If you don’t want to wait for the entire conversion process, you can tick off "Showdown computer when conversion completed" and go away to do other things. Further Reading:
Facebook Weekend Promotion Here : Learn More: http://bit.ly/1hmOn34 Source: http://bestvideoking.blogspot.com/2015/09/watch-mkv-files-on-sony-tv.html
Step 3: Adjust video and audio parameters, including the bit rate of video and audio, the codec of video and audio, video size, sample rate, frame rate, audio channels, etc., in the Profile Settings by hitting "Settings" button. Step 4: Click "Convert" button to start the conversion work. You can get the generated files by clicking "Open" button. Conclusion: If you don’t want to wait for the entire conversion process, you can tick off "Showdown computer when conversion completed" and go away to do other things. Further Reading:
Facebook Weekend Promotion Here : Learn More: http://bit.ly/1hmOn34 Source: http://bestvideoking.blogspot.com/2015/09/watch-mkv-files-on-sony-tv.html
Summary: Having troubles when importing Sony PXW-X70 XAVC MXF files to Premiere Elements for a nice editing? Want to know the best way to import Sony PXW-X70 XAVC MXF files to Premiere Elements and edit with Premiere Elements native codec? You may have interest to read this article.  Whatever for Mac users or Windows users, some popular editing software may be taken as good assistants if you are a professional video editor. As Mac users have FCP, Windows users always take Premiere as their favorite. With hundreds of features worthy of listing, some problems or unwanted gaps may appear when editing. For example, Sony PXW-X70 XAVC MXF files to Premiere Elements importing issues. "Just got the Sony PXW-X70 and I can’t seem to open its XAVC MXF or even successfully transcode the video files into something that can be read by Premiere Elements. I downloaded several video tools and neither of them works. They just are able to import the audio but not the video portion. Very frustrated here, any advice?" "I have purchased Sony PXW-X70 camcorder last week. Since I got it I always take it when I go traveling. I have recorded several 1080p videos with Sony PXW-X70 and the recordings are in two video formats. One is XAVC and another is AVCHD, when I try to import the XAVC MXF files to Premiere Elements on my PC, the Premiere Elements says the video formats are not supported to import, can you help me?" To be frank, recently on some recording forums there are a few of Sony PXW-X70 users complained that Premiere Elements can’t recognize the Sony PXW-X70 recorded XAVC MXF files. If you read the detail description of Premiere Elements on official website, you will get the info that MPEG-2 is the native codec for Premiere Elements. Once you convert Sony PXW-X70 XAVC MXF files to Premiere Elements best accepted MPEG-2, your importing and editing problem will be solved. Here we recommend you to take a free try on Pavtube Video Converter, which is an all-in-one video program. Other Download: - Pavtube old official address: http://www.pavtube.com/video_converter/ - Amazon Download: http://download.cnet.com/Pavtube-Video-Converter/3000-2194_4-75734821.html - Cnet Download: http://download.cnet.com/Pavtube-Video-Converter/3000-2194_4-75734821.html How to import Sony PXW-X70 XAVC MXF files to Premiere Elements for editing? Step 1: Download and have a quick installation. The trial version will have a watermark on your converted files. Except for that, there are no time limitation, no virus, and no unnecessary bundle apps while downloading. After that, click "Add Video" button to load your XAVC MXF files. You can load several files at once thanks to "Add from folder" button. Step 2: Click the "Format" bar to get the drop-down menu and you can get "Adobe Premiere/Sony Vegas", we suggest you to choose "MPEG-2 (*.mpg)" as the best output format.
  Step 3: Click "Settings" button to customize the output video and audio settings by yourself. But if you are not good at it, you’d better use the default parameters, they will ensure you a good balance between file size and image quality basically. You can change the resolution, bit rate, frame rate as you need. Step 4: When everything is done, you can take a preview by hitting "Play" button. If you are satisfied with the final result, you can click "Convert" button to finish the conversion work. Conclusion: When the conversion is done, you can click "Open" to get your generated files. Now, you can edit Sony PXW-X70 XAVC MXF files in Premiere Elements without any hassles. More related tips:
Facebook Weekend Promotion Here : Learn More: http://bit.ly/1hmOn34 Source: http://mxfworld.jimdo.com/2015/09/17/import-sony-xavc-mxf-files-to-premiere/
Step 3: Click "Settings" button to customize the output video and audio settings by yourself. But if you are not good at it, you’d better use the default parameters, they will ensure you a good balance between file size and image quality basically. You can change the resolution, bit rate, frame rate as you need. Step 4: When everything is done, you can take a preview by hitting "Play" button. If you are satisfied with the final result, you can click "Convert" button to finish the conversion work. Conclusion: When the conversion is done, you can click "Open" to get your generated files. Now, you can edit Sony PXW-X70 XAVC MXF files in Premiere Elements without any hassles. More related tips:
Facebook Weekend Promotion Here : Learn More: http://bit.ly/1hmOn34 Source: http://mxfworld.jimdo.com/2015/09/17/import-sony-xavc-mxf-files-to-premiere/
Summary: Problems occurred when importing H.264 files to Pinnacle Studio. You can fix importing issues by reading the following guide.  H.264 is not a stranger to most people, essentially all of the electronic digital products now support this encoding format. And various extensions of its capabilities have been added in subsequent. The intent of the H.264 project was to create a standard capable of providing good video quality at substantially lower bit rate than previous standards, without increasing the complexity of design so much that it would be impractical or excessively expensive to implement. Pinnacle Studio supports a wide rang video formats although. It is pretty picky with the codec of what it’ll accept. As far as I know Pinnacle Studio doesn’t like H.264 files. If you want to import H.264 to Pinnacle Studio flawlessly, I recommend you to convert H.264 to a more editable format for Pinnacle. The video format that Pinnacle Studio support: AVI File–(.avi) MPEG Files–MPEG-1, MPEG-2 SD & HD, and MPEG-4 – (.mpg, .mpeg, .mod, .mp2, .mp4, .m2ts, .mts, .m1v, m2v. mpv) WMV Files- (.wmv) DIVX–(.avi) MOD (JVC Everio cameras)–(.mod) 3GPP Files–(.3gp) TOD Files–(*.tod) AVCHD–(.m2ts, .mts)–Requires Ultimate or Ultimate Collection Comparing with others, Pavtube Video Converter has the strong ability of transcoding all different videos. With a faster conversion speed and easy operation, it can support most hot media devices and editing programs. Also, I’m sure you’ll be satisfied with some other functional items there. Other Download: - Pavtube old official address: http://www.pavtube.com/video_converter/ - Amazon Download: http://download.cnet.com/Pavtube-Video-Converter/3000-2194_4-75734821.html - Cnet Download: http://download.cnet.com/Pavtube-Video-Converter/3000-2194_4-75734821.html How to import H.264 files to Pinnacle Studio 14/15/16 for editing? Step 1: Download and install the program. Click "Add video" on the main interface to load H.264 files to the program. You can also drag the files to the program’s window list directly. This program can also support the batch video clips. Step 2: Select the right formats for editing in Pinnacle Studio. Here we suggest you to go to the "HD Video" list, you will get the "AVI HD Video (*.avi)"as the best output.
  Step 3: Click "Settings" button to customize the output video and audio settings by yourself. But if you are not good at it, you’d better use the default parameters, they will ensure you a good balance between file size and image quality basically. You can change the resolution, bit rate, frame rate as you need. Step 4: With all the preparations work done? Why not go back to the main interface to click the "Convert" button to get the work started? Conclusion: Once the conversion is finished, click "Open" to quickly find the converted files. Then, Pinnacle Studio 14/15/16 will recognize, catalog, play and stream them just fine. Facebook Weekend Promotion Here : Learn More: http://bit.ly/1hmOn34 More related tips:
Source: http://pc-mac-compatibility-issues.blogspot.com/2015/09/import-h264-to-pinnacle-studio.html
Step 3: Click "Settings" button to customize the output video and audio settings by yourself. But if you are not good at it, you’d better use the default parameters, they will ensure you a good balance between file size and image quality basically. You can change the resolution, bit rate, frame rate as you need. Step 4: With all the preparations work done? Why not go back to the main interface to click the "Convert" button to get the work started? Conclusion: Once the conversion is finished, click "Open" to quickly find the converted files. Then, Pinnacle Studio 14/15/16 will recognize, catalog, play and stream them just fine. Facebook Weekend Promotion Here : Learn More: http://bit.ly/1hmOn34 More related tips:
Source: http://pc-mac-compatibility-issues.blogspot.com/2015/09/import-h264-to-pinnacle-studio.html
Summary: If you have Panasonic FZ300 4K to FCP/Premiere/Avid importing issues, this article will shed you some lights on how to make NLEs work with FZ300 4K recordings.  Panasonic FZ300 is a new 4K camcorder for us, which can shoot high-resolution 4K QFHD video in MP4 format. As new to Panasonic FZ300, you may concern the Panasonic FZ300 4K workflow like how to import Panasonic FZ300 4K video to FCP/Premiere/Avid for editing. Generally, Final Cut Pro, Adobe Premiere Pro, Avid Media Composer can’t support MP4 format well which is not an ideal format for editing. Plus, expect for Final Cut Pro X, Adobe Premiere Pro CC, the old version FCP 6/7, Premiere Pro CS4/CS5/CS6 can’t support 4K video. To edit FZ300 4K video in FCP/Premiere/Avid flawlessly, an ultimate solution is to convert FZ300 4K MP4 files to ProRes MOV for FCP, MPEG-2 MPG for Premiere, DNxHD MOV for Avid. To convert FZ300 4K MP4 to FCP/Premiere/Avid friendly format quickly and easily, a professional and easy-to-use 4K video converter is the key. Here you can depend on Pavtube Video Converter for Mac(review). It provides hundreds of output format presets for 4K videos, such as DNxHD for Avid, Apple ProRes for Final Cut Pro, MPEG-2 for Adobe Premiere, Apple InterMediate Codec for iMovie, etc. Besides, this 4K converter is also available to customize the output resolutions to any size like 1080p, 2K, 4K as users want. It will save you both time and trouble, and all you need to do is to drag the result videos for prompt editing.
 Other Download: - Pavtube old official address: http://www.pavtube.com/video-converter-mac/ - Amazon Store Download: http://www.amazon.com/Pavtube-Video-Converter-Mac-Download/dp/B00QIBK0TQ - Cnet Download: http://download.cnet.com/Pavtube-Video-Converter/3000-2194_4-76179460.html How to convert FZ300 4K videos to FCP/Premiere/Avid? Step 1: Download and have a quick installation. The trial version will have a watermark on your converted files. Except for that, there are no time limitation, no virus, and no unnecessary bundle apps while downloading. After that, click "Add Video" button to load your FZ300 4K MP4 videos. You can load several files at once thanks to "Add from folder" button.
  Step 2: Click the "Format" bar to get the drop-down menu and you can get "Final Cut Pro>>Apple ProRes codec", including ProRes 422, ProRes 422 (HQ), ProRes 422 (LT), ProRes 422 (Proxy) and ProRes 4444. Choose the proper one you want. Here, we suggest you to choose "Apple ProRes 422 (*.mov)" as the best output format.
  Tips: For editing FZ300 4K MP4 in Premiere, choose "Adobe Premiere/Sony Vegas>>MPEG-2 (*.mpg)".
For editing FZ300 4K MP4 in Avid, choose "Avid Media Composer>>Avid DNxHD (*.mov)". Step 3: Click the "Settings" button and set proper video/ audio parameters. My advice is to set the video size, bit rate and fame rate to be exactly as the footages so that you will suffer least quality degradation. If you would like to use default settings, simply skip this step. Step 4: After all necessary settings, hit the "Convert" button to start the conversion work. Conclusion: After conversion, you can get the generated files by clicking "Open" button. Then, you can transfer FZ300 4K videos to FCP/Premiere/Avid without any hassles. If You Want to Get Our Weekend Pavtube Special offer,You can Click Here: http://bit.ly/1hmOn34 More related tips:
Source: http://mediaconverting.blogspot.com/2015/09/import-fz300-4k-videos-to-fcp-premiere-avid.html
Summary: Best answers are offered here to tell you how to easily convert MKV file to Apple TV for a playback.  With the release of Apple TV, it gives you anytime access to endless entertainment. Thousands of videos and TV shows can be shown on your widescreen TV. What a delightful thing if MKV file can be played on Apple TV! If you have searched the Apple TV official website, we will find that the biggest limitation of Apple TV is the lack of some codec support and not even having the ability to do basic surround sound like Dolby Digital 5.1. These issues were resolved almost immediately after the Apple TV was released, although the hacks were somewhat less than practical. Something as simple as getting your Apple TV to, say, sync and recognize your movies as playable was no simple feat. Have tried directly syncing MKV file to Apple TV, but failed? No worry, problems can be solved as long as you convert MKV file to Apple TV supported formats. We also have discussed related XviD/Divx to Apple TV, TiVo files to Apple TVand etc. issues. Here we list the Apple TV supported file types according to our multiple-testing result. Supported Video Formats: H.264 video up to 720p, 30 frames per second, Main Profile level 3.1 with AAC-LC audio up to 160 Kbps per channel, 48kHz, stereo audio in .m4v, .mp4, and .mov file formats. MPEG-4 video, up to 2.5 Mbps, 640 by 480 pixels, 30 frames per second, Simple Profile with AAC-LC audio up to 160 Kbps, 48kHz, stereo audio in .m4v, .mp4, and .mov file formats. Motion JPEG (M-JPEG) up to 35 Mbps, 1280 by 720 pixels, 30 frames per second, audio in ulaw, PCM stereo audio in .avi file format. Supported Audio Formats: AAC (16 to 320 Kbps) Protected AAC (from iTunes Store) MP3 (16 to 320 Kbps) MP3 VBR Audible (formats 2, 3, and 4) Apple Lossless AIFF WAV Dolby Digital 5.1 surround sound pass-through Compared with others, we have found the Pavtube Video Converter for Mac has the strong ability of transcoding MKV files well. This program offers quite effective solution for you to convert almost all the videos MKV as well as Xvid, DivX, MOV, MTS, TiVo, VOB, etc. It also allows you to adjust the video, audio parameter to get a decent output video that you want. Barely several steps are enough. Just download it and follow the steps below. Other Download: - Pavtube old official address: http://www.pavtube.com/video-converter-mac/ - Amazon Store Download: http://www.amazon.com/Pavtube-Video-Converter-Mac-Download/dp/B00QIBK0TQ - Cnet Download: http://download.cnet.com/Pavtube-Video-Converter/3000-2194_4-76179460.html How to play MKV file on Apple TV? Step 1: Download and have a quick installation. The trial version will have a watermark on your converted files. Except for that, there are no time limitation, no virus, and no unnecessary bundle apps while downloading. After that, click "Add Video" button to load your MKV files. You can load several files at once thanks to "Add from folder" button. Step 2: Select the right formats for playing on Apple TV. Here we suggest you to go to the "HD Video" list, you will get the "H.264 HD Video (*.mp4)" as the best output.
  Step 3: Adjust video and audio parameters, including the bit rate of video and audio, the codec of video and audio, video size, sample rate, frame rate, audio channels, etc., in the Profile Settings by hitting "Settings" button. Step 4: Click "Convert" button to start MKV video to H.264 HD Video MP4 conversion for Apple TV playing. You can get the generated files by clicking "Open" button. Conclusion: If you don’t want to wait for the entire conversion process, you can tick off "Showdown computer when conversion completed" and go away to do other things. If you are fond of enjoying MKV files on Apple TV, why not have a try? Enjoy streaming MKV files to Apple TV! More related tips:
If You Want to Get Our Weekend Pavtube Special offer,You can Click Here: http://bit.ly/1hmOn34 Source: http://file-editing-tips.over-blog.com/play-mkv-file-on-apple-tv
Step 3: Adjust video and audio parameters, including the bit rate of video and audio, the codec of video and audio, video size, sample rate, frame rate, audio channels, etc., in the Profile Settings by hitting "Settings" button. Step 4: Click "Convert" button to start MKV video to H.264 HD Video MP4 conversion for Apple TV playing. You can get the generated files by clicking "Open" button. Conclusion: If you don’t want to wait for the entire conversion process, you can tick off "Showdown computer when conversion completed" and go away to do other things. If you are fond of enjoying MKV files on Apple TV, why not have a try? Enjoy streaming MKV files to Apple TV! More related tips:
If You Want to Get Our Weekend Pavtube Special offer,You can Click Here: http://bit.ly/1hmOn34 Source: http://file-editing-tips.over-blog.com/play-mkv-file-on-apple-tv
Summary: M3U8 format was added into this powerful Video Converter. Detailed review about this converter you can find in this article.  The M3U8 file extension is used for playlists that are stored in the M3U UTF-8 (Unicode) text playlist format. M3U and M3U8 playlists can be opened in a variety of media players, such as Winamp, KMPlayer, iTunes, VLC media player etc. Playlist doesn’t contain any multimedia content, it is only list of media files selected from a hard disk or other media. You may get many different files from Internet, camcorder shooting and etc. Take the newly H.265 as an example: The big trend of 4K put an eager need for higher shooting quality, fast playback , powerful stream function. H.265 just came as a best connection between the 4K generation and video making equipment. Many giant Digital Company like Sony, Canon, and Panasonic all pursuit this latest trend. They all launched their 4K camera in order to size the market. The H.265/HEVC used by those HD Camcorder or Camera would be the best solution to compress those high resolution video into small size while maintain the sharp quality. Got these fantastic videos at hand, how to play them smoothly without waiting for the buffering time? Here, you need to convert your files like H.265 to M3U8, the format we mentioned at the very beginning. The advantage is that dragging videos is fast because of no extra datas. You can drag the video to any point you want to enjoy smoothly and immediately. Besides, the original supporting effect is good. Using an M3U8 Converter thus offers a neat advantage for both video producers and video consumers who will certainly be wowed. This is great news for producers of video who want to maximize quality and minimize costs. Online commercial distribution of video will certainly be less expensive on the storage side and highly interesting in terms of video supply variety, especially for businesses offering video-on-demand services. Here strongly recommend this all-in-one brand new Pavtube Video Converter, which is top-ranked M3U8 Converter for Windows. Other Download: - Pavtube old official address: http://www.pavtube.com/video_converter/ - Amazon Download: http://download.cnet.com/Pavtube-Video-Converter/3000-2194_4-75734821.html - Cnet Download: http://download.cnet.com/Pavtube-Video-Converter/3000-2194_4-75734821.html How to convert video files to M3U8 format on Windows? Step 1: Download and install the program. Click "Add video" on the main interface to load your files to the program. You can also drag the files to the program’s window list directly. This program can also support the batch video clips. Step 2: Click the "Format" bar to get the drop-down menu and you can get "HLS Streaming (m3u8)". Choose "ipad m3u8 streaming" or "iphone m3u8 streaming" as best output format. Any media player supporting TS format are all available for playing M3U8 format files.
  Step 3: Click "Settings" button to customize the output video and audio settings by yourself. Video codec is the default H.264 and audio codec is the default AAC. You can change the resolution, bit rate, frame rate as you need. But if you are not good at it, you’d better use the default parameters, they will ensure you a good balance between file size and image quality basically. Step 4: When everything is done, you can take a preview by hitting "Play" button. If you are satisfied with the final result, you can click "Convert" button to finish the conversion work. Conclusion: The output files should be named without space and file path should be in plain English or pure digital, or you could play them successfully. After conversion, you can set up a server to enjoy M3U8! Hope this top-ranked M3U8 Converter can help you a lot! By the way, Pavtube Video Converter Ultimate is the best BD/DVD/Video solution for Windows users to backup BD/DVD, compress disc and transcode video clip to almost all popular video and audio formats. Source: http://digisns.com/2015/06/m3u8-windows-converter-review/ Further Reading: GoPro 4K to ProRes 4K Workflow: Edit GoPro Hero4 4K Videos in FCP How to Transcode FLV Files to M3U8 Format on Mac? Get Sony Camera Video to Play on Apple TV Why Doesn’t VLC Decode NX 4K H.265 Video from Samsung? Edit Canon T6i/750D MP4 in Final Cut Pro Convert Panasonic P2 MXF to QuickTime MOV for Playing on Mac Yosemite Edit Sony A5100 XAVC S Files in FCP X Source: http://m3u8mediacentral.jimdo.com/2015/08/25/m3u8-windows-converter-review/
Summary: Transferring videos to iPad could be a big headache. This guide aims to tell you how to play MTS/M2TS recorded by Panasonic on iPad.  "It was that I record some MTS/M2TS files with Panasonic. Since I got a new iPad, I prefer to enjoy the files on my new tablet anywhere anytime. However, something wrong when I wanna put my MTS/M2TS files into iPad. Any good measures I can solve that problems well?" iPad supported video formats: H.264 video format: Up to 1080p, 60 frames/second, High Profile level 4.2 with AAC-LC audio up to 160 Kbps, 48kHz, stereo audio in .m4v, .mp4, and .mov file formats. MPEG-4 video format: Up to 2.5 Mbps, 640 x 480 pixels, 30 frames/second with AAC-LC audio up to 160 Kbps/ channel, 48kHz, stereo audio in .m4v, .mp4, and .mov file formats. Motion JPEG: Up to 35 Mbps, 1280 x 720 pixels, 30 frames/second audio in ulaw, PCM stereo audio in .avi file format. iPad supported audio formats: AAC and HE-AAC (bitrate from 8 to 320 Kbps) Protected AAC (DRM copy protection used on the iTunes Store) MP3 (8 to 320 Kbps) and MP3 VBR Audible (formats 2, 3, 4, Audible Enhanced Audio, AAX, and AAX+) ALAC (Apple Lossless), AIFF and WAV To make MTS/M2TS files compatible with iPad, Pavtube Video Converter should be your first choice since it can convert any videos to iPad supported formats. Compare with many other such video conversion tools, you will find this software is much powerful. Conversion could be easily achieved, but to keep the high quality will be much more difficult. Most such tools will supply new videos with much quality loss, but never will this Video Converter.
 Other Download: - Pavtube old official address: http://www.pavtube.com/video_converter/ - Amazon Download: http://download.cnet.com/Pavtube-Video-Converter/3000-2194_4-75734821.html - Cnet Download: http://download.cnet.com/Pavtube-Video-Converter/3000-2194_4-75734821.html How to play Panasonic MTS/M2TS on iPad? Step 1: Download and install the program. Click "Add video" on the main interface to load your original files to the program. You can also drag the files to the program’s window list directly. This program can also support the batch video clips.
 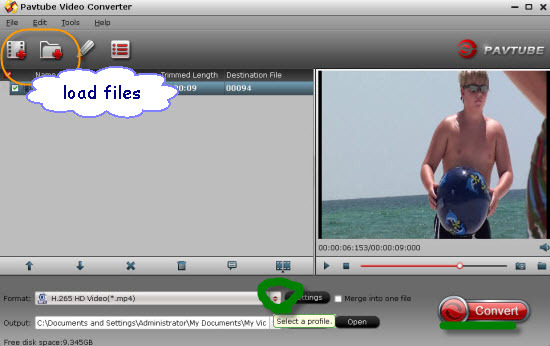 Step 2: Click the "Format" bar to get the drop-down menu and you can get "iPad". Choose "iPad Air HD Video (*.mp4)" as best output format.
  Step 3: Click "Settings" button to customize the output video and audio settings by yourself. But if you are not good at it, you’d better use the default parameters, they will ensure you a good balance between file size and image quality basically. You can change the resolution, bit rate, frame rate as you need. Step 4: Specify output folder on your computer to save the output files. Click the "Browse" button to choose the path where you want to save the output files in. Click "Convert" button to finish converting MTS/M2TS to iPad compatible MP4 format. Conclusion: Connect iPad to computer, start iTunes, and then import the converted file to iTunes for sync and transfer to iPad. Wait no more, just get this powerful iPad Video Converter now! More related tips:
Facebook Weekend Promotion Here : Learn More: http://bit.ly/1hmOn34 Source: http://android-ios-tips.tumblr.com/post/128766101208/play-panasonic-mts-m2ts-on-ipad
Step 3: Click "Settings" button to customize the output video and audio settings by yourself. But if you are not good at it, you’d better use the default parameters, they will ensure you a good balance between file size and image quality basically. You can change the resolution, bit rate, frame rate as you need. Step 4: Specify output folder on your computer to save the output files. Click the "Browse" button to choose the path where you want to save the output files in. Click "Convert" button to finish converting MTS/M2TS to iPad compatible MP4 format. Conclusion: Connect iPad to computer, start iTunes, and then import the converted file to iTunes for sync and transfer to iPad. Wait no more, just get this powerful iPad Video Converter now! More related tips:
Facebook Weekend Promotion Here : Learn More: http://bit.ly/1hmOn34 Source: http://android-ios-tips.tumblr.com/post/128766101208/play-panasonic-mts-m2ts-on-ipad
Summary: Ever met any importing and transferring problems while you are trying to import GX8 AVCHD/MP4 to Avid MC? This tutorial will teach you how to easily enjoy it with help of the best HD Video Converter for Mac.  Hot search: Panasonic GX8 4K Video to Premiere Pro CC/AE | Panasonic GX8 4K Clips to FCP/iMovie/FCE | Panasonic HVX2000A MXF Files to Avid MC The black Panasonic Lumix DMC-GX8 is a sleek, compact mirrorless camera enabling versatile, multimedia recording. In addition to the versatile still shooting modes, the GX8 also supports recording 4K UHD (3840*2160) video in the MP4 format. Full HD 1080p/60 is also supported, in both MP4 and AVCHD formats. But there are a few issues when it comes to viewing, importing and editing GX8 AVCHD/MP4 in Avid Media Composer. "I want to buy Panasonic GX8. It can shoot video with AVCHD but wanted to check the better encoder. I’m working with Avid and it does not recognize the 4K file. How to solve this problem? How to import MTS video to Avid on Mac?" If we want to import and edit Panasonic GX8 AVCHD/MP4 in Avid MC, the result may let you down- these popular video editing programs won't open the 4K footage from Panasonic GX8 correctly. Maybe an upgrade version of editing software could help. Still stuck with unsuccessful attempts? Perhaps there is some required codec missing or it is an incompatible video file format. In this case, the easy workaround is to convert GX8 AVCHD/MP4 video to DNxHD, which is the best codec with best results when working with Avid MC. To finish the job, Pavtube HD Video Converter for Mac (review) would be the great help. The program can effortlessly encode/re-encode 4K H.264(MP4/MOV), XAVC, XAVC S, etc footage for smoothly importing and editing in various non-linear editing systems. Other Download: - Pavtube old official address: http://www.pavtube.com/hd-video-converter-mac/ - Amazon Store Download: http://www.amazon.com/Pavtube-Video-Converter-Mac-Download/dp/B00QI9GNZS - AppStore Download: https://itunes.apple.com/de/app/pavtube-hd-video-converter/id502792488?mt=12 - Cnet Download: http://download.cnet.com/Pavtube-HD-Video-Converter/3000-2194_4-76177786.html How to import Panasonic GX8 4K video to Avid? Step 1: Launch the HD Video Converter on your Mac, and then click the "Add video" button to import your source files directly. In order to import several files at one time, you can click "Add from folder" button.
  Step 2: Click the "Format" bar to get the drop-down menu and you can get "Avid Media Composer>>Avid DNxHD (*.mov)" as best output format.
  Step 3: Click "Settings" button to customize the output video and audio settings by yourself. But if you are not good at it, you’d better use the default parameters, they will ensure you a good balance between file size and image quality basically. You can change the resolution, bit rate, frame rate as you need. Step 4: Now, click "Convert" and let it go. The program supports batch conversion. So if you have lots of files to convert, check "Shut down computer after conversion" and you can go away without keeping an eye on it. Conclusion: Once the conversion process shows in 100%, click "Open" to get the output videos. Create a project and start editing GX8 4K video in Avid MC with light speed. More related tips:
If You Want to Get Our Weekend Pavtube Special offer,You can Click Here: http://bit.ly/1hmOn34 Source: http://bestvideoking.blogspot.com/2015/09/edit-gx8-avchd-mp4-in-avid-mc.html
Step 3: Click "Settings" button to customize the output video and audio settings by yourself. But if you are not good at it, you’d better use the default parameters, they will ensure you a good balance between file size and image quality basically. You can change the resolution, bit rate, frame rate as you need. Step 4: Now, click "Convert" and let it go. The program supports batch conversion. So if you have lots of files to convert, check "Shut down computer after conversion" and you can go away without keeping an eye on it. Conclusion: Once the conversion process shows in 100%, click "Open" to get the output videos. Create a project and start editing GX8 4K video in Avid MC with light speed. More related tips:
If You Want to Get Our Weekend Pavtube Special offer,You can Click Here: http://bit.ly/1hmOn34 Source: http://bestvideoking.blogspot.com/2015/09/edit-gx8-avchd-mp4-in-avid-mc.html
Summary: Are you eager to know how to convert Panasonic BWT740 ACVHD MTS to MPEG-2 for making DVDs so that you can keep for the captured fantastic files? Read this article and find the best way here.  MTS is the file extension for the Advanced Video Codec High Definition, or AVCHD, video file type. Many camcorder manufacturers like Sony and Panasonic use this codec and the .mts file extension for the footage captured on their high definition camcorders. It really lets you down that MTS files can’t work with many video programs and editing software. If you want to burn Panasonic BWT740 AVCHD MTS for making DVDs, you will have no luck either. If you would like to use Panasonic BWT740 AVCHD MTS files for making DVDs, I’m afraid that DVDs don’t have the ability to accept the MTS videos. To get the work done, you will first need to run it through a third-party program that can read it and convert Panasonic BWT740 AVCHD MTS to MPEG-2 for making DVDs. It means a MTS to MPEG-2 Video Converter is required. There’s lots of conversion software out there, here we take Pavtube MTS/M2TS Converter for Mac (review) as example, a nice little program that can encode various video types into several other formats. There’s a lot more you can do with it, for instance, convert video from one type to another (of course including converting Panasonic BWT740 AVCHD MTS to MPEG-2), take snapshots of your favorite MTS videos, merge, clip and split files , batch processing and multi-threading. With optimized interface, this program only requires you to do few simple clicks.
 Other Download: - Pavtube old official address: http://www.pavtube.com/mts-converter-mac/ - Amazon Download: http://www.amazon.com/Pavtube-MTS-M2TS-Converter-Download/dp/B00QIE3U0Y - Cnet Download: http://download.cnet.com/Pavtube-MTS-M2TS-Converter/3000-2194_4-76177029.html How to convert Panasonic BWT740 AVCHD MTS to MPEG-2 for making DVDs? Step 1: Download, install and run the program on your Mac. When the main interface pops up, please click "Add video" button to import Panasonic BWT740 AVCHD MTS files that you want to convert. You can load several files at once by clicking "Add from folder".
  Step 2: Click format column and choose best video format for DVDs making. Just click and choose "Common Video>>MPEG-2 Video (*.mpg)" as output format for this profile is native format for converting Panasonic BWT740 AVCHD MTS for making DVDs. If you have the requirement to convert Panasonic BWT740 AVCHD MTS files to other programs, you can choose according to your need.
 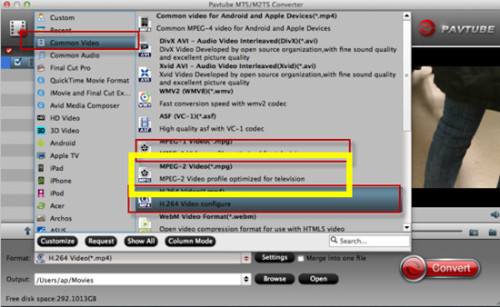 Step 3: Adjust video and audio parameters in Profile Settings, where you can get by clicking "Settings" on the main interface. Step 4: Click "Convert" button to start process of converting Panasonic BWT740 AVCHD MTS to MPEG-2 for making DVDs. This best Mac MTS to MPEG-2 Video Converter will start the conversion process immediately. Conclusion: After converting Panasonic BWT740 AVCHD MTS to MPEG-2, you can burn them into DVDs for keeping. It’s easy and it’s indeed of great convenience, right? The newly released Pavtube DVD Creator for Mac program makes DVD creation much easier than ever before. It lets you burn any kind of video sources to playable DVDs within a few clicks. If You Want to Get Our Weekend Pavtube Special offer,You can Click Here: http://bit.ly/1hmOn34 More related tips:
Source: http://lovecamcorder.tumblr.com/post/128697252192/convert-mts-to-mpeg-2-for-making-dvds
Step 3: Adjust video and audio parameters in Profile Settings, where you can get by clicking "Settings" on the main interface. Step 4: Click "Convert" button to start process of converting Panasonic BWT740 AVCHD MTS to MPEG-2 for making DVDs. This best Mac MTS to MPEG-2 Video Converter will start the conversion process immediately. Conclusion: After converting Panasonic BWT740 AVCHD MTS to MPEG-2, you can burn them into DVDs for keeping. It’s easy and it’s indeed of great convenience, right? The newly released Pavtube DVD Creator for Mac program makes DVD creation much easier than ever before. It lets you burn any kind of video sources to playable DVDs within a few clicks. If You Want to Get Our Weekend Pavtube Special offer,You can Click Here: http://bit.ly/1hmOn34 More related tips:
Source: http://lovecamcorder.tumblr.com/post/128697252192/convert-mts-to-mpeg-2-for-making-dvds
Summary: This guide you will know how to compress Panasonic FZ1000 4K MP4 and AVCHD MTS to Premiere Pro for editing with MPEG-2 native codec.  Hot search: Convert Panasonic FZ1000 4K Video to iMovie for Watching | Panasonic GX8 4K Video to Premiere Pro | Sony HDR-TD10 3D .mts/.m2ts to Premiere Pro Panasonic FZ1000 is one of the hottest 4K cameras in this Summer. The headline feature of the Panasonic GH4 is that it’s a Micro Four Thirds camera that can shoot 4K video (in MP4, MOV format) for under $2000, capturing either Quad HD (3840*2160) at up to 29.97p or "Cinema 4K" (4096*2160) at up to 24p. If you recorded some videos by Panasonic FZ1000, you may like editing the 4K videos in Premiere Pro. "Hi, all, does anyone have any experience of Panasonic Lumix FZ1000 and Premiere Pro workflow? I have just received my Panasonic FZ1000 camera the day before yesterday and everything is performing as expected, except there is no go when I importing FZ1000 4K video to Premiere Pro for basic editing. And yes I have other more robust video editing programs but I like the simplicity of Premiere Pro so I would like to use it. Does anyone know how to get around this and make Premiere Pro read FZ1000 raw footage flawlessly? I don’t even mind paying for third party software." Premiere Pro won’t open and import Panasonic FZ1000 4K MP4/AVCHD correctly. Question is, what’s causing the issues? According to my experience, it may due to the high video resolution and the video codec incompatibility. Since MPEG-2 is the best editing video codec for Premiere, so we can convert Panasonic FZ1000 4K MP4/AVCHD (1080p would be the best settings) with a top 4K Video Converter, which will save you both time and trouble, and all you need is to drag the result videos for prompt editing. Here Pavtube Video Converter is highly recommended. It does a good job in converting Panasonic FZ1000 4K MP4/AVCHD to Premiere most compatible format with least quality loss. Plus, it supports encoding camera shootings in different formats (MTS/M2TS, MP4, MXF, XAVC, etc.) to video editing software compatible file types, i.e. DNxHD for Avid Media Composer, MPEG-2 for Sony Vegas and etc. to meet your different needs. Other Download: - Pavtube old official address: http://www.pavtube.com/video_converter/ - Amazon Download: http://download.cnet.com/Pavtube-Video-Converter/3000-2194_4-75734821.html - Cnet Download: http://download.cnet.com/Pavtube-Video-Converter/3000-2194_4-75734821.html How to convert Panasonic FZ1000 4K MP4/AVCHD to Premiere Pro? Step 1: Download and have a quick installation. The trial version will have a watermark on your converted files. Except for that, there are no time limitation, no virus, and no unnecessary bundle apps while downloading. After that, click "Add Video" button to load your source files. You can load several files at once thanks to "Add from folder" button. Step 2: Click the "Format" bar to get the drop-down menu and you can get "Adobe Premiere/Sony Vegas". Choose "MPEG-2 (*.mpg)" as best output format. Step 3: Click "Settings" button to customize the output video and audio settings by yourself. But if you are not good at it, you’d better use the default parameters, they will ensure you a good balance between file size and image quality basically. You can change the resolution, bit rate, frame rate as you need.
Step 4: When everything is done, you can take a preview by hitting "Play" button. If you are satisfied with the final result, you can click "Convert" button to finish the conversion work.
Conclusion: When the conversion is done, you can click "Open" to get your generated files. Now, you can edit Panasonic FZ1000 4K MP4/AVCHD in Premiere Pro without any hassles. More related tips:
If You Want to Get Our Weekend Pavtube Special offer,You can Click Here: http://bit.ly/1hmOn34 Source: http://camcordervideoshare.altervista.org/blog/import-fz1000-4k-mp4-avchd-to-premiere/