Now some tips and tricks for Sony PXW-X500 XAVC Files to iMovie/FCE best workflow are listed below. Sony PXW-X500 has a number of updated features, including a three-CCD sensor system capable of 120fps, a range of codecs including XAVC. Now I just got one, how can I make iMovie/FCE work well with the PXW-X500 1080p XAVC videos to make these videos more stylish? XAVC has been created as an open format, giving a license system for other companies within the broadcast and production sector to create their very own good quality and higher frame price merchandise.**However, the latest high definition XAVC/XAVC S video format introduced by Sony--is not supported by iMovie/FCE so far.  To edit Sony PXW-X500 XAVC footage in iMovie/FCE smoothly, the easy workaround is to change the file extention from "XAVC" to "AIC", which is a friendly format supported by iMovie/FCE. Here is an easy and efficient solution for you. I just googled for a software that could do what I need and found a couple of articles that mentioned Pavtube XAVC Video Converter for Mac. With it, I complete the job by **XAVC to iMovie/FCE AIC Conversion perfectly and easily import Sony PXW-X500 XAVC files in iMovie/FCE for editing smoothly without quality loss. Now I will share the easy steps below. Read more: Top 3 Best XAVC/XAVC S Video Converter for Mac Reviews Transcode Sony PXW-X500 XAVC footage to iMovie/FCE editable format Step 1. Launch the Mac XAVC to iMovie/FCE Converter. Click "Add Video" and browse to XAVC clips from PMW-PXW-X500 and the software will add it to file list. Or you may click the "Add Folder" button to import all the XAVC files in the file structure.
 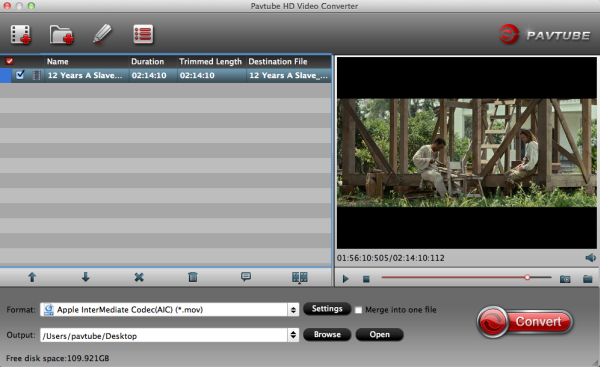 Step 2. Click on "Format" and choose "Apple Intermediate Codec(AIC) (*.mov)" from "iMovie and Final Cut Express" as the best codec for editing Sony PMW-PXW-X500 XAVC file in iMovie/FCE.
 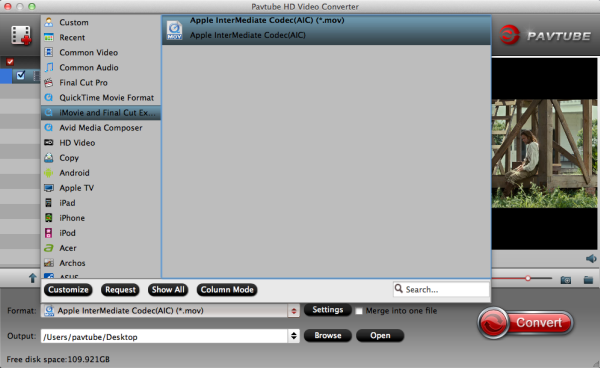 Step 3. Click on "Settings" to redefine output quality. You can also set a different video resolution, frame rate, bitrate, audio channels, etc. For users who would like to retain exactly the same settings (without any quality loss), set target settings the same to source video. Step 4. Click "Convert" to start transcoding Sony PXW-X500 XAVC to AIC for iMovie/FCE editing on Mac. The XAVC to iMovie/FCE Converter for Mac supports batch conversion, so if you have lots of xavc videos to convert, check "Shut down computer after conversion", and you can go away without keeping an eye on it. When the conversion is done, you can find the output files by clicking "Open" button on the main interface, then you can transfer the files to your iMovie/FCE to edit with ease. In addition, Pavtube XVAC Video Converter for Mac can also convert Sony XAVC files to FCP, QuickTime, Avid Media Composer, Avid Xpress Pro, Adobe Premiere Pro, Adobe After Effects, DaVinci Resolve or Apple Aperture 3 compatible video format for editing:
- 1. For FCP and Aperture 3: Click and choose "Final Cut Pro -> Apple ProRes 422(*.mov)" as the output format. FCP 6 only can support ProRes 422 and ProRes 422(HQ) codec. Learn more>>
- 2. For Avid Media Composer and Xpress Pro: Click and choose "Avid Media Composer ->Avid DNxHD(*.mov)" as the best output codec. Learn more>>
- 3. For Adobe Premiere Pro CC/CS and After Effects CC/CS: Click "Adobe Premiere/Sony Vegas", choose "MPEG-2 (*.mov)" or "MOV(AVC)(*mov)" or "WMV (VC-1)(*.wmv)" as the best video format. Learn more>>
- 4. For playing XAVC video on QuickTime: Choose "Common Video -> MOV-QuickTime(*.mov)" as the best video format. Learn more>>
Never miss to get Saving up to $44.1, MXF/MTS/M2TS/MKV/FLV/MOV Converter.etc at PavtubeBundles Deals! 
Some users are in trouble using DivX codec in Sony Vegas, this article will show you the solution to open DivX to Sony Vegas for editing using a DivX Converter. As a Windows based audio video editing program, it stands to reason that Sony Vegas should import, open and play AVI (a common video format under Windows). However, various issues occur when importing, such as vegas pro 10 and Divx issue:  Q1: After upgrading to Vegas Pro 10.0a 64-bit, I can no longer open in the timeline or trimmer any file encoded with the DivX codec. Further, I can no longer customize an .avi render to use the DivX codec. I upgraded the DivX Pro codec to 6.9.2, as part of the DivX Pro 8 bundle. That was no help. Is there some "registration" of the codecs that must be accomplished before Vegas Pro 10.0a will recognize and use them? Q2: I have over 200 AVI files that I want to edit them with Vegas 10, most are divx. However, I can't even import divx files into Vegas! Only the audio content is shown in the timeline. Then I tried Virtualdub and that didn't work either please help. Then how to use DivX codec in Sony Vegas Pro? In fact,Sony Vegas doesn't support DivX codec. That means if you want to import DivX to Sony Vegas Pro for editing, you will be failed. In order to edit your DivX in Sony Vegas smoothly, you should transcode DivX to MPEG-2/WMV format, which is best supported by Vegas Pro. Pavtube Divx Video Converter is the best choice to achieve your goal, I have used this tools for some time, it can deal nearly all kinds of videos filed including DivX files for Sony Vegas Pro easily, that is to convert Divx video to MPEG-2/WMV format, and then you can edit DivX files smoothly in Sony Vegas Pro. Now, we just intro an really good and easy way to help you convert and import your Divx files to Sony Vegas. Step 1. Download DixX to Vegas Pro converter, follow the prompts to install the program. Click "Add" to load DixX video files or directly drag the files into file list. If you want to join several DivX files together, check the "Merge into one file" box. Step 2. Click "Format" bar to determine output format. For smoothly editing in Sony Vegas Pro, you are recommended to choose Adobe Premiere/Sony Vegas -> WMV (VC-1) (*.wmv) or MPEG-2(*.mpg), this format is best for Sony Vegas Pro editing.
  Step 3. If you would like to customize the video and audio parameters, you can click "settings", adjust the parameters as you want, like Video Codec, aspect ratio, bit rate, frame rate, Audio codec, sampling rate, bit rate, channels.
  Step 4. Click "Convert" to start to convert DivX-formatted videos to Sony Vegas Pro. With this DixX to Sony Vegas Pro converter, it becomes easy for you to convert DivX AVI video to Sony Vegas Pro 12 smoothly for editing. Read more:
Good News: Pavtube Studio has announced this new update version. All Win versions have been updated to 4.8.2, which add XAVC, H.265/HEVC decode and encode. What new features have they got? Click here.
Step 4. Click "Convert" to start to convert DivX-formatted videos to Sony Vegas Pro. With this DixX to Sony Vegas Pro converter, it becomes easy for you to convert DivX AVI video to Sony Vegas Pro 12 smoothly for editing. Read more:
Good News: Pavtube Studio has announced this new update version. All Win versions have been updated to 4.8.2, which add XAVC, H.265/HEVC decode and encode. What new features have they got? Click here.  Source: http://digisns.com/2014/12/convert-bandicam-avi-to-sony-movie-studio/
In this article, you will learn the best way to import TiVo TV shows to QuickTime for playback smoothly on Mac Mavericks. Just follow it. You may have recoreded some TV shows and wanna enjoy and share the tivo files in QuickTime with family or friends at home. Howver, the Tivo files are saved by digital video recorders with copyright protection, which make it hard to play Tivo videos in QuickTime. In fact, QuickTime don't support TiVo files. And in that case, you need a Mac TiVo to QuickTime Converter to transcode TiVo to a format that QuickTime can recognize. To convert TiVo to QuickTime on Mac Mavericks successfully and quickly, an easy-to-use yet efficient tool-Pavtube Tivo to QuickTime Converter for Mac is highly recommended. It provides super-fast converting speed and high quality output video. Furthermore, it has optimized presets for QuickTime, which can save your much worry. This guide will show you how to convert Tivo to QuickTime mov for playing with QuickTime on Mac Mavericks.  Before transcoding TiVo shows, you need to transfer recorded TiVo shows from TiVo DVR to your Mac. To transfer TiVo shows to Mac, you need to use a TiVo Desktop Software for Mac. When your TiVo is connected to your home network, Mac TiVo Desktop provides you with a list of available shows for transferring to your Mac. After transfer TiVo files to your Mac, you can free download the Mac TiVo to QuickTime Converter. Install and run the application. Do as follows. Step 1. Import TiVo to the program. First click "Option" button, enter Media Access Key. Then, load TiVo files to the TiVo to QuickTime Converter on Mac,click top left two icons to load individual videos or load the entire folder.
 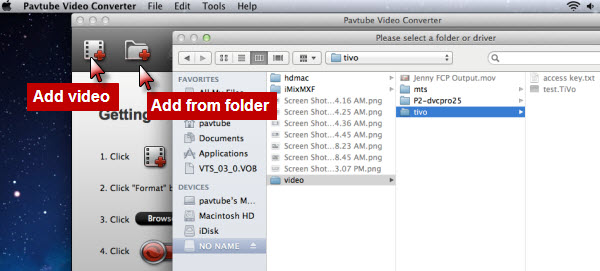 For the first time loading TiVo clips, the program asks "If you'd like to import *.tivo file(s)", please enter the correct Media Access Key and import the file(s) again.
 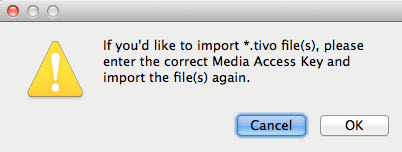 Click "OK", the "Options" dialog box appears. Fill in your Media Access Key, click "OK".
 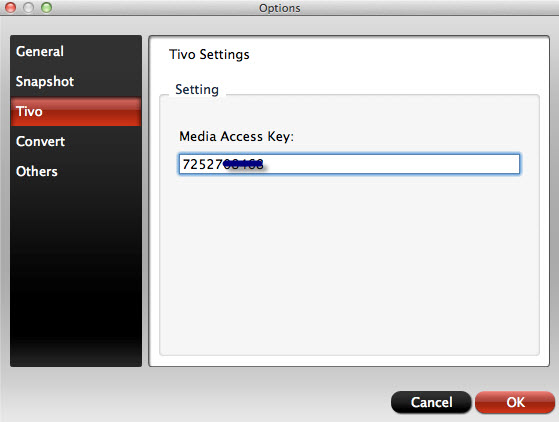 Return to the program and load your .TiVo shows again. If you want, you can merge several Tivo clips by ticking "Merge into one file" box. If the supposed size of the input files is 1GB, then the memory space should be up to 40GB
Step 2. Choose Common Video> MOV-QuickTime(*.mov) as the best video format for playing Tivo footage on QuickTime. 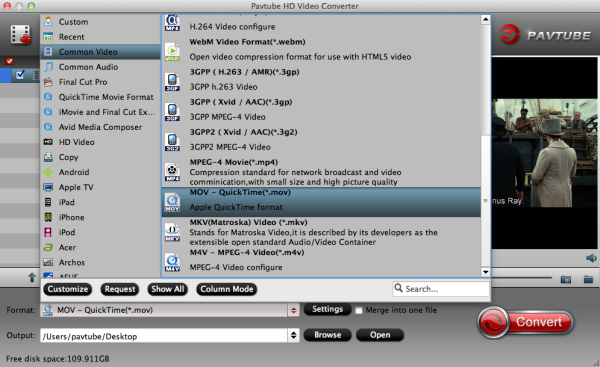 Optional - You can also click "Settings" to change the output video bitrate, frame rate, size, etc. all according to your needs. Step 3. Start TiVo shows to QuickTime MOV conversion on Mac Mavericks. When everything is done, click the "Convert" button at the bottom-right corner to finish the conversion . While you wait,have a coffee or take a nap and let Video Converter for Mac do the work in the background. After conversion, you can click "Open" to find the output quicktime mov file, then you can transfer the video files to QuickTime Player for playback smoothly. Just enjoy and watch .Tivo files with QuickTime in high quality now, just have a try! More Related Guides:
HOOOOOOOOT NEWS: Pavtube 2014 Christmas Biggest Promotion is coming: - Up to 40% off gift: iMixMXF - Pay extra $9.9 to Get Another Converter from pavtube.com/products - Like our Facebook, get 50% off discount: https://www.facebook.com/pavtubefans/app_198826126804423 Expiring on Jan 31, 2015. Time-limited! Never Miss!
Optional - You can also click "Settings" to change the output video bitrate, frame rate, size, etc. all according to your needs. Step 3. Start TiVo shows to QuickTime MOV conversion on Mac Mavericks. When everything is done, click the "Convert" button at the bottom-right corner to finish the conversion . While you wait,have a coffee or take a nap and let Video Converter for Mac do the work in the background. After conversion, you can click "Open" to find the output quicktime mov file, then you can transfer the video files to QuickTime Player for playback smoothly. Just enjoy and watch .Tivo files with QuickTime in high quality now, just have a try! More Related Guides:
HOOOOOOOOT NEWS: Pavtube 2014 Christmas Biggest Promotion is coming: - Up to 40% off gift: iMixMXF - Pay extra $9.9 to Get Another Converter from pavtube.com/products - Like our Facebook, get 50% off discount: https://www.facebook.com/pavtubefans/app_198826126804423 Expiring on Jan 31, 2015. Time-limited! Never Miss!  Source: http://onebestsoft.com/play-videos-on-quicktime/
Hello everyone, I have some great news Pavtube Studio just released updates for all Windows products! This event include:
Pavtube HD Video Converter
Pavtube MTS/M2TS Converter
Pavtube MXF Converter
Pavtube MXF MultiMixer
Pavtube Video Converter
Pavtube MKV Converter
Pavtube FLV Converter
 What's new?
1. Support MXF in XAVC video codec
2. Add H.264 baseline/main/high output profiles
3. Support H.265/HEVC decode
4. Support H.265/HEVC encode
What's new?
1. Support MXF in XAVC video codec
2. Add H.264 baseline/main/high output profiles
3. Support H.265/HEVC decode
4. Support H.265/HEVC encode
see also:
http://www.video-pedia.com/2014/12/25/pavtube-support-h265-hevc-encode-decode/
********************************************************************
Other Good News! Pavtube Bundles Dealsare coming! If you want to import/preserve/mix multi-track MXF in MKV/MP4/MOV formats, get multi-track Apple Prores MOV for further editing in Final Cut Pro (X), the following bundled software is your best choice:
 Video Converter($35) + MXF MultiMixer($45) = $54.9, Save $25.1 (buy link)
Video Converter for Mac($35) + iMixMXF($45) = $54.9, Save $25.1 (buy link)
MXF MultiMixer/iMixMXF Key Features:
-Import/preserve/mix multi-track MXF in MKV/MP4/MOV formats.
-Output multi-track Apple Prores MOV for further editing in Final Cut Pro (X).
-Support DVCPRO/HDV/Avid DNxHD/AIC output
-Convert MXF to any other formats for editing, playing, or broadcasting.
-Merge/split/trim/crop MXF footages.
Video Converter for Windows/Mac Key Features:
-Convert from and to any common SD/HD video and audio format.
-Support Apple ProRes/DVCPRO/HDV/Avid DNxHD/AIC encoding.
-Output formats for Windows/Mac editing software, e.g. FCP, iMovie, FCE, Avid, Adobe Premiere, Sony Vegas Pro, etc.
-Output formats for different playback devices, hdtv, hd media players, etc.
Go ahead and click the link to get your coupon. Save up to $44.1! Never miss!!!
********************************************************************
Good News Two! Pavtube 2014 Christmas promotional activities began! Just click "Share on Facebook" button, insert "#PavtubeChristmas2014",choose "Public", and click "Share Link". Then send us the screenshot by email to videowinsupport@pavtube.com or videomacsupport@pavtube.com, you will receive a 50% OFF discountlink of any converter from Pavtube within 24 hours on week days. Please do not forget to invite your families and friends to join in, and we'll appreciate your action! The event link is:http://www.pavtube.com/christmas-2014-specials.html
Video Converter($35) + MXF MultiMixer($45) = $54.9, Save $25.1 (buy link)
Video Converter for Mac($35) + iMixMXF($45) = $54.9, Save $25.1 (buy link)
MXF MultiMixer/iMixMXF Key Features:
-Import/preserve/mix multi-track MXF in MKV/MP4/MOV formats.
-Output multi-track Apple Prores MOV for further editing in Final Cut Pro (X).
-Support DVCPRO/HDV/Avid DNxHD/AIC output
-Convert MXF to any other formats for editing, playing, or broadcasting.
-Merge/split/trim/crop MXF footages.
Video Converter for Windows/Mac Key Features:
-Convert from and to any common SD/HD video and audio format.
-Support Apple ProRes/DVCPRO/HDV/Avid DNxHD/AIC encoding.
-Output formats for Windows/Mac editing software, e.g. FCP, iMovie, FCE, Avid, Adobe Premiere, Sony Vegas Pro, etc.
-Output formats for different playback devices, hdtv, hd media players, etc.
Go ahead and click the link to get your coupon. Save up to $44.1! Never miss!!!
********************************************************************
Good News Two! Pavtube 2014 Christmas promotional activities began! Just click "Share on Facebook" button, insert "#PavtubeChristmas2014",choose "Public", and click "Share Link". Then send us the screenshot by email to videowinsupport@pavtube.com or videomacsupport@pavtube.com, you will receive a 50% OFF discountlink of any converter from Pavtube within 24 hours on week days. Please do not forget to invite your families and friends to join in, and we'll appreciate your action! The event link is:http://www.pavtube.com/christmas-2014-specials.html

Using MXF footage on FCP is a big problem for people that are not familiar with the MXF format. If you're a FCP and Sony PMW-200 camcorder user, we'll recommend using iMixMXF to transcode PMW-200 XDCAM MXF to ProRes HQ 422 encoded MOV files preserving multiple tracks and channels, so as to import the MXF footage to FCP for editing. A camcorder can record the persons you may have met, and record your friends' and family's smile. Additionally, it might help you remenber the location you may have been, any time you develop older you may appear back the your younger time. This really is good point to the majority of us, so get a camcorder is cool factor. Let's possess a appear at Sony XDCAM PMW-200. The PMW-200 can record in HD442, HD440 and DVCAM formats, which implies that it can be completely compatible with all previous and present XDCAM workflows, and either UDF or FAT file formats is often applied with suitable recording media. A range of recording formats for instance 50Mbps/35Mbps MXF, 35Mbps/25Mbps MP4 and DVCAM are readily available for any wide array of applications and workflows.  As the PMW-200 records MPEG HD422 codec MXF format, it's not well for editing in FCP on Mac Mountain Lion 10.8, you will encounter importing/video/audio problems when you want to import Sony XDCAM MXF to FCP on Mac, the best way is to transcode Sony PMW-200 MXF to Apple ProRes 422 HQ codec MOV format, here you can try Pavtube iMixMXF, it has presetted output format for FCP with ProRes 422 HQ codec. As a professional MXF Converter, Pavtube iMixMXF provides your requirements for preserving and mixing MXF multi-tracks/channels, converting Sony PMW-200 XDCAM MXF files to Apple ProRes MOV for FCP preserving multiple tracks and channels. Apart from multi-track preserving, Pavtube iMixMXF can also mix multi tracks into one track. This feature help you mix the audios of interviewer, interviewee, surroundings, or editors'/directors' comments into one. It also features multi-track MKV/MP4/MOV video formats and various popular formats for professional editing in editing programs (e.g. FCE, iMovie, Adobe Premiere Pro CC/CS, Avid Media Composer, iPhoto, DaVinci Resolve, Kdenlive, Keynote, etc.), and free playback on Mac/iOS/Android/Windows devices, HDTV, HD Media Players, PS4, PS3, PSP, etc. (See also: 2015 Top 5 Excellent MXF Converter for Mac Review) Official Download: http://www.pavtube.com/imixmxf-mac/ Softonic Download: http://pavtube-imixmxf.en.softonic.com/mac Soft32 Download: http://pavtube-imixmxf.soft32.com/ User's testimonial "I am using a trial version of the iMixMXF to convert 50Mbps 1920X1080 23.98 MPEG HD422 XDCAM material shot on a Sony PMW-200 to ProRes HQ 422 .mov files. The computer is a 2.66 GHz Intel Core 2 Duo MacBook pro running OS 10.6.8 with 4GB ram. I loaded from a folder and I clicked the option to transfer all the files in the folder. For 22GB of material the transcoding time is very short, thank yor for your recommendation." Here's the main interface:
 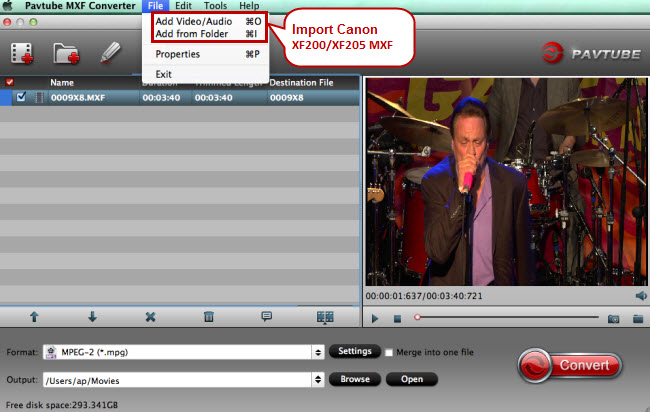 With this software, you can directly convert Sony PMW-200 MXF to multi-track ProRes 422 HQ for output. Here is the output profile.
 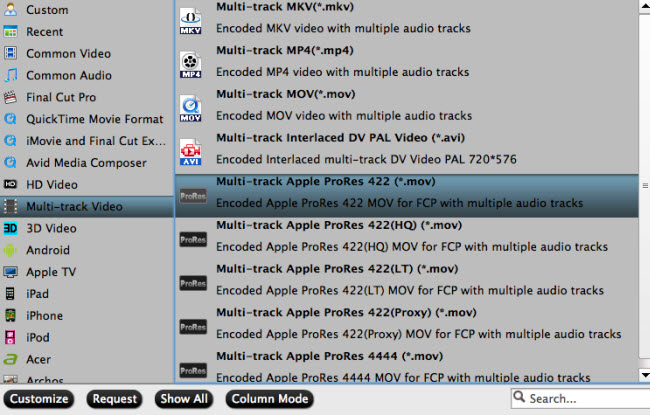 You are available to choose rich formats for output. Don't hesitate, just have a try! HOOOOOOOOT NEWS: Pavtube 2014 Christmas Biggest Promotion is coming: - Up to 40% off gift: iMixMXF - Pay extra $9.9 to Get Another Converter from pavtube.com/products - Like our Facebook, get 50% off discount: https://www.facebook.com/pavtubefans/app_198826126804423 Expiring on Jan 31, 2015. Time-limited! Never Miss! Other realted guides for you:
Summary: If you have the common "iMovie no sound problem" issue, your iMovie project appears to be missing one or more audio tracks when you play, import, or export a project, just read this article, you will find the best solution here.  Q1: Want to edit in imovie and there is no audio! Can't get it to play full screen. Won't open. Wont show clip in viewer either. I have tried restarting imovie. havee restarted Macbook pro) Q2: Completed my first movie in iMovie '11 and I'm having an audio problem. Searched and found many audio problems in iMovie-- too bad because it's a pretty easy program to work with! Q3: I'm making a movie on my Mac Mini and I am struggling with this audio bug using iMovie 11. I'm seeing this issue that I cannot solve. Any clues here? Thanks in advance. As above, "iMovie no sound" is a common problem asked by many mac users. What's the problem? This may lie in the unsupported codec and format of the video files that imports into iMovie. From Apple forum we know that many common vidoe codes and formats are not a suitable and native for iMovie, so you are suggested to transocde all kinds of videos to AIC (Apple Intermediate Codec), the favorite editing codec of iMovie in advance. This may be te easy solution! Pavtube HD Video Covnerter for iMovie can fix this iMovie no sound, which supports converting videos for using in iMovie with no limition. You can do it on All major Mac OS X operating systems, like Mountain Lion, Lion, Snow Leopard, Mavericks 10.9 and latest Yosemite. (Top 5 Best HD Video Converter for Mac Review) Steps: Convert and import videos to iMovie without losing sound issue Step 1: Run Pavtube HD Video Converter for Mac and video clips to it You can click either "Add Video" button or "Add from folder" button to load source files. If you want to combine the loaded video clips into one file, simply tick off the checkbox before "Merge into one file".
  Step 2: Select "Apple InterMediate Codec (AIC) (*.mov)" as target format In order to convert video to AIC for use in iMovie, simply hit "Format" menu and follow "iMovie and Final Cut Express" > "Apple InterMediate Codec (AIC) (*.mov)". See also: How to preserve multiple audio tracks for FCP X?
 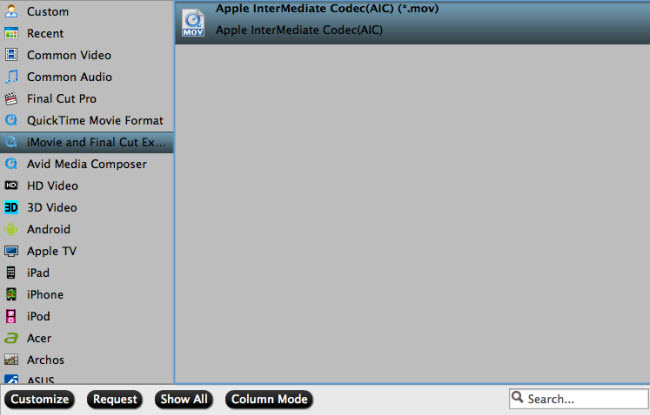 Settings:
 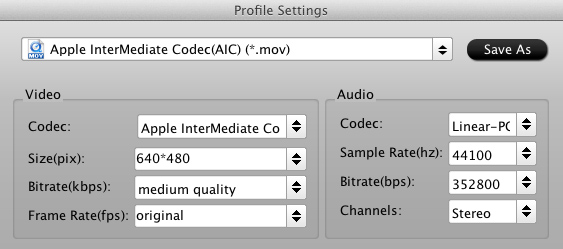 Step 3: Start all kinds of videos to AIC MOV conversion Click the big button "Convert" to start all kinds of videos to AIC Conversion. As soon as the conversion is completed, you are able to click "Open" button to get the generated AIC MOV files for use in iMovie. Step 4: Import converted videos to iMovie. Launch iMovie, and then choose "File > Import > Movies" to import the converted videos to iMovie for further editing. The audio of the video file will ok in iMovie and you will not have any "iMovie no sound" problem. Now you you can edit you video projects in iMovie without any hassle. Find more iMovie Solutions here. Read also:
Good News! On December 25, 2014, Pavtube Studio has announced this 2014 Christmas Deal, to celebrate this biggest festival in the end of the year. In order to let customers enjoy better about this fascinating holiday with Pavtube , special offers and 100% off discount is available on this page. Customers who interested in photography or movie making can benefit from this special event page.
Step 3: Start all kinds of videos to AIC MOV conversion Click the big button "Convert" to start all kinds of videos to AIC Conversion. As soon as the conversion is completed, you are able to click "Open" button to get the generated AIC MOV files for use in iMovie. Step 4: Import converted videos to iMovie. Launch iMovie, and then choose "File > Import > Movies" to import the converted videos to iMovie for further editing. The audio of the video file will ok in iMovie and you will not have any "iMovie no sound" problem. Now you you can edit you video projects in iMovie without any hassle. Find more iMovie Solutions here. Read also:
Good News! On December 25, 2014, Pavtube Studio has announced this 2014 Christmas Deal, to celebrate this biggest festival in the end of the year. In order to let customers enjoy better about this fascinating holiday with Pavtube , special offers and 100% off discount is available on this page. Customers who interested in photography or movie making can benefit from this special event page.  Source: http://1080p-video-tool.blogspot.com/2013/07/solve-imovie-no-sound-problem.html
Handycam is a Sony brand used to market its camcorder range, including HDR-XR350V, HDR-CX350V,HDR-CX300, HDR-XR200V, HDR-XR520V, HDR-FX1000, HDR-CX520V, HDR-FX7, etc. Sony Handycam records High Definition video in record AVCHD MTS file format, which is a high-definition MPEG, AVC, H.264 transport stream video file format.  When you captured the shootings, the first thing you may try to do is transfer those AVCHD .mts clips from Sony Handycam to Windows/Mac, and then enjoy it. Here shows the instruction about Sony Handycam video transfer: 1. Connect your camcorder to your computer through the USB or firewire port. Note: Older camcorders will typically use firewire while more recent camcorders typically use USB 2.0. Your camcorder will come with the appropriate cable to connect it. 2. Put your camcorder in "play" mode. The switch on your camcorder should be directly beside where you power it on to record videos. You are almost done! However, if you want to play the mts files from Handycam camcorder on most computers or Android/IOS/Windows 8 devices and share them with others on Youtube or Vimeo, the most effective method is to convert Sony Handycam .MTS to .MP4 format on Windows/Mavericks, which is recognizable and compatible with virtually all media player, operating systems and protable devices. Pavtube Video Converter - The champion of easiest and fastest conversion. The top Sony Handycam MTS to MP4 converter program that makes the process easy and give you files that are playable on any portable device you can choose, which can help you convert MTS from your Handycam camcorder to MP4, and convert videos from your computer or downloaded from the Internet to target readable format in which you want the video to be played. Just import the video, pick your preferred format, and hit convert, and you're ready to transfer that video to your mobile device, or upload to Youtube/Vimeo. It's an easy job to personalize videos and make them special and different. You can merge multiple MTS video files into one singe long MP4 video, add your own audio/subtitle/watermark to your video, clip or crop video and add special effects. The Top-ranked Video Converter is also able to extract audio from video files and save into MP3, AAC, WMA, OGG, Apple Lossless Audio and more formats. And it supports converting audio files directly as well! If you are still seeking a easy and fast conversion, Pavtube Video Converter will be the best choice. For Mac user, please try Video Converter for Mac. Guide to convert Sony Handycam AVCHD videos on MP4 for playback and sharing 1. Install and run the best Sony Handycam MTS to MP4 Converter, choose the one according to your operating platform. Transfer Sony HandyCam video to hard drive, and then click "Import" to add the mts files you need into the program.
 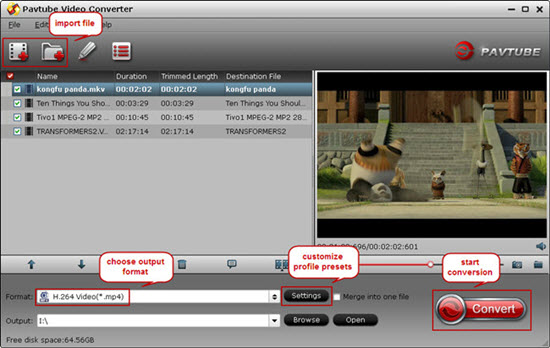 Note: This great Sony Handycam MTS Video Converter is GPU video card enabled, which means you could encode or decode source videos by ticking off below one or two buttons to accelerate largely accelerate video encoding speed when transcoding/converting/ripping video files from one format to another by using H.264 codec.
  2. Click "Format" column and choose the output format, you can choose MP4 format for output. This is the perfect format for playing on Tablets/Smartphones and sharing on website.
  Note: In case you cannot find the perfect format for your device, this video converter offers several common profiles for Android and Windows devices so that you could still play HD videos on your smartphone or tablet with small profile adjustments.
  3: Click settings button to adjust the output video's parameters, such as bitrate, resolution, etc. 4. You can edit the Sony Handycam MTS videos in this program before converting to other formats on Windows 10, Windows 8.1/8. Trim, crop, add watermark or adjust effect as you want.
  5. Start converting Sony HandyCam AVCHD video to MP4 for Win/Mac Mavericks. In this way, you can convert Sony handycam recorded MTS footages to playback or sharing. Please take a try now, hope it will do a great favor for you. You can find more related guides in Sony Column. Overall, it's a good program, and worth checking out if you often want to convert video files to play on other devices, tv, media players or edit video in Avid Media Composer, Adobe Premiere, Pinnacle Studio, Windows Movie Maker, Sony Vegas Pro 13, Sony Movie Studio 13 Platinum, Avid Xpress Pro, MAGIX Movie Edit Pro HD, Corel VideoStudio Pro, Cinelerra, Sorenson Squeeze and so on. See also:
Good News! Pavtube Bundles Dealsare coming! If you want to import/preserve/mix multi-track MXF in MKV/MP4/MOV formats, get multi-track Apple Prores MOV for further editing in Final Cut Pro (X), the following bundled software is your best choice: Video Converter($35) + MXF MultiMixer($45) = $54.9, Save $25.1 (buy link) Video Converter for Mac($35) + iMixMXF($45) = $54.9, Save $25.1 (buy link) MXF MultiMixer/iMixMXF Key Features: -Import/preserve/mix multi-track MXF in MKV/MP4/MOV formats. -Output multi-track Apple Prores MOV for further editing in Final Cut Pro (X). -Support DVCPRO/HDV/Avid DNxHD/AIC output -Convert MXF to any other formats for editing, playing, or broadcasting. -Merge/split/trim/crop MXF footages. Video Converter for Windows/Mac Key Features: -Convert from and to any common SD/HD video and audio format. -Support Apple ProRes/DVCPRO/HDV/Avid DNxHD/AIC encoding. -Output formats for Windows/Mac editing software, e.g. FCP, iMovie, FCE, Avid, Adobe Premiere, Sony Vegas Pro, etc. -Output formats for different playback devices, hdtv, hd media players, etc. Go ahead and click the link to get your coupon. Save up to $44.1! Never miss!!!
5. Start converting Sony HandyCam AVCHD video to MP4 for Win/Mac Mavericks. In this way, you can convert Sony handycam recorded MTS footages to playback or sharing. Please take a try now, hope it will do a great favor for you. You can find more related guides in Sony Column. Overall, it's a good program, and worth checking out if you often want to convert video files to play on other devices, tv, media players or edit video in Avid Media Composer, Adobe Premiere, Pinnacle Studio, Windows Movie Maker, Sony Vegas Pro 13, Sony Movie Studio 13 Platinum, Avid Xpress Pro, MAGIX Movie Edit Pro HD, Corel VideoStudio Pro, Cinelerra, Sorenson Squeeze and so on. See also:
Good News! Pavtube Bundles Dealsare coming! If you want to import/preserve/mix multi-track MXF in MKV/MP4/MOV formats, get multi-track Apple Prores MOV for further editing in Final Cut Pro (X), the following bundled software is your best choice: Video Converter($35) + MXF MultiMixer($45) = $54.9, Save $25.1 (buy link) Video Converter for Mac($35) + iMixMXF($45) = $54.9, Save $25.1 (buy link) MXF MultiMixer/iMixMXF Key Features: -Import/preserve/mix multi-track MXF in MKV/MP4/MOV formats. -Output multi-track Apple Prores MOV for further editing in Final Cut Pro (X). -Support DVCPRO/HDV/Avid DNxHD/AIC output -Convert MXF to any other formats for editing, playing, or broadcasting. -Merge/split/trim/crop MXF footages. Video Converter for Windows/Mac Key Features: -Convert from and to any common SD/HD video and audio format. -Support Apple ProRes/DVCPRO/HDV/Avid DNxHD/AIC encoding. -Output formats for Windows/Mac editing software, e.g. FCP, iMovie, FCE, Avid, Adobe Premiere, Sony Vegas Pro, etc. -Output formats for different playback devices, hdtv, hd media players, etc. Go ahead and click the link to get your coupon. Save up to $44.1! Never miss!!!
This guide introduces the quickest and easiest way to convert TS video to MP4 format, so that you can play TS video on portable devices and media players freely.  What is TS file? TS is abbreviations for Transport Stream, which is specified in MPEG-2. And it is a standard format for transmission and storage of audio, video, and data, and is used in broadcast systems such as DVB and ATSC. Transport stream specifies a container format encapsulating packetized streams, with error correction and stream synchronization features for maintaining transmission integrity when the signal is degraded. What problems we have with .ts video files? Hi, I am looking for a tool able to convert some ts files to mp4. These ts files contain a H264 (mpeg4 avc) video stream and a AAC sound track. Only the ts container shall be converted to mp4, not the video nor audio stream which shall stay untouched. I tried many tools but all of them encode the video and audio stream. avidemux should be able to do the job since there is an option "copy" for both video and audio but unfortunately it always crashs. Any great program recommended? And how to encode these videos without de-synchronisation. As .ts is not compatible with many portable devices and media players, if you would like to easily playback these .ts video files you have recorded, you'd better transcode these TS videos to a common format which is suitable for watching, like the MP4 format. Software required: To convert your TS file to MP4 format, I recommend this TS Video Converter, which is exactly the software specially made for compressing/encoding TS file to MP4 file format for most players quickly and easily and with excellent video quality. You can also edit TS video before TS to MP4 conversion, you can trim TS videos, join TS videos together, increase the volume of TS files, increase the video quality of TS files, rotate TS files, add effect/watermark/subtitles to TS video and etc. Becides that, it's capable of converting TS to MKV, convert TS to AVI, convert TS to WMV, convert TS to MPEG, convert TS to FLV, convert TS to VOB, convert TS to DivX, convert TSV to AVI, and convert TS files to many other video formats. The nice TS to MP4 Converter can also convert TS to MP3, ALAC, AIFF, FLAC, OGG and more, it's easy of use and choices for decode/encode to all popular formats. With the professional TS to MP4 Converter, you can easily play TS files in iTunes, QuickTime, iPad, iPhone, Surface, Android, Windows Media Player, upload TS files to YouTube and edit TS files in Sony Vegas Pro, Avid, Premiere, Windows Movie Maker, etc. Note: its Mac version is renamed as TS Video Converter for Mac. Now download TS to MP4 Converter, install and run it. And then follow the steps below: Guide: Convert TS format to MP4 format Mac without losing the video quality Step 1: Launch Pavtube Video Converter Ultimate; import .ts video. Free download the best TS to MP4 Converter and run it to add the TS footages.
 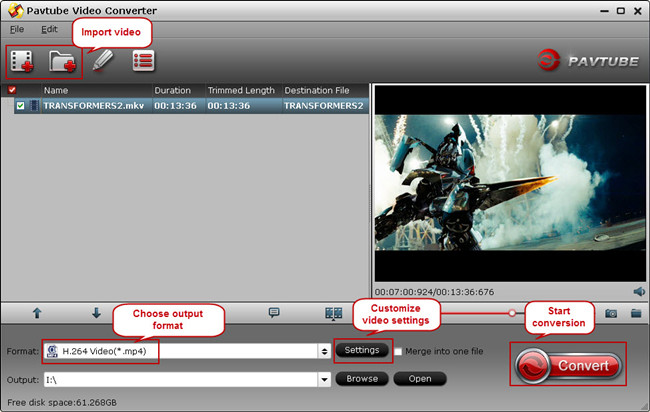 Step 2: Choose format. Hit "Format" drop-down list and choose "HD Video> H.264 HD Video(*.mp4)" as the most widely used format for playback on smartphones, tablets and media players.
 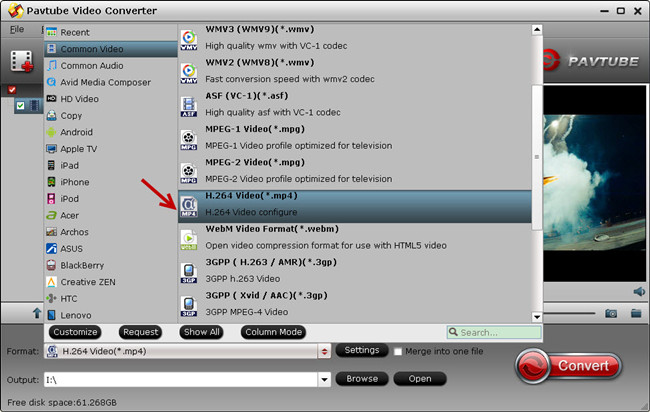 Step 3: Adjust output settings (Optional) You can click "Settings" (besides "Format") to change target video size, bitrate, frame rate and other specs. Change the size to "Original" to get full size picture that can be playback clearly. And the higher bitrate you choose, the better video quality will be. Step 4: Start the TS to MP4 conversion. Back to the main interface and hit the "Convert" to start converting TS to HD MP4 on your PC/Mac; this converter will start all the tasks in batch. Wait for a while till the conversion completed; click "Open output folder" to quick locate the converted files. Now play the converted .mp4 movies on you device and share them with your family and friends. Have a good time! See Also:
HOOOOOOOOT NEWS: Pavtube 2014 Christmas Biggest Promotion is comeing ----------Up to 40% off gifs, --------Pay extra $9.9 to Get Another Video Converter, --------Facebook 50% off discount, take a look at Pavtube 2014 Christmas Deals. The most popular software is at 50% off Discount expiring on Jan 10, 2015. Time-limited! Never Miss! Good News! Pavtube 2014 Christmas promotional activities began! Just click "Share on Facebook" button, insert "#PavtubeChristmas2014",choose "Public", and click "Share Link". Then send us the screenshot by email to videowinsupport@pavtube.com or videomacsupport@pavtube.com, you will receive a 50% OFF discountlink of any converter from Pavtube within 24 hours on week days. Please do not forget to invite your families and friends to join in, and we'll appreciate your action! The event link is:http://www.pavtube.com/christmas-2014-specials.html source:http://videostepconvertmap.blogspot.com/2014/12/how-do-i-convert-ts-files-into-mp4-for.html
Step 3: Adjust output settings (Optional) You can click "Settings" (besides "Format") to change target video size, bitrate, frame rate and other specs. Change the size to "Original" to get full size picture that can be playback clearly. And the higher bitrate you choose, the better video quality will be. Step 4: Start the TS to MP4 conversion. Back to the main interface and hit the "Convert" to start converting TS to HD MP4 on your PC/Mac; this converter will start all the tasks in batch. Wait for a while till the conversion completed; click "Open output folder" to quick locate the converted files. Now play the converted .mp4 movies on you device and share them with your family and friends. Have a good time! See Also:
HOOOOOOOOT NEWS: Pavtube 2014 Christmas Biggest Promotion is comeing ----------Up to 40% off gifs, --------Pay extra $9.9 to Get Another Video Converter, --------Facebook 50% off discount, take a look at Pavtube 2014 Christmas Deals. The most popular software is at 50% off Discount expiring on Jan 10, 2015. Time-limited! Never Miss! Good News! Pavtube 2014 Christmas promotional activities began! Just click "Share on Facebook" button, insert "#PavtubeChristmas2014",choose "Public", and click "Share Link". Then send us the screenshot by email to videowinsupport@pavtube.com or videomacsupport@pavtube.com, you will receive a 50% OFF discountlink of any converter from Pavtube within 24 hours on week days. Please do not forget to invite your families and friends to join in, and we'll appreciate your action! The event link is:http://www.pavtube.com/christmas-2014-specials.html source:http://videostepconvertmap.blogspot.com/2014/12/how-do-i-convert-ts-files-into-mp4-for.html
Fall in trouble when editing Sony 4K XAVC videos in Premiere Elements 13? If so, follow the easy workaround here. Adobe Premiere Elements with stunning features is popular video editing software for us. The point here, sometimes, you will find it's a painful experience when loading Sony 4K XAVC files into Premiere Elements 13. And there are some frequently asked question quoted as below.  Q1: Does Premiere Elements 13 Support 4K video? Somehow my previous question disappeared. Does this program support 4K to burn to 4K Blu Rays? Q2: Sony F55 4K XAVC footage to Premiere Elements 13 crash? I've tried to get some 4K XAVC footage from an F55 to work in Premiere Elements 13. It imports, but when I try to do anything with it, it crashes. As far as I know, Premiere Elements 13 has project presets for the video with the resolution of 3840 x 2160 (a 4K resolution) under NTSC only. It also offers export of the 3840 x 2160 resolution under Publish+Share/Computer/XAVC-S. However, there is no burn to Blu-ray with any 4K resolution. The compatibility between 4K videos and Adobe Premiere Elements is still an unsolved mystery in that some persons can import 4K videos into Elements, while the others can not: On the one hand, the computer configuration and operation environment should play an important role on this aspect. On the other hand, bypassing 4K issue, XAVC, as a newly high compressed video format, is not supported by most NLEs, including Premiere Elements, FCP, iMovie, Avid Media Composer, iPhoto, etc. So to get rid of the issue, the first step we need to do is to make 4K XAVC files editable in Premiere Elements 13. Here we suggest you give a go with Pavtube XAVC Video Converter for Mac or Windows which work smoothly in converting Sony 4K XAVC to a more "edit" friendly codec for Premiere Elements 13 like MPEG-2/AVC MOV. The most attractive thing is that it can downscale your 4K videos into common 1080p so that NLEs can afford well. If you're troubled by the similar problem, just download the right version and follow the guide below to start conversion. (Learn more: Top 3 Best XAVC/XAVC S Video Converter for Mac Review) Before processing: Back up/Transfer the 4K XAVC footage to Mac computer - copy the whole video folder to your computer hard drive, not just the individual .xavc files. Step 1. Install Launch the Mac XAVC to Premiere Elements Converter. Click "Add Video" and browse to Sony XAVC clips and the software will add it to file list. Repeat the operation to load multiple XAVC videos. Or you may click the "Add Folder" button to import all the XAVC files in the file structure.
  Step 2. Click on "Format" and choose "MPEG-2 (*.mpg)" or "MOV(AVC) (.mov)" from "Adobe Premiere/Sony Vegas> " as the best codec for editing Sony 4K XAVC in Premiere Elements 13. What's more, you can also transcode XAVC to FCP, iMovie, Davinci Resolve, Avid for editing or to QuickTime and various multimedia devices for playback.
  Step 3. Click on "Settings" to redefine output quality. You can also set a different video resolution (1920x1080/1440x1080/1280x720/720x480), frame rate (24p/30p), bitrate, audio channels, etc. For users who would like to retain exactly the same settings (without any quality loss), set target settings the same to source video. Step 4. Click "Convert" to start transcode 4K XAVC to MPEG-2/MOV for Premiere Elements 13 editing on Mac/PC. Once you get the converted .MOV/.MPG file, you can import videos to Premiere Elements. Now you can edit your Sony 4K XAVC videos in Premiere Elements 13 with ease. Read Also:
Good news! Pavtube Bundles Deals are coming! It's a time for taking a break from work and relaxing. And now you can enjoy your colorful time with good featured products at "Pavtube Bundles Deals". Go ahead and click the link to get your coupon. Save up to $44.1! Never miss!!! MTS/M2TS Converter for Mac($29) + MXF Converter for Mac($29) = Only $29.9 MTS/M2TS Converter for Mac($29) + MKV Converter for Mac($29) = Only $29.9 MTS/M2TS Converter for Mac($29) + FLV/F4V Converter for Mac($29) = Only $29.9 iMixMXF($45) + HD Video Converter for Mac($35) = Only $54.9 ......
Does iMovie 11 properly handle 60fps video now? If you are currently having 60fps files and iMovie import issue, the post will tell you why iMovie not importing 60fps HD videos and offer the best and fasest solution.  Got one camcorder, like Sony NEX-5N, NEX7, A99, A65, Panasonic HC-V720, HDC-TM90 to record 1920*1080 Full HD MTS footage up to 60fps (50fps for PAL) and have met the incompatible erros when you tried importing 60fps videos to iMovie 8/9/11 for further editing? From googling, we find many users have the same issues: Question1. "Whilst away snowboarding on my most recent trip, I recorded most days in 720p / 60fps (as it looks ultra smooth) and have just over 54Gb of footage; divided into five folders on my iMac (one for each day) with about 20 .mp4 files in each one. I assumed I could put together something decent on iMovie 11. Some Googling revealed that iMovie 10 does not support 60FPS. Is that right? And then how to get imovie easily working with these 60fps video? Any help would be appreciated." Qustion 2. "I am a novice iMovie 11 user. I have footage in a 60fps camera that I imported into iMovie. When I import it, either with or without optimization, the video is very jumpy and the audio doesn't time with the footage at all. But 30fps footage imports into iMovie correctly. Is there any way to import the 60fps video correctly so that I don't have this problem, even if it means downgrading the quality?" In fact, iMovie can't support the format 1080p@60fps because it is a nonstandard frame rate. If you want to natively ingest and edit the 60fps videos in iMovie, you have to firstly transcode 60fps footage it to a compatible frame rate with a native format by iMovie, like AIC. It means that you have to use a professional HD Video Converter for Mac to encode the 60fps video to Apple IntermediateCodec(AIC) yourself at 60p, and iMovie will let you edit a 24p or 30p project. Note that even if you shift your footage to AIC at 60p, iMovie will downgrade it to 24fps or 30fps on export (depending on what you chose), but it still doesn't look bad at all. It will just use the extra frames to make it smoother. If you shoot in 60fps and slow it down to 30fps, you are still using 30 frames to fill 30 frames. It will be much smoother. If you attempt to transcode 60p video to AIC for using with iMovie, we would recommend Pavtube HD Video Converter for Mac - Top 60fps HD Video to iMovie Converter. Main features: This software is best Mac HD Video Converter that can transcode any kinds of HD Video files to Apple InterMediate Codec (AIC), Apple ProRes 422 codec, DNxHD codec, MPEG, WMV, AVI, MOV, etc. for puting into iMovie, FCP, Adobe, Avid, iPhoto, DaVinci Resolve, Kdenlive, Keynote, Aperture 3, etc. NLE's for editing, and enables users to custom video and audio settings like frame rate, bit rate, resolution, sample rate and audio channel at will. These output formats are specially presetted, so the conversion quality is guaranteed, you can get lossless video conversion with this tool. (Learn more:Pavtube HD Video Converter for Mac 3.6.1 Review) Here is step by step guide: How to get 1080p/60fps videos to iMovie for editing? Step 1. Download, install and launch this 60fps HD Video to iMovie Converter. Import the 60fps footage to the Mac converter by clicking the "Add Video" or "Add from folder" button.
  Step 2. Click "format" bar to choose the output format. If yo want to edit 1080 60fps video in iMovie 8/9/11, please choose iMovie and Final Cut Express -> Apple InterMediate Codec(AIC) (*.mov). This is best format for iMovie editing on Mac, once converted, you won't need to render.
  Step 3. You can click "Settings" to customize the output parameters, adjust the resolution, bitrate as you want. To export 60p video, simply set the video frame rate at 60p; to export 30p video, simply set the video frame rate at 30p. Step 4. Click "Convert" button to start converting 1080p 60fps video to AIC .mov - the best suited editing format for using within Apple iMovie Version 11, 8, or 9. After the conversion, you can import footages to iMovie. It's just a piece of cake to edit 60fps HD video files in iMovie? Just have a try! Good luck, and let us know if your problem is fixed. ;-) Also read:
Source: http://handycameratips.jimdo.com/2014/12/10/edit-60fps-video-in-imovie/
Step 3. You can click "Settings" to customize the output parameters, adjust the resolution, bitrate as you want. To export 60p video, simply set the video frame rate at 60p; to export 30p video, simply set the video frame rate at 30p. Step 4. Click "Convert" button to start converting 1080p 60fps video to AIC .mov - the best suited editing format for using within Apple iMovie Version 11, 8, or 9. After the conversion, you can import footages to iMovie. It's just a piece of cake to edit 60fps HD video files in iMovie? Just have a try! Good luck, and let us know if your problem is fixed. ;-) Also read:
Source: http://handycameratips.jimdo.com/2014/12/10/edit-60fps-video-in-imovie/
If you are a devoted in FCP video editors, whether to encounter the following problems: XAVC S footage and FCP 7 incompatibility? Problems working XAVC videos with Final Cut Pro X? Importing MKV video into Final Cut Pro X but without success? Error when logging and transferring MXF files in FCP? Can't import AVHCD files into FCP 7? Final Cut Pro X Blu-ray export failure? After importing .MOV File into FCP 7 It Shows Up as "Narrow" with Black Space on Either Side? Can't open AVI Files in Final Cut Pro X? Fortunately, there are some easy way to fix the issues. Let's find them out here.  See also: How to Connect Your Camcorder To Final Cut Pro? Question 1: Sony A7S XAVC S footage and FCP 7 Workflow "Has anyone worked with media from the Sony A7S camera. Looking for some tips regarding post workflow and getting the media into FCP 7.
Import XML isn't working, it asks for a navigational file and gives us an error.
I have h264/mpeg4s of the footage which I'd rather not use since its a compressed codec that doesn't always get along with fcp.
Any and all advice is welcome and appreciated." Answer: You can work natively with the XAVC S codec in FCP X without transcoding, but not in FCP 7 as far as I know. The basic reason why we can't work Sony A7S XVAC S with Final Cut Pro is that XAVC S codec is a new one, and is not widely supported. To make the XAVC S compatible with FCP, the easy workaround is to convert XAVC S to ProRes MOV, which ensures best results when using in Final Cut Pro 7. Pavtube HD Video Converter for Mac is the solid tool to help users make the XAVC S to ProRes transcoding on Mac OS X. With it, you effortlessly encode/re-encode XAVC S intra footage shot from Sony A7S to FCP 7 highly compatible ProRes MOV, ensuring maximum editing quality and efficiency when working with Final Cut Pro X or FCP 7. Besides, it also convert XAVC/XAVC S videos to iMovie, Adobe Premiere Pro CC/CS, After Effects CC, Premiere Elements, FCE, Aperture 3, Avid Media Composer, DaVinci Resolve, iPhoto, Kdenlive, Keynote editable formats. Chances are you already installed this great free utility. If not, download it it from here. Below are the steps on converting XAVC S to ProRes MOV for FCP.
Question 2: How to load Avid MXF to FCP 6 for editing "I have some Avid recorded MXF files and need to keep it deinterlaced, then edit in FCP6. What's the most efficient work flow for this?" Answer: FCP 6 does not support MXF files directly, so you are suggested to try a third party converter: the Mac MXF Converter to transcode MXF to Apple ProRes MOV for FCP with best video quality. It enables editing before conversion and you can check the deinterlacing there.
Question 3: Extract multi-track clip from Blu-ray for FCP editing "I want to extract a small clip from my blu-ray and edit it in FCPX, is there anyway to keep all my audio tracks?" Answer: to output a clip of blu-ray with all the audio tracks saved, you are suggested to try Pavtube ByteCopy for Mac for that it's able to output multi-track ProRes for FCP; also you can keep all the subtitles preserved in the converted video in best quality.
Question 4: Convert multi-track Canon MXF to FCP X on Mac "Using a card reader to download my footage shot with a C300 into FCP X. FCP X crashed while opening. If I am using Canon XF utility to backup the files, find out they are not readable? What's that? I am sure the videos are playable on camera. So strange. Any insight here how can I import these files into FCP X?" Answer: I believe you are not the first one to have this problem. Canon XF utility will not help you import a MXF, so I switch to use a third party converter - iMixMXF from Pavtube to output multi-track ProRes videos, I think it's much easier for me. Anyway, depends on you, suggest you to try different things.
Question 5: Convert Blackmagic MXF to ProRes for FCP X "I have some mxf files from Blackmagic Design; was wondering if these mxf are supported by FCPX for editing directly?" Answer: Blackmagic output mxf files are not like normal mxf files from camera; it's encoded with its own codec and the best work flow is to convert them to Apple ProRes for FCP. The Best MXF Converter for Mac is suggested for it's reliable conversion speed and video quality.
Question 6: How to convert Sony XDCAM footage to FCP? "I want to edit a bunch of mp4 files that I believe came from XDCAM but they were passed to me from a client with no camera info. What's your suggestion if I want to edit in FCP?" Answer: Sony XDCAM EX camera will shot videos in MP4 format, so you may guess right. You can use XDCam browser to help you copy the MP4 file to hard drive, but to edit those files in FCP, you will need to transfer them from MP4 to ProRes encoded MOV. Pavtube XDCAM Video Converter is a good program for you, I am working well with it, and you can try it yourself. I find a guide for you.
In addition, I also find a solution, hope it can help you: Importing XDCAM-EX into Final Cut Pro Question 7: How to edit Canon T4i videos in FCP 7 without any quality loss? "I newly purchased a Canon T4i for its high definition, and I need to edit these videos in FCP 7 without any quality loss. But after test I found this mov format is not so good to FCP, is there anyway to transfer it as quick as possible? Also a step by step guide would be appreciated." Answer: A friend of mine also has Canon T4i and I have also tried with this, it does output good video quality which I would not like to lose. We did some searches and finally choose one of them as it's recommended through out the web. You could click here to get to Pavtube HD Video Converter for Mac.
Question 8: How to import Canon XF105 24p MXF to FCP 7? "We shot some Canon XF105 24p mxf at 24p and copied them to hard drive, but these footage could not playback in sync with VLC player. Using FCP7. I know the videos are fine because they just playback normally on camera. What's the problem?" Answer: When you copy the footage to Mac hard drive, you'd better to copy the entire folder, not individual mxf files; or that your may lose the time code and playlist info. Canon XF105 MXF file is not supported by FCP X directly, thus you can try Canon Utility; or try the Mac MXF Converter directly:
Question 9: Import Sony AVCHD to FCP on Mac "My Sony camera gave me videos as AVCHD file which I have not acknowledged with. I tried with both quicktime and FCPX but none of them could recognize it. Is there any step-by-step work flow for this? PS: the footages are on 1080 60p." Answer: There are cameras and camcorders that are not compatible with FCP 7. Check if your AVCHD camcorder is on the list of Final Cut Pro Supported Cameras; if not, you are suggested to use a third party Mac Sony MTS Converter program to transform your AVCHD videos from camcorder to Apple ProRes for FCP.
Question 10: How to convert Sony HandyCam AVCHD to ProRes for FCP 7? "I have a Sony handycam and it shoots AVCHD file, the problem is that I could not find a way to upload the footage to FCP 7 for further editing. Have someone else have this problem?" A: Sony has developed plug-ins to help users with some cams. AVCHD Plug-ins: Sony AVCHD Plug-in for FCP7/FCP6 Download. Or you may use third party software to convert AVCHD to ProRes video - Pavtube MTS/M2TS Converter for Mac
Question 11: Import Canon XF300 MXF to FCP 7? "Just got a Canon XF300 and was wondering how to load my videos to FCP directly? Is MXF a supported format for FCP7?" Answer: That camera wraps in MXF files. The XF300 requires a Canon Plugin for FCP, it's on the install disc that comes with the camera. Once the plugin was installed Log and Transfer was a breeze. But seems the plug in is only comes with the disc, and not available on their website. If you have problem to find the plug in, you will need to try a third party encoder – Pavtube MXF Converter for Mac. While I can't recommend one I can point you to one below:
Question 12: Convert Canon C300 MXF to FCP "Which software do I need to convert c300 files to be readable in FCP? I have more than 200 MXF files, I need to batch process them. Can anyone help regarding this conversion?" Answer: FCP 7 or FCP X? If you are using FCP7, you can use L&T to import the files, below is a guide I found from forum. http://library.creativecow.net/ross_shane/tapeless-workflow_fcp-7/1 You will need drivers for Canon XF and C300. Another way to import, you can use a third party converter to help you encode MXF to ProRes MOV; it's the recommended codec in FCP. I find you a hot guide as below:
Question 13: Import my Canon XA10 files into FCP for editing "Will any converter work with Canon XA10? Currently my mac won't even recognize the files from the camera. I will want import my Canon XA10 files into FCP for editing, I am using Mac OSX 10.8." Answer: Canon XA10 camera shoots in AVCHD format, it will not be read directly on Mac 10.8 due to Apple changed the structure on Mac Mountain Lion, you can convert the AVCHD file to FCP compatible ProRes code, then import it. Pavtube MXF Converter for Mac is the Converter I use to help me convert my AVCHD file to ProRes format well. Hope it helps you too.
Note: You can also choose other FCP Converter for Mac softwares. There are list of five HD Videos to FCP Converter for Mac review, you can take a look, choose the most suitable for you.
Good news! Pavtube Bundles Deals are coming! It's a time for taking a break from work and relaxing. And now you can enjoy your colorful time with good featured products at "Pavtube Bundles Deals". Go ahead and click the link to get your coupon. Save up to $44.1! Never miss!!! MTS/M2TS Converter for Mac($29) + MXF Converter for Mac($29) = Only $29.9 MTS/M2TS Converter for Mac($29) + MKV Converter for Mac($29) = Only $29.9 MTS/M2TS Converter for Mac($29) + FLV/F4V Converter for Mac($29) = Only $29.9 iMixMXF($45) + HD Video Converter for Mac($35) = Only $54.9 ...... Source: http://strong-video-master.over-blog.com/hd-video-to-fcp-faqs