Summary: Are you have some problem about how to convert Canon T6s/760D MP4 to MOV in FCP, iMovie, FCE, Premiere, Avid MC? This guide will tell you how.  Hot search: VLC/QuickTime won't play MP4 from Canon T6s/760D | Import Canon T6s/760D MP4 to VLC, QuickTime for Playing on Mac OS X Yosemite Canon has been relatively cautious updating its Rebel DSLR line. The latest upgrade is the Canon Rebel T6s (760D). It features a 24.2MP APS-C sensor, up from 18MP and supports recording Full HD video in MP4 format. While, for the Canon T6s/760D footage with FCP, iMovie, FCE, Premiere, Avid MC, have you ever met any trouble? If so, check out the page and found some tips for you to import and edit MP4 videos from Canon T6s (760D) in these NLEs. It will give you some hints. The Canon T6s (760D) outputs its files as MP4 files (the container). Files are compressed using the H.264 codec. It is a final delivery codec, not one you want to use for editing. Therefore you may have problems when importing Canon 760D/T6s footage into NLEs. For smoothly editing Canon T6s MP4 in NLEs, you first need to convert Canon 760D/T6s MP4 to a more editing-friendly format. To get the work done, a third-party converting tool is needed. Here Pavtube HD Video Converter for Mac is highly recommended. It's a professional and powerful high-quality Mac video converter and editor. With it, you can effortlessly convert T6s MP4 files to MOV for importing and editing. Meanwhile, the Mac Video Conversion tool can create files compatible with various non-linear editing systems like Avid,FCE, iMovie and Adobe Premiere Pro, etc.
 Other Download: - Pavtube old official address: http://www.pavtube.com/hd-video-converter-mac/ - Amazon Store Download: http://www.amazon.com/Pavtube-Video-Converter-Mac-Download/dp/B00QI9GNZS - AppStore Download: https://itunes.apple.com/de/app/pavtube-hd-video-converter/id502792488?mt=12 - Cnet Download: http://download.cnet.com/Pavtube-HD-Video-Converter/3000-2194_4-76177786.html Tutorial on converting Canon T6s MP4 files to MOV for FCP, iMovie, FCE, Premiere, Avid: Step 1: Launch the HD Video Converter on your Mac, and then click the "Add video" button to import your MP4 files from Canon T6s directly. In order to import several files at one time, you can click "Add from folder" button.
  Step 2: Take editing T6s MP4 in FCP as an example: click the "Format" bar to get the drop-down menu and you can get "Final Cut Pro>>Apple ProRes codec", including ProRes 422, ProRes 422 (HQ), ProRes 422 (LT), ProRes 422 (Proxy) and ProRes 4444. Choose the proper one you want. Here, we suggest you to choose Apple ProRes 422 .mov as the best output format.
  Tips:
Tips:
For iMovie/FCE, choose "iMovie and Final Cut Express>>Apple InterMediate Codec (AIC) (*.mov)".
For Premiere, choose "Adobe Premiere/Sony Vegas>>MOV (AVC) (*.mov)".
For Avid MC, choose "Avid Media Composer>>Avid DNxHD (*.mov)". Step 3: Press the "Settings" icon and you can change the parameters here according to your requirement. If you don’t think it’s a necessary, you can skip this step. Step 4: Now, click "Convert" and let it go. The MP4 HD Video Converter for Mac supports batch conversion. So if you have lots of MP4 videos to convert, check "Shut down computer after conversion" and you can go away without keeping an eye on it. Conclusion: Once the conversion process shows in 100%, click "Open" to get the output videos. Create a project and start Canon T6s editing MP4 files in NLEs with light speed.
More related tips:
Facebook Weekend Promotion Here : Learn More: http://bit.ly/1hmOn34 Source: http://handycameratips.jimdo.com/2015/09/09/convert-mp4-to-mov-for-nles/
Summary: I don't know if you have ever met Nikon D7200 H.264 MOV to Premiere Pro CC incompatibility issues, if you did, why not take the following article as a reference for enjoying editing MOV to Premiere Pro CC?  The Nikon D7200 is new to the Nikon’s DSLR and it surpassed all my expectations. It can record footage with H.264 codec and save the files in MOV container format. However, I usually saw the Nikon DSLR users encounter importing issues when attempting to edit Nikon D7200 H.264 MOV in Premiere Pro CC like import it slowly, and couldn’t edit videos smoothly. So, here comes the question: can we import Nikon D7200 H.264 MOV to Premiere Pro CC directly without any hassle? H.264 MOV delivers stunning picture quality, but it not an ideal editing format for Premiere Pro CC. So you’ll get crashed or other issues. Based on other users’ feedback, I’ve got to know that it’s hard to import Nikon D7200 H.264 MOV to Premiere Pro CC flawlessly. That’s because Nikon footage is highly compressed with H.264 codec, which is unacceptable by various non-linear editing systems (NLEs) like Premiere Pro CC. To edit Nikon D7200 H.264 MOV in Premiere Pro CC smoothly, the best solution is to convert H.264 MOV to Premiere Pro CC best accepted format MPEG-2, which ensures maximum editing quality and efficiency. The quick solution for the problem likewise is to use Pavtube HD Video Converter for Mac. With this top Mac MOV to Premiere Pro CC Video Converter, you can import H.264 MOV to PPro CC correctly and saving the rendering time. Other Download: - Pavtube old official address: http://www.pavtube.com/hd-video-converter-mac/ - Amazon Store Download: http://www.amazon.com/Pavtube-Video-Converter-Mac-Download/dp/B00QI9GNZS - AppStore Download: https://itunes.apple.com/de/app/pavtube-hd-video-converter/id502792488?mt=12 - Cnet Download: http://download.cnet.com/Pavtube-HD-Video-Converter/3000-2194_4-76177786.html Here are the steps for you to import Nikon D7200 H.264 MOV to Premiere Pro CC: Step 1: Install and launch the HD MOV to Premiere Pro CC Video Converter on your Mac, and then click "Add video" button to browse to H.264 MOV footage or directly drag the footage from your D7200 to the program. Thanks to "Add from folder", you can load several H.264 MOV files at once.
 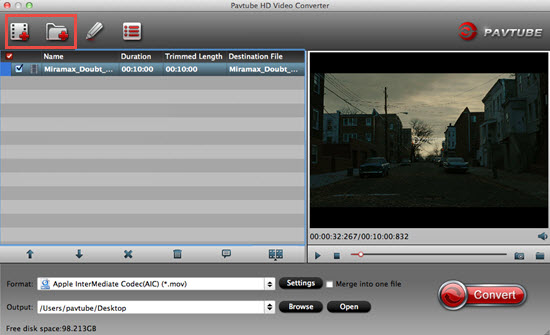 Step 2: Click the "Format" bar to select output format. Choose "Adobe Premiere/Sony Vegas>>MPEG-2 (*.mpg)" for editing raw H.264 MOV in Premiere Pro CC with natively supported video codec.
  Step 3: Tap "Settings" to choose or customize the output parameters, adjust the resolution, bit rate as you want. Usually the higher bit rate you choose, the better video quality will be. And you can click the pencil-like icon on the top to open Video Editor—it will help you to trim, crop, add subtitles or edit audio of the source file before conversion. Step 4: Back to the main interface and click "Convert" on the bottom right corner, it will pop up a conversion progress window with all the tasks. Click "Options" button and there is a "Convert" item in it, running processes can be changed. You are allowed to convert up to 4 files simultaneously here and the rest will be queued up. After the conversion, click "Open output folder" to quick locate the converted video. Conclusion: Now you are able to import generated Nikon D7200 H.264 MOV to Premiere Pro CC without any hassles. Launch Premiere on your Mac, refer to the transfer of importing H.264 MOV to Premiere Pro CC and enjoy on the go! Facebook Weekend Promotion Here : Learn More: http://bit.ly/1hmOn34 More related tips:
Source: http://digitalmediasolution.altervista.org/blog/tag/convert-h-264-mov-to-mpeg-2/
Step 3: Tap "Settings" to choose or customize the output parameters, adjust the resolution, bit rate as you want. Usually the higher bit rate you choose, the better video quality will be. And you can click the pencil-like icon on the top to open Video Editor—it will help you to trim, crop, add subtitles or edit audio of the source file before conversion. Step 4: Back to the main interface and click "Convert" on the bottom right corner, it will pop up a conversion progress window with all the tasks. Click "Options" button and there is a "Convert" item in it, running processes can be changed. You are allowed to convert up to 4 files simultaneously here and the rest will be queued up. After the conversion, click "Open output folder" to quick locate the converted video. Conclusion: Now you are able to import generated Nikon D7200 H.264 MOV to Premiere Pro CC without any hassles. Launch Premiere on your Mac, refer to the transfer of importing H.264 MOV to Premiere Pro CC and enjoy on the go! Facebook Weekend Promotion Here : Learn More: http://bit.ly/1hmOn34 More related tips:
Source: http://digitalmediasolution.altervista.org/blog/tag/convert-h-264-mov-to-mpeg-2/
Overview: In this article, you will get detailed tutorial on how to upload MXF video files to DropBox on Mac OS. Just have a try!  DropBox is a mobile document and media storage tool that allows you to sync you files online for backup. Anything like movies and music you save to your computer can be saved to your DropBox. As we all know, currently, most camcorders are recorded with MXF video files, and you can also download MXF files from website, while none of them is supported by DropBox. What types of files can I store or view on DropBox? Files that preview as a video: .3gp/.3gpp/.3gpp2/.avi/.mov/.mp4/.wmv/.m4v/.mpg/.mkv/.mpeg/.vob/.flv/.mts/.m2t/.ts/.dv If you have some nice MXF files and want to add to DropBox for streaming and playback on iPhone, iPod, Galaxy Tab,Kindle Fire HD and more media devices, you have to convert MXF files to other format like MP4, MOV or other format compatible with DropBox. To do so, a DropBox Converter is essential. Here Pavtube Video Converter is recommended to you. If you are a Mac user, please turn to PavtubeVideo Converter for Mac (review). Thanks to the built-in video editor, you can trim, crop and retouch your videos in clicks. Overall, no matter what versions, this program is a completely professional converter, editor and player.
 Other Download: - Pavtube old official address: http://www.pavtube.com/video_converter/ - Amazon Download: http://download.cnet.com/Pavtube-Video-Converter/3000-2194_4-75734821.html - Cnet Download: http://download.cnet.com/Pavtube-Video-Converter/3000-2194_4-75734821.html Move on and learn the step-by-step tutorial: Step 1: Download and install the corresponding program. Click "Add video" on the main interface to load your MXF files to the program. You can also drag the files to the program’s window list directly. This program can also support the batch video clips.
  Step 2: Select the right formats for streaming to DropBox. Here we suggest you to go to the "HD Video" list, you will get the "H.264 HD Video (*.mp4)" as the best output.
  Step 3: In the "Settings" button, you can adjust video and audio settings, including codec, bit rate, frame rate, sample rate, and audio channel. Step 4: After all the settings, you can preview the final result of movie. If you are happy with the effect, you can then press the big "Convert" button on the lower right to launch the conversion. Conclusion: Wait a moment, and then the conversion will be done flawlessly. After conversion, click "Open Folder" button to locate the converted video files. Note: How to load generated files to DropBox? -Sign in to the DropBox website. -Click the Upload button from the very top of the window. -A window will appear. Click the Choose File button and then select the file on your computer that you’d like to add to your DropBox. -Choose as many files as you like, and then click the Start Upload button. -The window will disappear, your files will start uploading, and you’ll be shown a progress indicator. That’s it, you’ve added files to your DropBox! More related tips:
Facebook Weekend Promotion Here : Learn More: http://bit.ly/1hmOn34 Source: http://mxfworld.jimdo.com/2015/09/08/upload-mxf-video-files-to-dropbox/
Step 3: In the "Settings" button, you can adjust video and audio settings, including codec, bit rate, frame rate, sample rate, and audio channel. Step 4: After all the settings, you can preview the final result of movie. If you are happy with the effect, you can then press the big "Convert" button on the lower right to launch the conversion. Conclusion: Wait a moment, and then the conversion will be done flawlessly. After conversion, click "Open Folder" button to locate the converted video files. Note: How to load generated files to DropBox? -Sign in to the DropBox website. -Click the Upload button from the very top of the window. -A window will appear. Click the Choose File button and then select the file on your computer that you’d like to add to your DropBox. -Choose as many files as you like, and then click the Start Upload button. -The window will disappear, your files will start uploading, and you’ll be shown a progress indicator. That’s it, you’ve added files to your DropBox! More related tips:
Facebook Weekend Promotion Here : Learn More: http://bit.ly/1hmOn34 Source: http://mxfworld.jimdo.com/2015/09/08/upload-mxf-video-files-to-dropbox/
Summary: Failed to enjoy MKV files on iPod Touch 6 more easily ? Read through to know great idea about converting MKV to MP4 formats. You will find a good MKV video converter.  Apple’s newly released and much needed update to the iPod touch has seen the much maligned music and baby iPhone receive a new lease of life, once again making it a viable alternative for those that don’t want a cellular plan but like the idea of using iOS on something smaller than an iPad. We’re not sure why it’s taken Apple so long to get an update out the door, but now it’s here the iPod touch is worth consideration once again. iPod Touch 6 video playback: H.264 video up to 1080p, 30 frames per second, Main Profile level 4.1 with AAC-LC audio up to 160 Kbps, 48kHz, stereo audio in .m4v, .mp4, and .mov file formats MPEG-4 video up to 2.5 Mbps, 640 by 480 pixels, 30 frames per second, Simple Profile with AAC-LC audio up to 160 Kbps per channel, 48kHz, stereo audio in .m4v, .mp4, and .mov file formats Motion JPEG (M-JPEG) up to 35 Mbps, 1280 by 720 pixels, 30 frames per second, audio in ulaw, PCM stereo audio in .avi file format As it is shown above, MKV files are not supported by iPod Touch 6. If you want to enjoy MKV files on iPod Touch 6, you’d better convert your source files to iPod Touch 6 best accepted video format. Here you can depend on Pavtube Video Converter for Mac. This program can convert any video formats as you like to iPod Touch 6 supported foramts. Other Download: - Pavtube old official address: http://www.pavtube.com/video-converter-mac/ - Amazon Store Download: http://www.amazon.com/Pavtube-Video-Converter-Mac-Download/dp/B00QIBK0TQ - Cnet Download: http://download.cnet.com/Pavtube-Video-Converter/3000-2194_4-76179460.html How to convert MKV files to iPod Touch 6? Step 1: Download, install and launch the program, you can import the video files either by dragging and dropping directly into the main interface or by clicking "Add Video" or "Add from folder" button.
  Step 2: You can choose from a number of different formats displayed in the "Format" bar at the bottom. Here you’re suggested to choose "HD Video>>H.264 HD Video (*.mp4)" as output format.
 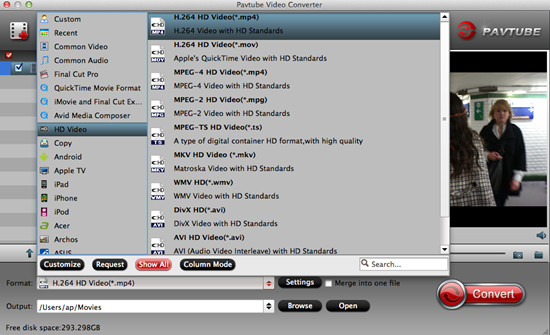 Step 3: Go back to the main interface, hit the big button "Convert" there. Conclusion: There is no need for waiting for a long time. We can receive the best output files nicely. After conversion, you can get the generated files by hitting "Open" button. Now, it’s easy to enjoy MKV files on iPod Touch 6. If You Want to Get Our Weekend Pavtube Special offer,You can Click Here: http://bit.ly/1hmOn34 More related tips:
Source: http://bestvideoking.blogspot.com/2015/09/enjoy-mkv-files-on-ipod-touch-6.html
Step 3: Go back to the main interface, hit the big button "Convert" there. Conclusion: There is no need for waiting for a long time. We can receive the best output files nicely. After conversion, you can get the generated files by hitting "Open" button. Now, it’s easy to enjoy MKV files on iPod Touch 6. If You Want to Get Our Weekend Pavtube Special offer,You can Click Here: http://bit.ly/1hmOn34 More related tips:
Source: http://bestvideoking.blogspot.com/2015/09/enjoy-mkv-files-on-ipod-touch-6.html
Summary: This guide provides a solution to Import Sony HDR-AS200V XAVC S to Final Cut Pro 7/X you want to preserve. Keep reading a brief how-to.
 Meet the NEW Action Cam HDR AS200V, the highest image quality of all Full HD Action Cam ever. You may have got the Sony HDR-AS200V camera which recorded some full-HD footages in XAVC S format. Do you have a desire to import XAVC S to FCP 7/X for editing?
XAVC S, a new format introduced by Sony with MPEG-4 AVC/H.264 level 5.2, the highest picture resolution and frame rate video compression codec is much more than a video format that FCP can support. So, it’s not strange that you have met so many Sony XAVC S to FCP import issues.
First of all, let’s look at a case found online. "I have a bunch of XAVC S files from a Sony HDR-AS200V. What is the easiest way to import XAVC S to FCP? When I try to import, FCP won’t allow me to use the XAVC S files as it doesn’t have the codec for it."
As you can see, XAVC S is not among the accepted video types by FCP. To load Sony HDR-AS200V XAVC S files into FCP, you should convert Sony XAVC S to FCP best accepted ProRes MOV.Pavtube Video Converter for Mac is perfect for you to finish the conversion job on any Mac version, such as El Capitan, Yosemite. It will save you both time and trouble, and all you need to do is to drag the result videos for prompt editing.
Other Download:
- Pavtube old official address: http://www.pavtube.com/video-converter-mac/
- Amazon Store Download: http://www.amazon.com/Pavtube-Video-Converter-Mac-Download/dp/B00QIBK0TQ
- Cnet Download: http://download.cnet.com/Pavtube-Video-Converter/3000-2194_4-76179460.html
How to import Sony HDR-AS200V XAVC S to FCP 7/X?
Step 1: Download and have a quick installation. The trial version will have a watermark on your converted files. Except for that, there are no time limitation, no virus, and no unnecessary bundle apps while downloading. After that, click "Add Video" button to load your Sony XAVC S videos. You can load several files at once thanks to "Add from folder" button.
Step 2: Click the "Format" bar to get the drop-down menu and you can get "Final Cut Pro>>Apple ProRes codec", including ProRes 422, ProRes 422 (HQ), ProRes 422 (LT), ProRes 422 (Proxy) and ProRes 4444. Choose the proper one you want. Here, we suggest you to choose "Apple ProRes 422 (*.mov)" as the best output format.
Step 3: Click the "Settings" button and set proper video/ audio parameters. My advice is to set the video size, bit rate and fame rate to be exactly as the footages so that you will suffer least quality degradation. If you would like to use default settings, simply skip this step.
Step 4: After all necessary settings, hit the "Convert" button to start the XAVC S to FCP best supported ProRes MOV conversion.
Conclusion: If you have added quite a bunch of XAVC S files, it would take some time to convert. In such case, you can click "Option" and tick the box "Shut down the computer after conversion".
More related tips:
If You Want to Get Our Weekend Pavtube Special offer,You can Click Here: http://bit.ly/1hmOn34
Source: http://1080p-video-tool.blogspot.com/2015/09/import-sony-xavc-s-to-fcp.html
Meet the NEW Action Cam HDR AS200V, the highest image quality of all Full HD Action Cam ever. You may have got the Sony HDR-AS200V camera which recorded some full-HD footages in XAVC S format. Do you have a desire to import XAVC S to FCP 7/X for editing?
XAVC S, a new format introduced by Sony with MPEG-4 AVC/H.264 level 5.2, the highest picture resolution and frame rate video compression codec is much more than a video format that FCP can support. So, it’s not strange that you have met so many Sony XAVC S to FCP import issues.
First of all, let’s look at a case found online. "I have a bunch of XAVC S files from a Sony HDR-AS200V. What is the easiest way to import XAVC S to FCP? When I try to import, FCP won’t allow me to use the XAVC S files as it doesn’t have the codec for it."
As you can see, XAVC S is not among the accepted video types by FCP. To load Sony HDR-AS200V XAVC S files into FCP, you should convert Sony XAVC S to FCP best accepted ProRes MOV.Pavtube Video Converter for Mac is perfect for you to finish the conversion job on any Mac version, such as El Capitan, Yosemite. It will save you both time and trouble, and all you need to do is to drag the result videos for prompt editing.
Other Download:
- Pavtube old official address: http://www.pavtube.com/video-converter-mac/
- Amazon Store Download: http://www.amazon.com/Pavtube-Video-Converter-Mac-Download/dp/B00QIBK0TQ
- Cnet Download: http://download.cnet.com/Pavtube-Video-Converter/3000-2194_4-76179460.html
How to import Sony HDR-AS200V XAVC S to FCP 7/X?
Step 1: Download and have a quick installation. The trial version will have a watermark on your converted files. Except for that, there are no time limitation, no virus, and no unnecessary bundle apps while downloading. After that, click "Add Video" button to load your Sony XAVC S videos. You can load several files at once thanks to "Add from folder" button.
Step 2: Click the "Format" bar to get the drop-down menu and you can get "Final Cut Pro>>Apple ProRes codec", including ProRes 422, ProRes 422 (HQ), ProRes 422 (LT), ProRes 422 (Proxy) and ProRes 4444. Choose the proper one you want. Here, we suggest you to choose "Apple ProRes 422 (*.mov)" as the best output format.
Step 3: Click the "Settings" button and set proper video/ audio parameters. My advice is to set the video size, bit rate and fame rate to be exactly as the footages so that you will suffer least quality degradation. If you would like to use default settings, simply skip this step.
Step 4: After all necessary settings, hit the "Convert" button to start the XAVC S to FCP best supported ProRes MOV conversion.
Conclusion: If you have added quite a bunch of XAVC S files, it would take some time to convert. In such case, you can click "Option" and tick the box "Shut down the computer after conversion".
More related tips:
If You Want to Get Our Weekend Pavtube Special offer,You can Click Here: http://bit.ly/1hmOn34
Source: http://1080p-video-tool.blogspot.com/2015/09/import-sony-xavc-s-to-fcp.html