If you want to edit AVCHD MTS footage on Final Cut Express and FCE does not take the AVCHD files from your camcorder, the best way is converting all MTS files to FCE editable formats - AIC MOV, ProRes MOV. Pavtube MTS to FCE Converter is the easiest and fastest tool for users who cann't import MTS to FCE. The following are the details.
Final Cut Express doesn't actually edit AVCHD MTS files, it Log and transfer MTS to Apple Intermediate Codec(AIC), which is a much more editing friendly HD supporting codec.Final Cut will only handle AVCHD files when it finds them in their original file structure (either by connecting the camcorder or using a memory card reader), not isolated .mts files. The biggest problem will be storage. For doing that type of work AIC takes a lot more space then AVCHD. figure a multiple of 3-7x the file storage size for a single video file, then multiply that by 3 or 4 to account for working space. So, for example, let's say you have videos to import, the videos total about 6 gig on your camcorder, they will take 18 – 42 gigs of hard drive space just to import the footage. Figuring 3 to 4x that for editing space, you're gonna need between 54 and 168 gig to edit the video.
 Give Compressor up. I recommed convert AVCHD MTS to AIC or Apple's ProRes 422 codec with Pavtube MTS/M2TS Converter for Mac. The app save me 2 hours and even more.
Note: You can also choose other MTS to AIC MOV converter for Mac softwares. There are list of five MTS/M2TS Converter for Mac review, you can take a look, choose the most suitable for you.
How to transcode MTS to Apple Intermediate Codec(AIC) for Final Cut Express faster?
Step one. Free Download and install the great MTS to AIC Converter for Mac. Click 'Add' button, browse to the AVCHD MTS files and load them to the MTS to AIC converter. You can check the files and take thumbnails in Preview window.
Give Compressor up. I recommed convert AVCHD MTS to AIC or Apple's ProRes 422 codec with Pavtube MTS/M2TS Converter for Mac. The app save me 2 hours and even more.
Note: You can also choose other MTS to AIC MOV converter for Mac softwares. There are list of five MTS/M2TS Converter for Mac review, you can take a look, choose the most suitable for you.
How to transcode MTS to Apple Intermediate Codec(AIC) for Final Cut Express faster?
Step one. Free Download and install the great MTS to AIC Converter for Mac. Click 'Add' button, browse to the AVCHD MTS files and load them to the MTS to AIC converter. You can check the files and take thumbnails in Preview window.
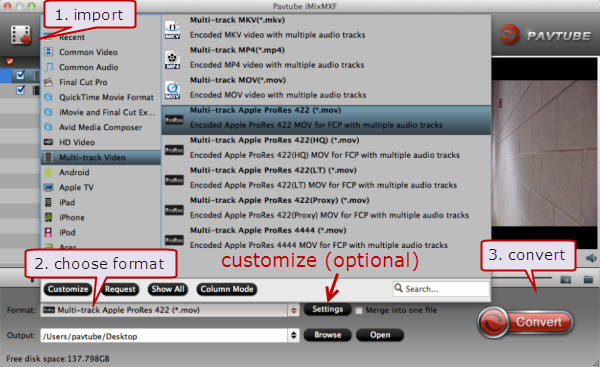
 Step two. Select the items to be converted, and click on 'Format' bar to specify output format. FCE compatible formats such as Apple Intermediate Codec(AIC), MP4, MOV, MPG, DV, AVI can be found in the profile list. For instance, you could follow Final Cut->Apple Intermediate Codec(AIC)(*.mov).
 Step three. Click the 'Settings' button and set proper video/ audio parameters. My advice is to set the video size, bitrate and fame rate to be exactly as the footages so that you will suffer least quality degradation. For example, when the video is shot at 1920*1080, 5mbps, 30fps, you could set Size-1920*1080, Bitrate-original, Frame rate-30. If you would like to use default settings, simply skip this step.
 Step four. Click the 'Browse' button next to the Export to field and select a location on your HDD for the output video file.
Step five. Click the 'Convert' button to start converting AVCHD MTS files to AIC for FCE on Mac (Mac OS X 10.10 Yosemite and Mavericks 10.9 included).
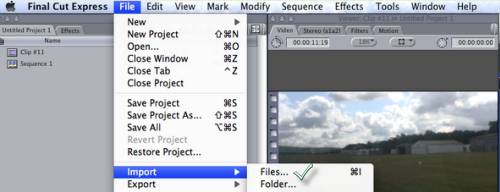
After conversion you can click the 'Open' button to locate converted video files, and open up Final Cut Express, follow File > Import > Files… to browse and load the MTS files you need. Now you can edit the MTS footages with FCE for playback on QuickTime connected to your HDTV, Mac, as well as upload to Youtube.
Step four. Click the 'Browse' button next to the Export to field and select a location on your HDD for the output video file.
Step five. Click the 'Convert' button to start converting AVCHD MTS files to AIC for FCE on Mac (Mac OS X 10.10 Yosemite and Mavericks 10.9 included).
After conversion you can click the 'Open' button to locate converted video files, and open up Final Cut Express, follow File > Import > Files… to browse and load the MTS files you need. Now you can edit the MTS footages with FCE for playback on QuickTime connected to your HDTV, Mac, as well as upload to Youtube.
 See also:
Professional Movie Producer's Choice: To Transcode AVCHD into ProRes
Import AVCHD footage to Premiere Pro
iMovie Does Not Accept .m4v Files on Mac Mavericks?
Easiest Way to Edit AVCHD Wedding Files in Pinnacle Studio 16
Let's Import Sony NX30 AVCHD MTS Videos into FCP
Importing Panasonic HX-WA03 1080P Videos to FCP 7/X
Playing MKV on Mac with QuickTime or iTunes?
Transcode Sony PMW-200 XDCAM MXF to ProRes HQ 422 for FCP.
No Audio when Editing MTS files in Adobe Premiere Pro CC?
***********************************************************************************
Good news! Pavtube Bundles Deals are coming! It's a time for taking a break from work and relaxing. And now you can enjoy your colorful time with good featured products at "Pavtube Bundles Deals". Go ahead and click the link to get your coupon. Save up to $44.1! Never miss!!!
MTS/M2TS Converter for Mac($29) + MXF Converter for Mac($29) = Only $29.9
MTS/M2TS Converter for Mac($29) + MKV Converter for Mac($29) = Only $29.9
MTS/M2TS Converter for Mac($29) + FLV/F4V Converter for Mac($29) = Only $29.9
iMixMXF($45) + HD Video Converter for Mac($35) = Only $54.9
......
See also:
Professional Movie Producer's Choice: To Transcode AVCHD into ProRes
Import AVCHD footage to Premiere Pro
iMovie Does Not Accept .m4v Files on Mac Mavericks?
Easiest Way to Edit AVCHD Wedding Files in Pinnacle Studio 16
Let's Import Sony NX30 AVCHD MTS Videos into FCP
Importing Panasonic HX-WA03 1080P Videos to FCP 7/X
Playing MKV on Mac with QuickTime or iTunes?
Transcode Sony PMW-200 XDCAM MXF to ProRes HQ 422 for FCP.
No Audio when Editing MTS files in Adobe Premiere Pro CC?
***********************************************************************************
Good news! Pavtube Bundles Deals are coming! It's a time for taking a break from work and relaxing. And now you can enjoy your colorful time with good featured products at "Pavtube Bundles Deals". Go ahead and click the link to get your coupon. Save up to $44.1! Never miss!!!
MTS/M2TS Converter for Mac($29) + MXF Converter for Mac($29) = Only $29.9
MTS/M2TS Converter for Mac($29) + MKV Converter for Mac($29) = Only $29.9
MTS/M2TS Converter for Mac($29) + FLV/F4V Converter for Mac($29) = Only $29.9
iMixMXF($45) + HD Video Converter for Mac($35) = Only $54.9
......
 The original from: http://camcorder-video-tips.over-blog.com/article-how-to-convert-mts-to-apple-intermediate-codec-for-final-cut-express-faster-78552951.html
This article outlines how to transfer Sony PXW-X70 XAVC footage to Mac and import into Premiere Pro CC, CS6, CS5 for smooth editing. Keep reading for a brief how-to.
Sony PXW-X70 is a highly compact, single chip camera the images it produces are really very good. The XAVC HD recordings are 10 bit 422 long GoP at 50Mb/s, 35Mb/s or 25Mb/s. The quality of the 50Mb/s recordings is amazing with no compression artefacts that you can see. Even the 25Mb/s recordings look really good. You can shoot at up to 60fps in 60i mode and 50fps in 50i mode. In 60i mode you also have 24fps.
 In general, as we know, Premiere Pro CC has added support for this new camera format. And for Premiere Pro CS5/CS5.5/CS6, you can download Rovi Totalcode, a Plug-in for Premire which has perfect support for Sony's 4K XAVC format. However, this third-party plug-in will cost you a lot of money.
In this case, the following passage will introduce a cost effective and simple way- convert Sony PXW-X70 XAVC footages to Premiere Pro for editing.
Software Requirement: XAVC to Premiere Pro Converter for Mac from Pavtube Studio.
See also: Top 5 Best HD Video Converters for Mac OS X Yosemite/Mavericks
The software does a good job in converting XAVC to Adobe Premiere Pro favorable format MOV/MPEG-2 with original quality kept, so as to allow you import Sony PXW-X70 XAVC to Premiere Pro CC, CS6, CS5, CS4 or CS3, etc. for extension editing without any hassles. Moreover, before starting the conversion, you are allowed to perfect the XAVC video files by rendering to the editing features provided. Becides, it allows you to join the XAVC clips together. (For windows user, turn to XAVC to Premiere Converter)
Guide: How to transcode Sony PXW-X70 XAVC to MPEG-2/MOV for Premiere
Step 1. Load Sony PXW-X70 XAVC footage to XAVC to Premiere Pro Converter.
Transfer XAVC files from Sony PXW-X70 to computer via USB cable. Download HD Video Converter for Mac from Pavtube and run the software as the best Sony XAVC converter. Click the "Add Video" button or "Add from folder" icon to load XAVC videos from PXW-X70.
In general, as we know, Premiere Pro CC has added support for this new camera format. And for Premiere Pro CS5/CS5.5/CS6, you can download Rovi Totalcode, a Plug-in for Premire which has perfect support for Sony's 4K XAVC format. However, this third-party plug-in will cost you a lot of money.
In this case, the following passage will introduce a cost effective and simple way- convert Sony PXW-X70 XAVC footages to Premiere Pro for editing.
Software Requirement: XAVC to Premiere Pro Converter for Mac from Pavtube Studio.
See also: Top 5 Best HD Video Converters for Mac OS X Yosemite/Mavericks
The software does a good job in converting XAVC to Adobe Premiere Pro favorable format MOV/MPEG-2 with original quality kept, so as to allow you import Sony PXW-X70 XAVC to Premiere Pro CC, CS6, CS5, CS4 or CS3, etc. for extension editing without any hassles. Moreover, before starting the conversion, you are allowed to perfect the XAVC video files by rendering to the editing features provided. Becides, it allows you to join the XAVC clips together. (For windows user, turn to XAVC to Premiere Converter)
Guide: How to transcode Sony PXW-X70 XAVC to MPEG-2/MOV for Premiere
Step 1. Load Sony PXW-X70 XAVC footage to XAVC to Premiere Pro Converter.
Transfer XAVC files from Sony PXW-X70 to computer via USB cable. Download HD Video Converter for Mac from Pavtube and run the software as the best Sony XAVC converter. Click the "Add Video" button or "Add from folder" icon to load XAVC videos from PXW-X70.
 Step 2. Set MOV/MPEG-2 format as output format for editing.
Click format bar to choose the format for output. Select "MOV (AVC)(*.mov)" or "MPEG-2 (*.mpg)" under Adobe Premiere/Sony Vegas for editing in Adobe Premiere Pro CC, CS6, CS5.
Step 2. Set MOV/MPEG-2 format as output format for editing.
Click format bar to choose the format for output. Select "MOV (AVC)(*.mov)" or "MPEG-2 (*.mpg)" under Adobe Premiere/Sony Vegas for editing in Adobe Premiere Pro CC, CS6, CS5.
 Step 3. Adjust video and audio settings to keep 1080p HD quality
Click "Settings" button, then you will be able to adjust audio and video parameters on the popup window to customize the output file quality, these adjustable parameters include codec name, aspect ratio, bit rate, frame rate, sample rate, and audio channel.
For example, to maintain original HD quality, you may set "original" in the fields of "Size", "Bitrate" and "Frame rate". To downsize the Sony XAVC files, just set a smaller bitrate.
Step 4. Click "Convert" button to convert Sony PXW-X70 XAVC to Premiere Pro CC, CS6, CS5
Once the conversion is finished by Sony XAVC to Premiere Converter, you can click "Open" button to get the output files effortlessly. Now you have got it right, just import and edit Sony PXW-X70 XAVC files in Adobe Premiere Pro CC, CS6, CS5 without rending time.
FYI:
1. To get Sony XAVC work for Avid Media Composer, pls refer to the guide.
2. Click here to learn: How to import Media Files to Premiere Pro on Mac.
3. You can also play your XAVC files with QuickTime Player and iPad Air.
See also:
Never miss to get Saving up to $44.1, MXF/MTS/M2TS/MKV/FLV/MOV Converter.etc at Pavtube Bundles Deals!
Source: http://pc-mac-compatibility-issues.blogspot.com/2014/10/edit-pxw-xavc-in-premiere-and-ae.html
Step 3. Adjust video and audio settings to keep 1080p HD quality
Click "Settings" button, then you will be able to adjust audio and video parameters on the popup window to customize the output file quality, these adjustable parameters include codec name, aspect ratio, bit rate, frame rate, sample rate, and audio channel.
For example, to maintain original HD quality, you may set "original" in the fields of "Size", "Bitrate" and "Frame rate". To downsize the Sony XAVC files, just set a smaller bitrate.
Step 4. Click "Convert" button to convert Sony PXW-X70 XAVC to Premiere Pro CC, CS6, CS5
Once the conversion is finished by Sony XAVC to Premiere Converter, you can click "Open" button to get the output files effortlessly. Now you have got it right, just import and edit Sony PXW-X70 XAVC files in Adobe Premiere Pro CC, CS6, CS5 without rending time.
FYI:
1. To get Sony XAVC work for Avid Media Composer, pls refer to the guide.
2. Click here to learn: How to import Media Files to Premiere Pro on Mac.
3. You can also play your XAVC files with QuickTime Player and iPad Air.
See also:
Never miss to get Saving up to $44.1, MXF/MTS/M2TS/MKV/FLV/MOV Converter.etc at Pavtube Bundles Deals!
Source: http://pc-mac-compatibility-issues.blogspot.com/2014/10/edit-pxw-xavc-in-premiere-and-ae.html
This article I will concentrate on how to import Sony XDCAM MXF to After Effects CC on Mac OS Mavericks. If you are planning to add some MXF clips to Adobe AE for further editing, just read on.
Perhaps the most exciting new feature of Adobe's motion graphics application is the Live 3D Pipeline between After Effects CC and Cinema 4D. With upcoming support for Adobe Anywhere, which allows video teams to work on a shared server without having to download source media, broadcast and post-production professionals can collaborate regardless of location. However, a bit frustrating. You will find your MXF footages from Sony XDCAM are not well supported by After Effects CC on Mac OS Mavericks. A typical issue is quoted as below:
Moved one of our Macs to Mavericks (as a test) and have lost the ability to import Sony F5 mxf files directly into an AE project. Current configuration OS 10.9.2 and After Effects CS6 11.0.4. Went from OS 10.8.5 where it was working perfectly. Doesn't seem to be an update from either the Sony or Adobe side to solve this problem. Tried a trial of the CC and it doesn't work there either (although Premiere will import the file directly). I like using Synthetic Aperture for the color correction of the s-log files. Does anyone have a workaround without having to first make a movie file? We still have many other machines configured with the old OS so we aren't in any major bind.
Well, you can see, when comes to Mac Mavericks, Sony XDCAM MXF fiels are becoming heavy for After Effects CC to handle. Originally you can download and use the Sony (PLAD-RW1_v1.2_for Mac) plug-in to enable importing of those mxf files. But if you want to find an easier way, you may have have to transcode Sony XDCAM MXF to AE CC6 preferred format like MOV (AVC) to get it working well with your wonderful footages. To help all users to solve the problem, I show you the details in the post.
First, please install a professional Pavtube MXF Converter for Mac, which can transcode Sony XDCAM MXF to a editable format by After Effects CC. As far as I know, this MXF to AE Converter is designed to transform all MXF videos. It also allows you convert MXF to any other format as you want for importing into different NLE apps, such as Premiere Pro, After Effects, iMovie, FCP 6/7/X, Avid Media Composer, and more. Just download it and follow the workflow using After Effects CC with Sony XDCAM on Mac OS Mavericks.
How to convert Sony XDCAM MXF to After Effects CC editable format on Mac OS Mavericks?
Step 1. Connect your Sony XDCAM camcorder to Mac and keep it on, or use a card reader to transfer your footage to Mac. Get this MXF to AE Converter installed, click top left two icons to load individual videos or the entire folder correspondingly.
 Step 2. Choose best format for editing in After Effects CC.
Click the drop-down list besides "Format", choose "Adobe Premiere/Sony Vegas > MOV(AVC)(*.mov)" as the most compatible format as well as best video quality for After Effects CC. You can also choose "MPEG-2 (*.mpg)", "WMV (VC-1) (*.wmv)" or Final Cut Pro > Apple ProRes 422 (*.mov).
Step 2. Choose best format for editing in After Effects CC.
Click the drop-down list besides "Format", choose "Adobe Premiere/Sony Vegas > MOV(AVC)(*.mov)" as the most compatible format as well as best video quality for After Effects CC. You can also choose "MPEG-2 (*.mpg)", "WMV (VC-1) (*.wmv)" or Final Cut Pro > Apple ProRes 422 (*.mov).
 Step 3. Adjust output video settings including video size, codec, bitrate, frame rate by clicking "Settings", all according to your needs. (Optional)
Step 4. Click the big red "Convert" to start converting Sony XDCAM MXF to AVC MOV. Wait for a while, you can get the fresh hot converted video which is compatible with After Effects CC.
After the conversion is finished, just run Adobe After Effects CC and import the generated .mov files. You will find the output video work perfectly on After Effects CC as well as for After Effects CS6, CS5, CS4 for freely editing on Mac OS Mavericks.
See also:
Top MXF Converter for Mac Review
Get rid of no audio problem converting MXF to MOV/MP4/AVI/MKV/WMV on Mac
Upload 1080/50p footage to Youtube/Vimeo From JVC HD Everio GZ-RX110BE
Edit Wedding Videos in Pinnacle Studio 16 with AVI HD
Convert Panasonic P2 footage to Davinci Resolve for editing
Troubled in Editing Panasonic AJ-HPX2700 MXF in Premiere Pro CC/CS6?
Talks on GH4 4K Videos and New iMovie
Work JVC HD Everio GZ-RX110BE AVCHD Footage with Avid Media Composer
Make Sony PDW-850 XDCAM MXF with multi-track Accepted by FCP X
Get JVC HD Everio GZ-RX110BE AVCHD MTS Files to FCP X
Step 3. Adjust output video settings including video size, codec, bitrate, frame rate by clicking "Settings", all according to your needs. (Optional)
Step 4. Click the big red "Convert" to start converting Sony XDCAM MXF to AVC MOV. Wait for a while, you can get the fresh hot converted video which is compatible with After Effects CC.
After the conversion is finished, just run Adobe After Effects CC and import the generated .mov files. You will find the output video work perfectly on After Effects CC as well as for After Effects CS6, CS5, CS4 for freely editing on Mac OS Mavericks.
See also:
Top MXF Converter for Mac Review
Get rid of no audio problem converting MXF to MOV/MP4/AVI/MKV/WMV on Mac
Upload 1080/50p footage to Youtube/Vimeo From JVC HD Everio GZ-RX110BE
Edit Wedding Videos in Pinnacle Studio 16 with AVI HD
Convert Panasonic P2 footage to Davinci Resolve for editing
Troubled in Editing Panasonic AJ-HPX2700 MXF in Premiere Pro CC/CS6?
Talks on GH4 4K Videos and New iMovie
Work JVC HD Everio GZ-RX110BE AVCHD Footage with Avid Media Composer
Make Sony PDW-850 XDCAM MXF with multi-track Accepted by FCP X
Get JVC HD Everio GZ-RX110BE AVCHD MTS Files to FCP X
Never miss to get Saving up to $44.1, MXF/MTS/M2TS/MKV/FLV/MOV Converter.etc at Pavtube Bundles Deals!
Pavtube Video Converter is an all-in-one video converter and editor tool based on NVIDIA CUDA technology which is specially developed for users to convert videos from one format to another.
 Pavtube Video Converter has been designed to cover all your video conversion needs while providing you with a few interesting editing features. It supports nearly all known video formats and codecs for both standard and high-definition video, including MKV, AVI, MP4, M4V, VOB, MOV, WMV, Tivo, FLV, MPG, WebM, MVI, VRO, MTS, M2TS, M2T, TS, MXF, XAVC, along with audio extensions like MP3 and FLAC, etc. Batch processing is permitted.
In order to manage such a vast list of video, audio, and image file formats, the program offers you a somehow organized list of output profiles.
These are classified following different criteria, such as device manufacturer (Apple, Samsung, Google, Sony, HTC, Amazon, Asus, Microsoft, Acer, Nokia, LG, Panasonic, Toshiba, HuaWei, BlackBerry, Lenovo or HP, etc.), software tool (Windows or PowerPoint), media type (Common Video or Common Audio – for audio extraction purposes), or device (Zune, Xbox 360, Xbox One, Wii, Windows Media Player, VLC, AC Ryan Player, HiMedia 900B, PS4, PS3, WD TV Live Plus Media Player, Xtreamer Ultra, Dune HD Player, Seagate, Popcorn Hour, Asus O!Play Mini Plus, KDLINKS Media Player, ViewSonic NMP-708 and so on), although you can also find some more "exotic" categories, such as Remux, Interlaced, Lossless raw video, or DV. Useful as it may be, it doesn't seem to follow any logical order. To overcome this difficulty, the program offers you a Profile Manager, which you can use to select only those categories you really use. Likewise, you can also tick off those specific presets within each category that you know you won't be using often.
Once the output selection process has been conveniently simplified according to your preferences, you can select the video or video files you wish to convert and apply to all of them one of the many output formats provided (regrettably, multiple-output conversion is not supported). You can then select one of your videos and watch them on the program's built-in player, or simply move into the program's editor.
This simple editing tool offers you the possibility of trimming and cropping your videos, of adding text and image/video watermarks to them, editing their background audio, importing a subtitle stream from an SRT or SSA subtitle file, or applying one of the various video effects provided – gauss blur, Laplacian sharpen, aged film (a kind of sepia effect), negative, etc.
Pavtube Video Converter has been designed to cover all your video conversion needs while providing you with a few interesting editing features. It supports nearly all known video formats and codecs for both standard and high-definition video, including MKV, AVI, MP4, M4V, VOB, MOV, WMV, Tivo, FLV, MPG, WebM, MVI, VRO, MTS, M2TS, M2T, TS, MXF, XAVC, along with audio extensions like MP3 and FLAC, etc. Batch processing is permitted.
In order to manage such a vast list of video, audio, and image file formats, the program offers you a somehow organized list of output profiles.
These are classified following different criteria, such as device manufacturer (Apple, Samsung, Google, Sony, HTC, Amazon, Asus, Microsoft, Acer, Nokia, LG, Panasonic, Toshiba, HuaWei, BlackBerry, Lenovo or HP, etc.), software tool (Windows or PowerPoint), media type (Common Video or Common Audio – for audio extraction purposes), or device (Zune, Xbox 360, Xbox One, Wii, Windows Media Player, VLC, AC Ryan Player, HiMedia 900B, PS4, PS3, WD TV Live Plus Media Player, Xtreamer Ultra, Dune HD Player, Seagate, Popcorn Hour, Asus O!Play Mini Plus, KDLINKS Media Player, ViewSonic NMP-708 and so on), although you can also find some more "exotic" categories, such as Remux, Interlaced, Lossless raw video, or DV. Useful as it may be, it doesn't seem to follow any logical order. To overcome this difficulty, the program offers you a Profile Manager, which you can use to select only those categories you really use. Likewise, you can also tick off those specific presets within each category that you know you won't be using often.
Once the output selection process has been conveniently simplified according to your preferences, you can select the video or video files you wish to convert and apply to all of them one of the many output formats provided (regrettably, multiple-output conversion is not supported). You can then select one of your videos and watch them on the program's built-in player, or simply move into the program's editor.
This simple editing tool offers you the possibility of trimming and cropping your videos, of adding text and image/video watermarks to them, editing their background audio, importing a subtitle stream from an SRT or SSA subtitle file, or applying one of the various video effects provided – gauss blur, Laplacian sharpen, aged film (a kind of sepia effect), negative, etc.
 In addition, you can preview clips and take snapshots, apply effects, make image adjustments (e.g. brightness, contrast), replace the audio steam, and more.
But you can also make audio and video modifications when it comes to the codec, size, bit rate, frame rate, sample frequency rate, channels and others. Settings can be restored to their default values.
See Also: Pavtube Vdieo Converter Online Help
*************************************************************
During the conversion job you can check out the progress for the current and total files, elapsed and remaining time, generated and estimated size, as well as a log file. Plus, you can pause the task and enable Pavtube Video Converter to automatically turn off the computer after conversion.
The conversion process itself is fairly fast (thanks to the program's multi-thread support) and doesn't take up much of your system's resources. An attractive and affordable option for those looking for fast and stress-free video conversion processes.
Official Download: http://download.pavtube.com/video_converter/videoconverter_setup.exe
Cnet Download: http://download.cnet.com/Pavtube-Video-Converter/3000-2194_4-75734821.html
Pros
- The conversion process itself is fairly fast.
- Intuitive and nice-to-look-at interface.
- Batch processing is permitted.
- Includes a useful output profile manager.
- Allows you to add various video effects to your source files.
- Subtitle support.
- Supports nearly all known media file formats.
Cons
- Multiple-output conversion is not supported.
Lists of Pavtube Video Converter Guides:
Learn more at http://www.pavtube.com/video_converter/
In addition, you can preview clips and take snapshots, apply effects, make image adjustments (e.g. brightness, contrast), replace the audio steam, and more.
But you can also make audio and video modifications when it comes to the codec, size, bit rate, frame rate, sample frequency rate, channels and others. Settings can be restored to their default values.
See Also: Pavtube Vdieo Converter Online Help
*************************************************************
During the conversion job you can check out the progress for the current and total files, elapsed and remaining time, generated and estimated size, as well as a log file. Plus, you can pause the task and enable Pavtube Video Converter to automatically turn off the computer after conversion.
The conversion process itself is fairly fast (thanks to the program's multi-thread support) and doesn't take up much of your system's resources. An attractive and affordable option for those looking for fast and stress-free video conversion processes.
Official Download: http://download.pavtube.com/video_converter/videoconverter_setup.exe
Cnet Download: http://download.cnet.com/Pavtube-Video-Converter/3000-2194_4-75734821.html
Pros
- The conversion process itself is fairly fast.
- Intuitive and nice-to-look-at interface.
- Batch processing is permitted.
- Includes a useful output profile manager.
- Allows you to add various video effects to your source files.
- Subtitle support.
- Supports nearly all known media file formats.
Cons
- Multiple-output conversion is not supported.
Lists of Pavtube Video Converter Guides:
Learn more at http://www.pavtube.com/video_converter/
Using a top MXF to ProRes Converter for Mac, you can easily convert Canon XF MXF files to Final Cut Pro X native Apple ProRes 422 for editing flawlessly.
Below are several disscussions about looking for the way importing Canon MXF files to the Final Cut Pro X:
Q1: Canon MXF files into FCP X
I'm interested in the new Canon XF300 camera, but I'm still working on an Apple G5 with FCP X. Is there an application, plug-in, etc. for the new FCP X to take in MXF files? [G5, Mac OS X (10.4.11)]
Q2: importing Canon .MXF files to Final Cut Pro X
What plug-in do I need to install so i can import and edit .MXF video files in Final Cut. The suggestion of doing Log and Transfer doesn't work (the .MXF files are gray out not allowing me to select it.) [Final Cut Pro X, Mac OS X (10.5.8)]
Q3: Support for Canon MXF from XF100 in FCP X?
How do I import .mxf files into Final Cut Pro X? This is the latests and greatests software right? There must be a way. Help Please.
 Here many folks are talking about how to import Canon MXF files into Final Cut Pro X for editing without rendering time. Well, don't blame to the Final Cut Pro X, the "Import from Camera…" option works just like "Log and Transfer". The thing is, even FCP X does not work with the Canon MXF files.
As far as i know, to solve those problems, the most important piece of the equation is that transcoding Canon MXF files to Final Cut Pro X native formats(e.g. Apple ProRes encoded mov format) along with some help from the third-party software. To help those who wanna import/edit MXF files in Final Cut Pro X flawlessly, I'm sharing my experience to convert Canon MXF files to Apple ProRes Codec for Final Cut Pro X.
As a professional MXF video converter, Pavtube iMixMXF provides your requirements for preserving and mixing MXF multi-tracks/channels, converting your Canon MXF video files to Apple ProRes codec, which is the best format for FCP (X)) output. The great MXF Converter for Mac also transcode MXF from HD camcorders (like JVC, Panasonic, Sony and Canon) to multi-track MKV/MP4/MOV or popular HD & Common video formats for professional editing in editing programs (e.g. FCE, iMovie, Avid Media Composer, Adobe Premiere Pro CC/CS, After Effects CC/CS, Premiere Elements, Creative Suite 6/5, Aperture 3, DaVinci Resolve, iPhoto, Kdenlive, Keynote) and free playback on iOS/Android/Windows devices, HDTV, Media Players and more. Apart from **multi-track preserving**, Pavtube iMixMXF can also mix multi tracks into one track. This feature help you mix the audios of interviewer, interviewee, surroundings, or editors/directors comments into one.
____________________________________________________________________________________
Mac OS X 10.10 Yosemite, Mavericks 10.9 are supported now. Below is how.
Guide: How to Transcode Canon MXF footage to Final Cut Pro X editable format?
Step 1. Import MXF files to the top Mac MXF to FCP X Converter.
(Before conversion, you need to transfer MXF files from your camcorder or camera to Mac Hard Drive, then click the "add" button to browse to import Canon MXF videos)
Step 2. Click the format bar, and move mouse cursor to "Final Cut Pro > Apple ProRes 422 (*.mov)" as output format.
Here many folks are talking about how to import Canon MXF files into Final Cut Pro X for editing without rendering time. Well, don't blame to the Final Cut Pro X, the "Import from Camera…" option works just like "Log and Transfer". The thing is, even FCP X does not work with the Canon MXF files.
As far as i know, to solve those problems, the most important piece of the equation is that transcoding Canon MXF files to Final Cut Pro X native formats(e.g. Apple ProRes encoded mov format) along with some help from the third-party software. To help those who wanna import/edit MXF files in Final Cut Pro X flawlessly, I'm sharing my experience to convert Canon MXF files to Apple ProRes Codec for Final Cut Pro X.
As a professional MXF video converter, Pavtube iMixMXF provides your requirements for preserving and mixing MXF multi-tracks/channels, converting your Canon MXF video files to Apple ProRes codec, which is the best format for FCP (X)) output. The great MXF Converter for Mac also transcode MXF from HD camcorders (like JVC, Panasonic, Sony and Canon) to multi-track MKV/MP4/MOV or popular HD & Common video formats for professional editing in editing programs (e.g. FCE, iMovie, Avid Media Composer, Adobe Premiere Pro CC/CS, After Effects CC/CS, Premiere Elements, Creative Suite 6/5, Aperture 3, DaVinci Resolve, iPhoto, Kdenlive, Keynote) and free playback on iOS/Android/Windows devices, HDTV, Media Players and more. Apart from **multi-track preserving**, Pavtube iMixMXF can also mix multi tracks into one track. This feature help you mix the audios of interviewer, interviewee, surroundings, or editors/directors comments into one.
____________________________________________________________________________________
Mac OS X 10.10 Yosemite, Mavericks 10.9 are supported now. Below is how.
Guide: How to Transcode Canon MXF footage to Final Cut Pro X editable format?
Step 1. Import MXF files to the top Mac MXF to FCP X Converter.
(Before conversion, you need to transfer MXF files from your camcorder or camera to Mac Hard Drive, then click the "add" button to browse to import Canon MXF videos)
Step 2. Click the format bar, and move mouse cursor to "Final Cut Pro > Apple ProRes 422 (*.mov)" as output format.
 Step 3. Click "Convert" button to start transcoding Canon MXF files to Apple ProRes Codec.
Once the conversion is 100% completed, you can smoothly import the converted Canon MXF files to FCP X for further editing without hassle.
Some more helpful features of the app:
1. Settings- click to set video resolution(1920×1080/1440×1080/1280×720/720×480), bitrate (from 1Mbps to 20Mbps), frame rate (24p/30p)
2. Editor (next to "Add" icon)- click to set deinterlace, denoise, mute, volume up, trim, crop, etc.
______________________________________________________________________________
Read more:
Step 3. Click "Convert" button to start transcoding Canon MXF files to Apple ProRes Codec.
Once the conversion is 100% completed, you can smoothly import the converted Canon MXF files to FCP X for further editing without hassle.
Some more helpful features of the app:
1. Settings- click to set video resolution(1920×1080/1440×1080/1280×720/720×480), bitrate (from 1Mbps to 20Mbps), frame rate (24p/30p)
2. Editor (next to "Add" icon)- click to set deinterlace, denoise, mute, volume up, trim, crop, etc.
______________________________________________________________________________
Read more: