Canon C300 Mark II is a very hot camcorder on the market now. A lot of users choose to buy this excellent camcorder. It is a new camcorder with 4K internal video recording, which is aimed at beginners and semi-professionals who would want to upgrade to shooting 4K video without spending the big bucks for it. While as we often mentioned, as the incompatible one, MXF cannot be one of the best supported video formats for iMovie. Hot search: 4K MXF to YouTube/Vimeo/Facebook | 4K MXF to DaVinci Resolve | 4K MXF to Sony Vegas | 4K MXF to After Effects | MXF to Avid Media Composer | MXF to Apple Aperture 3  Though Canon C300 Mark II camcorder can help you to record high quality 4K MXF footages, but usually it can make video editing a real nightmare. "I’ve got a ton of Canon C300 Mark II footage that I’m trying to import the C300 Mark II 4K MXF files to iMovie for further editing. Since the files come out natively as MXF, iMovie couldn’t recognize these files at all, let alone do the polishing work. What should I do?" Some main formats that iMovie supported are allowed below:
  List of iMovie exported video formats:
  iMovie supports Apple InterMediate Codec (AIC) natively although, it is pretty picky with the codec of what it’ll accept. For those who need to edit Canon C300 Mark II 4K MXF in iMovie on Mac, we would recommend converting 4K MXF to AIC MOV before editing. As we mentioned above, AIC is iMovie’s favorite editing codec, which iMovie will read and handle well. In this way, you can expect a fast and fluid workflow between C300 Mark II 4K MXF and iMovie. How could we remove the troubles when editing C300 Mark II 4K MXF in iMovie? The process is surprisingly easy and can be done with the help ofPavtube iMixMXF. With this program, you can effortlessly encode/re-encode Canon C300 Mark II 4K MXF footage for smoothly importing and editing in various NLEs.
 Other Download: - Pavtube old official address: http://www.pavtube.com/imixmxf-mac/ - Amazon Download: http://www.amazon.com/Pavtube-Studio-iMixMXF-Download/dp/B00QI7MY4Y - Cnet Download: http://download.cnet.com/Pavtube-iMixMXF/3000-2194_4-76171460.html Hot News!!! Pavtube Summer Promotion has become something of a tradition, and it's back for 2015. Giveaway and Save up to 50% OFF for new Pavtube Software owners, this sale runs until Aug 7, 2015.
  How to import Canon C300 Mark II 4K MXF to iMovie for further editing on Mac? Step 1: Download and install the program from the website or click the free trial icon. Then, launch the best iMixMXF and load your original MXF files in with "Add video" or "Add from folder". Directly drag files in is available.
 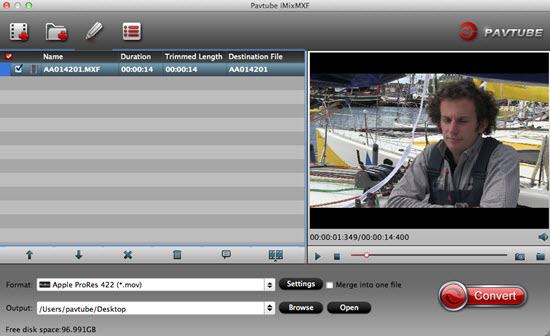 Step 2: Click the "Format" bar to get the drop-down menu and you can get "iMovie and Final Cut Express>>Apple InterMediate Codec (AIC) (*.mov)".
  Step 3: Click "Settings" button to customize the output video and audio settings by yourself. But if you are not good at it, you’d better use the default parameters, they will ensure you a good balance between file size and image quality basically. You can change the resolution, bit rate, frame rate as you need. Step 4: Click the "Convert" button on the main interface if you have done all the preparation work. This is the workflow that we need to convert 4K MXF to AIC MOV. Conclusion: OK, everything is ready, you can get the generated files by clicking "Open" button and instantly edit Canon C300 Mark II 4K MXF files in iMovie. More related tips:
Source: http://digisns.com/2015/07/edit-4k-mxf-in-imovie/
Step 3: Click "Settings" button to customize the output video and audio settings by yourself. But if you are not good at it, you’d better use the default parameters, they will ensure you a good balance between file size and image quality basically. You can change the resolution, bit rate, frame rate as you need. Step 4: Click the "Convert" button on the main interface if you have done all the preparation work. This is the workflow that we need to convert 4K MXF to AIC MOV. Conclusion: OK, everything is ready, you can get the generated files by clicking "Open" button and instantly edit Canon C300 Mark II 4K MXF files in iMovie. More related tips:
Source: http://digisns.com/2015/07/edit-4k-mxf-in-imovie/
The newly released Samsung NX500 has the ability to support both 4K and UHD video recording. The built-in H.265/HEVC codec, the most advanced compression technology available, brings efficiency to the storage of video clips by compressing high quality video to half the size and the bit rate of H.264 footage without any compromise on quality. Hot search: NX500 to DaVinci Resolve Lite | NX500 to QuickTime | NX500 to AE CC | NX500 to Ultra HDTV | NX500 to Sony Vegas Pro | NX500 to iMovie/FCE  The H.265/HEVC used by those HD Camcorder or Camera would be the best solution to compress those high resolution video into small size while maintain the sharp quality. But the step of relevant support software can’t catch this fast digital speed. So users have find that if there is no proper tools, they cannot do anything with NX500 H.265 videos , for the lack of codec among most NLEs or media player and devices. There’s no doubt nonlinear editors will eventually support the H.265 codec, but if you’re like us, you may have to convert NX500 videos to a usable codec before you can import and edit your footage. Comparing with others, Pavtube Video Converter for Mac has the strong ability of transcoding all different videos. With a faster conversion speed and easy operation, it can support most hot media devices and editing programs. Also, I’m sure you’ll be satisfied with some other functional items there. If you are running on Windows operating system, you can choose the equivalent version- Pavtube Video Converter.
 Other Download: - Pavtube old official address: http://www.pavtube.com/video-converter-mac/ - Amazon Store Download: http://www.amazon.com/Pavtube-Video-Converter-Mac-Download/dp/B00QIBK0TQ - Cnet Download: http://download.cnet.com/Pavtube-Video-Converter/3000-2194_4-76179460.html How to convert and edit NX500 videos? Step 1: Download and have a quick installation. The trial version will have a watermark on your converted files. Except for that, there are no time limitation, no virus, and no unnecessary bundle apps while downloading. After that, click "Add Video" button to load your original NX500 video files. You can load several files at once thanks to "Add from folder" button.
  Step 2: You can choose the output format in the "Format" drop-down list according to your needs. If you are planning to transfer the output videos to portable devices, media players, video sharing websites, NLEs and etc. for enjoyment, playing and editing, you can choose the optimized presets. More than 160 formats to export is available for you and it can meet your needs fully. For instance, if you want to edit NX500 videos in iMovie, choose "iMovie and Final Cut Express>>Apple InterMediate Codec (AIC) (*.mov)" as output format.
  Step 3: This best program offers some editing functions. You can tick "Merge into one file" under the preview window. And click "Edit" button, you can make changes to the video effects as you wish. In the editing window, you can trim your favorite part from the video, crop the frame size, adjust the visual effects, or add watermarks and more. For inserting subtitles, click "Edit" to choose the "Subtitle" to check "Enable" to select your subtitle paths. After completing, hit "OK" to return to the main interface. If you want to change the video parameters, go back to the main interface and click "Settings" button, you can select the video encoder, resolution, audio channel and more. This function is something worth trying. You can get the work done splendidly. Step 4: After all preparation work done, click "Convert" button to start the edit and conversion work. Conclusion: When the conversion is done, you can click "Open" to get your generated files. With this program, you can convert and edit NX500 videos seamlessly. More related tips:
Source: http://ivideo-home.jimdo.com/2015/07/23/convert-edit-nx500-h265-videos/
Step 3: This best program offers some editing functions. You can tick "Merge into one file" under the preview window. And click "Edit" button, you can make changes to the video effects as you wish. In the editing window, you can trim your favorite part from the video, crop the frame size, adjust the visual effects, or add watermarks and more. For inserting subtitles, click "Edit" to choose the "Subtitle" to check "Enable" to select your subtitle paths. After completing, hit "OK" to return to the main interface. If you want to change the video parameters, go back to the main interface and click "Settings" button, you can select the video encoder, resolution, audio channel and more. This function is something worth trying. You can get the work done splendidly. Step 4: After all preparation work done, click "Convert" button to start the edit and conversion work. Conclusion: When the conversion is done, you can click "Open" to get your generated files. With this program, you can convert and edit NX500 videos seamlessly. More related tips:
Source: http://ivideo-home.jimdo.com/2015/07/23/convert-edit-nx500-h265-videos/
Summary: What's the best way to work with Canon C100 Mark II AVCHD in FCP X? This article aims to give you an easy solution to edit C100 Mark II AVCHD in FCP X on Mac OS X (Yosemite included) without hassle.
Hot search: Canon LEGRIA HF to FCP | Canon 3D Videos in After Effects | Canon C100 to DaVinci Resolve | Convert Sony/Panasonic/Canon Cameras Files | MTS to MOV
 Canon C100 Mark II camcorder is unveiled not long ago, now many users have bought this camcorder. The C100 mark II uses super 35mm canon cmos sensor and a digic dv 4 processor, which are very excellent on the market. With this equipment, this camcorder can offer you better image quality. Besides, it also has many useful features.
However, due to different reasons, people sometimes may encounter incompatibility issues one or another while importing and editing Canon C100 Mark II footage in FCP X. "Not long ago, I purchased the C100 Mark II camcorder. This device has helped me to record a lot of videos since I got it. Today I need to edit few of the videos in FCP X on Mac, so I tried to import the footages into FCP X, but it is disappointed to find that FCP X can't recognize the AVCHD MTS files recorded by C100 Mark II. It is said the video format is not supported."
The Canon C100 Mark II is able to records 1080p videos with dual codec capability in AVCHD and MP4 container format. As we know AVCHD MTS format is great for recording footage from the camera, but it can be a challenge for editing. Although FCP X now has the ability to support MTS videos natively, it doesn't mean you can edit MTS in FCP smoothly all the time. To solve those problems, the quick workaround is to convert Canon C100 Mark II AVCHD to FCP X best accepted format.
Some main files formats recommended for Final Cut Pro:
Video Formats: Apple Animation codec, Apple Intermediate codec, Apple ProRes(all versions), AVC-intra, AVCHD (including AVCCAM, AVCHD Lite, and NXCAM), DV (including DVCAM, DVCPRO, and DVCPRO50), DVCPRO HD, H.264, HDV, iFrame, Motion JPEG(OpenDML only), MPEG IMX(D-10), REDCODE RAW (R3D), Uncompressed 10-bit 4:2:2, Uncompressed 8-bit 4:2:2, XAVC, XDCAM HD/EX/HD422, QuickTime formats.
Audio Formats: AAC, AIFF, BWF, CAF, MP3, MP4, WAV
Container Format: 3GP, AVI, MP4, MXF, QuickTime
Still-image Formats: BMP, GIF, JPEG, PNG, PSD, RAW, TGA, TIFF
According to the information above, Apple ProRes codec, natively supported by FCP X, is highly recommended. Along with some help from third-party software to convert AVCHD MTS to ProRes, editing Canon C100 Mark II AVCHD in FCP X can be done effortlessly. The utility applied here is the professional Pavtube MTS/M2TS Converter for Mac which can be used as a top MTS/M2TS to ProRes Converter under OS X Yosemite. With it, you can effortlessly transcode AVCHD MTS/M2TS files to ProRes 422 encoded MOV for Final Cut Pro X, and it works well and converts flawlessly. Meanwhile, the Mac MTS conversion tool can create files compatible with various non-linear editing systems including Avid Media Composer, iMovie/FCE, and Adobe Premiere Pro, Premiere Elements, After Effects, etc.
Other Download:
- Pavtube old official address: http://www.pavtube.com/mts-converter-mac/
- Amazon Download: http://www.amazon.com/Pavtube-MTS-M2TS-Converter-Download/dp/B00QIE3U0Y
- Cnet Download: http://download.cnet.com/Pavtube-MTS-M2TS-Converter/3000-2194_4-76177029.html
Here is a step-by-step tutorial for you to figure out your AVCHD MTS footage to FCP X problem:
Step 1: Import Canon C100 Mark II files to Mac MTS Converter. Run it as the best Mac MTS Converter, and click the "Add video" button to load your original files. You may also directly drag and drop files to application UI for importing files.
Canon C100 Mark II camcorder is unveiled not long ago, now many users have bought this camcorder. The C100 mark II uses super 35mm canon cmos sensor and a digic dv 4 processor, which are very excellent on the market. With this equipment, this camcorder can offer you better image quality. Besides, it also has many useful features.
However, due to different reasons, people sometimes may encounter incompatibility issues one or another while importing and editing Canon C100 Mark II footage in FCP X. "Not long ago, I purchased the C100 Mark II camcorder. This device has helped me to record a lot of videos since I got it. Today I need to edit few of the videos in FCP X on Mac, so I tried to import the footages into FCP X, but it is disappointed to find that FCP X can't recognize the AVCHD MTS files recorded by C100 Mark II. It is said the video format is not supported."
The Canon C100 Mark II is able to records 1080p videos with dual codec capability in AVCHD and MP4 container format. As we know AVCHD MTS format is great for recording footage from the camera, but it can be a challenge for editing. Although FCP X now has the ability to support MTS videos natively, it doesn't mean you can edit MTS in FCP smoothly all the time. To solve those problems, the quick workaround is to convert Canon C100 Mark II AVCHD to FCP X best accepted format.
Some main files formats recommended for Final Cut Pro:
Video Formats: Apple Animation codec, Apple Intermediate codec, Apple ProRes(all versions), AVC-intra, AVCHD (including AVCCAM, AVCHD Lite, and NXCAM), DV (including DVCAM, DVCPRO, and DVCPRO50), DVCPRO HD, H.264, HDV, iFrame, Motion JPEG(OpenDML only), MPEG IMX(D-10), REDCODE RAW (R3D), Uncompressed 10-bit 4:2:2, Uncompressed 8-bit 4:2:2, XAVC, XDCAM HD/EX/HD422, QuickTime formats.
Audio Formats: AAC, AIFF, BWF, CAF, MP3, MP4, WAV
Container Format: 3GP, AVI, MP4, MXF, QuickTime
Still-image Formats: BMP, GIF, JPEG, PNG, PSD, RAW, TGA, TIFF
According to the information above, Apple ProRes codec, natively supported by FCP X, is highly recommended. Along with some help from third-party software to convert AVCHD MTS to ProRes, editing Canon C100 Mark II AVCHD in FCP X can be done effortlessly. The utility applied here is the professional Pavtube MTS/M2TS Converter for Mac which can be used as a top MTS/M2TS to ProRes Converter under OS X Yosemite. With it, you can effortlessly transcode AVCHD MTS/M2TS files to ProRes 422 encoded MOV for Final Cut Pro X, and it works well and converts flawlessly. Meanwhile, the Mac MTS conversion tool can create files compatible with various non-linear editing systems including Avid Media Composer, iMovie/FCE, and Adobe Premiere Pro, Premiere Elements, After Effects, etc.
Other Download:
- Pavtube old official address: http://www.pavtube.com/mts-converter-mac/
- Amazon Download: http://www.amazon.com/Pavtube-MTS-M2TS-Converter-Download/dp/B00QIE3U0Y
- Cnet Download: http://download.cnet.com/Pavtube-MTS-M2TS-Converter/3000-2194_4-76177029.html
Here is a step-by-step tutorial for you to figure out your AVCHD MTS footage to FCP X problem:
Step 1: Import Canon C100 Mark II files to Mac MTS Converter. Run it as the best Mac MTS Converter, and click the "Add video" button to load your original files. You may also directly drag and drop files to application UI for importing files.
 Step 2: Click the "Format" bar to get the drop-down menu and you can get "Final Cut Pro>>Apple ProRes codec", including ProRes 422, ProRes 422 (HQ), ProRes 422 (LT), ProRes 422 (Proxy) and ProRes 4444. Choose the proper one you want. Here, we suggest you to choose "Apple ProRes 422 (*.mov)" as the best output format.
 Step 3: Click "Settings" button to customize the output video and audio settings by yourself. But if you are not good at it, you'd better use the default parameters, they will ensure you a good balance between file size and image quality basically. You can change the resolution, bit rate, frame rate as you need.
Step 4: When everything is ready, click "Convert" to start converting C100 Mark II AVCHD MTS to ProRes MOV. This Mac MTS/M2TS Converter supports batch conversion so you may load multiple files and convert them at one time.
Conclusion: After converting, you can get the generated files by clicking "Open" button. Now, you can edit Canon C100 Mark II AVCHD footage in FCP X freely.
More related tips:
Hot News!!! Pavtube Summer Promotion has become something of a tradition, and it's back for 2015. Giveaway and Save up to 50% OFF for new Pavtube Software owners, this sale runs until Aug 7, 2015.
Source: http://digitalmediasolution.altervista.org/blog/edit-avchd-in-fcp-x/
Step 3: Click "Settings" button to customize the output video and audio settings by yourself. But if you are not good at it, you'd better use the default parameters, they will ensure you a good balance between file size and image quality basically. You can change the resolution, bit rate, frame rate as you need.
Step 4: When everything is ready, click "Convert" to start converting C100 Mark II AVCHD MTS to ProRes MOV. This Mac MTS/M2TS Converter supports batch conversion so you may load multiple files and convert them at one time.
Conclusion: After converting, you can get the generated files by clicking "Open" button. Now, you can edit Canon C100 Mark II AVCHD footage in FCP X freely.
More related tips:
Hot News!!! Pavtube Summer Promotion has become something of a tradition, and it's back for 2015. Giveaway and Save up to 50% OFF for new Pavtube Software owners, this sale runs until Aug 7, 2015.
Source: http://digitalmediasolution.altervista.org/blog/edit-avchd-in-fcp-x/
Summary: Does Canon C300 Mark II recorded 4K MXF footages just go straight to Premiere Pro CS6/5/4/3? In this article, we’ll give you the tips how to import and edit C300 Mark II 4K MXF in Premiere Pro CS6/5/4/3 without problems. Hot search: MXF to Avid MC | MXF to iMovie | MXF to FCP X | MXF to Avid Media Composer | MXF to Apple Aperture 3 | 4K MXF in Quantel workstation  Canon C300 Mark II is a hot camcorder on the market, since it released it has attracted great attention due to its excellent hardware equipment. It features a Super 35mm CMOS sensor, which will help you to record 4K, 1920*1080 60/50i, 23.98/25p True 24p videos. With C300 Mark II you can record high quality videos, it delivers the highest image quality with its XF Codec–the same codec used by other Canon XF professional camcorders. Though Canon C300 Mark II camcorder can help you to record high quality 4K MXF footages, but usually it can make video editing a real nightmare. "I’ve got a ton of Canon C300 Mark II footage that I’m trying to import the C300 Mark II 4K MXF files to Premiere Pro CS4 for further editing. Since the files come out natively as MXF, Premiere Pro CS4 couldn’t recognize these files at all, let alone do the polishing work. What should I do?" If you are currently using an older version of the Adobe (for instance prior to Adobe version CS5), maybe an upgrade of the Adobe version could help. Still stuck with unsuccessful attempts? Perhaps there is some required codec missing or it is an incompatible video file format. Actually, it’s not so hard to do the trick. Why we always have trouble editing because Premiere Pro still cannot accept all codecs contained in an MXF file to go natively. From Adobe Premiere Pro supported file formats list, we can find Premiere supports MPEG-2. So here comes to the key problem. Now, the problem seems easier to be solved–a professional and powerful tool is the solution. Here we recommend Pavtube iMixMXF, applying which you are capable of converting C300 Mark II 4K MXF to MPEG-2 MPG format, the compatible video format with Premiere, with lossless quality at faster speed so that you can edit the footages in Premiere Pro CS6/5/4/3 without any problem. Besides, the program is developed with some useful editing features, including merging several clips into one for easy importing, downsizing the files for editing and storage, adding text/image/video to original files, adding subtitles, replacing original audio tracks, etc. Other Download: - Pavtube old official address: http://www.pavtube.com/imixmxf-mac/ - Amazon Download: http://www.amazon.com/Pavtube-Studio-iMixMXF-Download/dp/B00QI7MY4Y - Cnet Download: http://download.cnet.com/Pavtube-iMixMXF/3000-2194_4-76171460.html How to import Canon C300 Mark II 4K MXF to Premiere Pro CS6/5/4/3 for further editing? Step 1: Download and install the program from the website or click the free trial icon. Then, launch the best iMixMXF and load your original MXF files in with "Add video" or "Add from folder". Directly drag files in is available. Step 2: Click the "Format" bar to get the drop-down menu and you can get "Adobe Premiere/Sony Vegas>>MPEG-2 (*.mpg)".
  Step 3: Click "Settings" button to customize the output video and audio settings by yourself. But if you are not good at it, you’d better use the default parameters, they will ensure you a good balance between file size and image quality basically. You can change the resolution, bit rate, frame rate as you need. Step 4: Click the "Convert" button on the main interface if you have done all the preparation work. This is the workflow that we need to convert 4K MXF to MPEG-2 .mpg. Conclusion: OK, everything is ready, you can get the generated files by clicking "Open" button and instantly edit Canon C300 Mark II 4K MXF files in Premiere Pro CS6/5/4/3. More related tips:
Source: http://1080p-video-tool.blogspot.com/2015/07/import-4k-mxf-to-premiere-pro.html
Step 3: Click "Settings" button to customize the output video and audio settings by yourself. But if you are not good at it, you’d better use the default parameters, they will ensure you a good balance between file size and image quality basically. You can change the resolution, bit rate, frame rate as you need. Step 4: Click the "Convert" button on the main interface if you have done all the preparation work. This is the workflow that we need to convert 4K MXF to MPEG-2 .mpg. Conclusion: OK, everything is ready, you can get the generated files by clicking "Open" button and instantly edit Canon C300 Mark II 4K MXF files in Premiere Pro CS6/5/4/3. More related tips:
Source: http://1080p-video-tool.blogspot.com/2015/07/import-4k-mxf-to-premiere-pro.html
Summary: When playing 4K Red recordings on Realplayer, you're gonna suffer a big annoyance- Realplayer won't play 4K Red recordings for you. Any suggestions can be offered? Hot search: HD 4K video to iMovie | 4K videos on VLC | 4K Video to DropBox | 4K Videos To PS4 | 4K Video to 1080p | 4K Video to Sony Movie Studio | 4K Video to Avid MC | 4K MXF to Premiere Pro| 4K Video to DNxHD  The Red digital cinema camera company is an American company that manufactures professional-grade digital cinematography and photography tools. Red cameras are very modular and support raw recording of stills and video, in the case of the RED Epic-M up to 6K resolution. "I'm on Windows operating system and recently my friend gave me a 4K Red video. When I used Realplayer, the video is very sharp and some of the text in it can't be seen correctly." There are more and more 4K recordings that we can access such as from 4K Red camera, famous streaming video hosting sites (YouTube, Vimeo) and others. When you got some 4K Red recordings, you may wanna play them on computer, mobile or portable devices. Well, as there are many users are facing the trouble watching 4K Red recordings on Realplayer, what's the best solution? Currently, most 4K recordings are recorded in MXF/RAW/XAVC/XAVC-S format, while Realplayer supports .mp4 format best. That means, as long as you convert 4K Red recordings to Realplayer supported MP4 format, you can play any 4K Red recordings on Realplayer flawlessly. Luckily, now we've got this problem fixed! Pavtube Video Converter is highly recommended and you can depend on it to perfectly convert any 4K Red recordings to Realplayer accepted MP4 format with 100% the original 4K video quality kept. If you are running on Mac version, you can refer to the equivalent version- Pavtube Video Converter for Mac.
 Other Download: - Pavtube old official address: http://www.pavtube.com/video_converter/ - Amazon Download: http://download.cnet.com/Pavtube-Video-Converter/3000-2194_4-75734821.html - Cnet Download: http://download.cnet.com/Pavtube-Video-Converter/3000-2194_4-75734821.html Hot News!!! Pavtube Summer Promotion has become something of a tradition, and it's back for 2015. Giveaway and Save up to 50% OFF for new Pavtube Software owners, this sale runs until Aug 7, 2015.More details are allowed here for you to take the advice: Step 1: Download and install the corresponding program. Click "Add video" on the main interface to load 4K videos to the program. You can also drag the files to the program's window list directly. This program can also support the batch video clips.
  Step 2: Select the right formats for playing on Realplayer. Here we suggest you to go to the "HD Video" list, you will get the "H.264 HD Video (*.mp4)" as the best output.
  Step 3: Click "Settings" button; you can adjust video and audio settings, including codec, aspect ratio, bit rate, frame rate, sample rate, and audio channel. To down-convert ultra HD 4K to 1080p for easier playback, you just need to adjust video size to 1920*1080. Step 4: After all the settings, you can preview the final result of movie. If you are happy with the effect, you can then press the big "Convert" button on the lower right to launch the conversion. Conclusion: Some guys recommend third-party 4K video player apps like VLC, DivX Player, Media Player Classic, but all of them can't be an ultimate solution for all 4K videos. Based on our testing, to have a smooth 4K Red recordings playback on Realplayer, this professional converter is the best choice. More related tips:
Source: http://1080p-video-tool.blogspot.com/2015/06/play-4k-red-recordings-on-realplayer.html
Step 3: Click "Settings" button; you can adjust video and audio settings, including codec, aspect ratio, bit rate, frame rate, sample rate, and audio channel. To down-convert ultra HD 4K to 1080p for easier playback, you just need to adjust video size to 1920*1080. Step 4: After all the settings, you can preview the final result of movie. If you are happy with the effect, you can then press the big "Convert" button on the lower right to launch the conversion. Conclusion: Some guys recommend third-party 4K video player apps like VLC, DivX Player, Media Player Classic, but all of them can't be an ultimate solution for all 4K videos. Based on our testing, to have a smooth 4K Red recordings playback on Realplayer, this professional converter is the best choice. More related tips:
Source: http://1080p-video-tool.blogspot.com/2015/06/play-4k-red-recordings-on-realplayer.html