Receive XAVC S footage from the newest Sony FDR-AX100 camcorder? After editing your XAVC files in PowerDirector 13, both H.265 and H.264 codec videos you can get as output. but how to convert them freely to each other has become an important task.  'Last sunday I made my first shot with FDR-AX100. Then I edit the video with PowerDirector13 Ultra. I create 2 exports: One 4K-to-1080p H264 codec and One 4K-to-1080p H265 codec. Both videos are MP4 conteiners. In order to freely transcode the H.265 and H.264 to each other no matter for editing in NELs or playing on media players, I'm looking for a professional video converter that can work the issues well. Any good suggestions?' Pavtube Video Converter - Best H.264/H.265 converter for us! From H.264 to H.265, we can fully take advantage of the higher quality and smaller size. While from H.265 to H.264, it can help us edit or play H.265 videos on NELs and players much more eaisly. That's the truth! So here we strongly recommend the Pavtube Video Converter for you, with the newest version 4.8.2.0, it can support the H.265/HEVC videos encode and decode well. Let's see the great changes of this H.65 Video Converter (Upgraded details) How to Encode Sony AX100 XAVC S videos to H.265 video for playing?[b]
[b]Step 1. When you download and install this program in according to its instructions, open the main interface, drag your files with 'Add video' or 'Add from folder', we can easily let the source files in. The latest version 4.8.2.0 can support the H.265/HEVC videos for importing well. 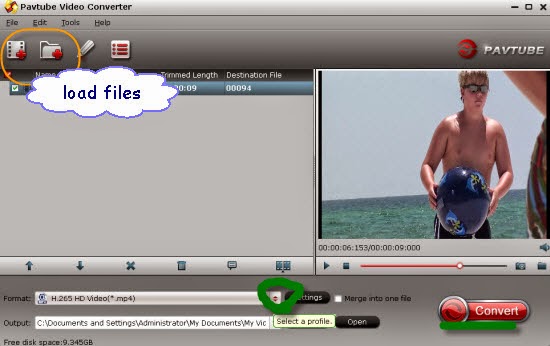 Step 2. Next, let's come to the output list for more details, there are some main changes we should know better in this new version. Such as the added item 'H.264 Baseline/Main/High' three standards we can choose as we want. Usually, for some older devices, we can choose the baseline for the best, but for new, we always choose the 'High' to get the best quality.
 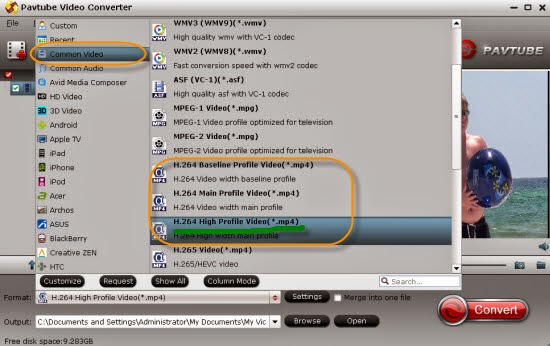 What's more, we can see the added 'HD Video>>H.265 HD Video(*/mp4)', here we can transcode our video to H.265 codec. With the smallest body of H.265 videos, I'm afraid it will take us a lot of time. So if you are free, why not have a try to presume the higher video quality? As mentioned above, we can choose this one for editing in PowerDirector for a nice editing.
 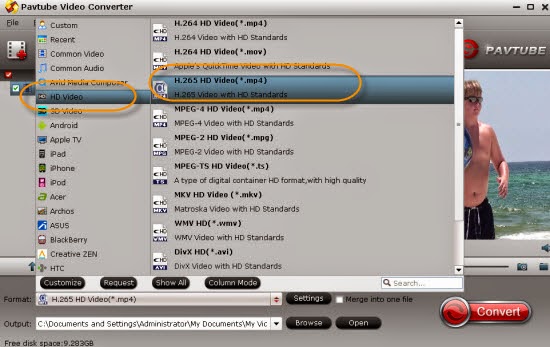 The upgraded version has already fixed the bug of the crash when importing MXF in XAVC codec in for working. Additionally, the original 'Settings' and 'Edit' functions they have preserved well. Tips: For now, the two versions are only available for Windows, the upgraded Mac version will release as soon as possible. So if you have already got this H.265 video converter, just click the 'Help'>>'Update'to the latest version for more enjoyment. Now, are you still worrying about how o deal with the H.264/H.265 videos after edited from PowerDirrector 13? Related:
Top-ranked Pavtube H.265 Video Converter Review
Convert HD Videos to Any Format or Device on Windows 8.1/8
Convert AAC MKV/MP4 movies to AC3 with 5.1 Channels
Synchronizing Media Contents to Your Microsoft Surface
Workflow: Samsung NX1 4K H.265 to Sony Movie Studio 13
Upload GoPro Hero4 4K Videos to YouTube/Vimeo
Convert GoPro Hero4 4K Videos to MKV/AVI/MOV/MPG/MP4/SWF/ASF
The upgraded version has already fixed the bug of the crash when importing MXF in XAVC codec in for working. Additionally, the original 'Settings' and 'Edit' functions they have preserved well. Tips: For now, the two versions are only available for Windows, the upgraded Mac version will release as soon as possible. So if you have already got this H.265 video converter, just click the 'Help'>>'Update'to the latest version for more enjoyment. Now, are you still worrying about how o deal with the H.264/H.265 videos after edited from PowerDirrector 13? Related:
Top-ranked Pavtube H.265 Video Converter Review
Convert HD Videos to Any Format or Device on Windows 8.1/8
Convert AAC MKV/MP4 movies to AC3 with 5.1 Channels
Synchronizing Media Contents to Your Microsoft Surface
Workflow: Samsung NX1 4K H.265 to Sony Movie Studio 13
Upload GoPro Hero4 4K Videos to YouTube/Vimeo
Convert GoPro Hero4 4K Videos to MKV/AVI/MOV/MPG/MP4/SWF/ASF
Source: http://bestvideoking.blogspot.com/2015/01/sony-ax100-exports-h.264-h.265-videos.html
******************************************************************
Good News! Pavtube Bundles Dealsare coming! If you want to import/preserve/mix multi-track MXF in MKV/MP4/MOV formats, get multi-track Apple Prores MOV for further editing in Final Cut Pro (X), the following bundled software is your best choice:
Video Converter($35) + MXF MultiMixer($45) = $54.9, Save $25.1 (buy link)
Video Converter for Mac($35) + iMixMXF($45) = $54.9, Save $25.1 (buy link)
MXF MultiMixer/iMixMXF Key Features:
-Import/preserve/mix multi-track MXF in MKV/MP4/MOV formats.
-Output multi-track Apple Prores MOV for further editing in Final Cut Pro (X).
-Support DVCPRO/HDV/Avid DNxHD/AIC output
-Convert MXF to any other formats for editing, playing, or broadcasting.
-Merge/split/trim/crop MXF footages.
Video Converter for Windows/Mac Key Features:
-Convert from and to any common SD/HD video and audio format.
-Support Apple ProRes/DVCPRO/HDV/Avid DNxHD/AIC encoding.
-Output formats for Windows/Mac editing software, e.g. FCP, iMovie, FCE, Avid, Adobe Premiere, Sony Vegas Pro, etc.
-Output formats for different playback devices, hdtv, hd media players, etc.

Go ahead and click the link to get your coupon. Save up to $44.1! Never miss!!!
Summary: Here are several best upgraded H.265/HEVC video converters offered especially for those Windows users who wanna work with their H.265/HEVC recordings. In a word, as the newest H.265/HEVC codec has become more and more popular in our video codec area. What brought to us was the related questions. What's the true meaning of H.265/HEVC? How could we edit or play H.265/HEVC codec videos? Is there any best methods provided for us to handle the H.265 encode and decode workflow well for other common or h.265 media devices? Why we need this H.265/HEVC instead of H.264? In a word, in order to compress our videos to smaller size and higher quality for a nice enjoyment, we sometimes wanna do some changes with this new codec. The new H.265 video format brings one huge benefit, which is the ability to stream high-quality video at half the bitrate that's normally required with H.264. While H.264 has become extremely popular during the past recent years, the ICU says that H.265 will be relevant for at least the next decade, and it could made 4K streaming less of a burden on bandwidth. See also: Comparison between H.265 (HEVC) and H.264 (AVC)  Pavtube Video Converter - 2015 Best H.265/HEVC Encoder and Converter Several days ago, Pavtube Studio, which is a famous video transcode studio announced that their upgraded Windows products can support the H.265/HEVC encode and decode job. I s that cool? With this good news, we won't worry about the H.265/HEVC recordings from some advanced 4K camcorders. Let's learn more information here. Key features after upgraded: 1. Acting as the H.265 Encoder, Pavtube Video Converter enables to encode all variety of video files including MP4, MOV, AVI, WMV, ASF, MPG, MKV, VOB, FLV, AVCHD, MXF, MOD, TOD, R3D, TS, RMVB, WTV and etc. to H.265(HEVC) format.
 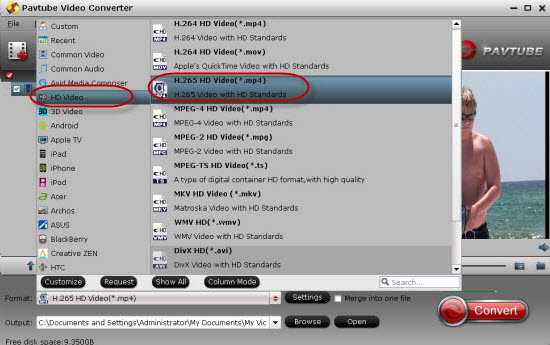 2. Acting as the H.265 Decoder, it supports decoding H.265 to other video format like MP4, AVI or directly convert H.265 video to audio format like MP3, WAV, AAC, WMA, AIFF, FLAC, RA, AU, DTS and etc. 3. Acting as the H.265 Player, Pavtube H.265 Converter can directly play H.265 video files without format conversion in the preview window after loaded in. 4. Acting as the H.265 Editor, it can edit H.265 like merge H.265 files into one, crop H.265, trim H.265, rotate H.265 video, add subtitles/watermark to HEVC, adjust the H.265 parameter like bitrates, frame rate, aspect ratio, audio volume and etc. Main H.265/HEVC Conversion guide you should know as follows: When you download the three H.265/HEVC converters we mentioned above, launch it and on the main interface you will see the 'Add video' and 'Add from folder' to make a favor in importing H.265 source files. Then on the output list, any one you can choose as you favorite if you need. For example, from H.265 to H.264, let's come to the 'Common Video' to select the 'H.264 Baseline/Main/High profile(*.mp4)' as the best. Just like the screen shot showed to you. See also: H.265 vs XAVC vs H.264 high profile output
  Before you start to work this H.265/HEVC conversion job, some extra functional items you can take a close looking. Such as the 'Settings' 'Edit' or 'Options' etc. With a high conversion speed, it will not take much more time to wait for the result. In all, it will be much easier to handle your H.265/HEVC videos in some popular Windows programs. Good luck! Free download the best H.265/HEVC Video Converter - Pavtube Video Converter for Windows users, install and launch it, the following interface will pop up. Simple guide on how to encode your H.265/HEVC Videos for editing, playing, burning and sharing etc.: http://www.video-pedia.com/2014/12/31/best-h265-hevc-video-encoder-decoder/ See Also: Convert H.264, MP4, MOV, AVI, MKV, FLV to H.265 video Convert Samsung NX1 H.265 videos to H.265 or H.264 MP4 video Workflow: Samsung NX1 4K H.265 to Sony Movie Studio 13 Import Samsung NX1 H.265 Recordings to Avid MC for Editing Cinemartin Cinec Alternative: Export to H.265/HEVC video format FFmpeg Alternatives: Encode H.265/HEVC Videos on Windows 8.1/8/7/XP Two Assistants: Encode H.265/HEVC Videos on Windows 8.1/8/7/XP Never miss to get Saving up to $44.1, MXF/MTS/M2TS/MKV/FLV/MOV Converter.etc at Pavtube Bundles Deals!
Summary: In order to make the Samsung NX1 4K H.265 recordings friendly with Sony Movie Studio, this following article can offer you some effective ways. Hello guys! It's not a bad idea if you are enjoying the 4K recordings with your Samsung NX1 camera! Cause this kind of 4K camera has shot the footage encoded by H.265 codec, which is the newest codec standard that not be fully spread in this video codec area. So editing your NX1 4K H.265 recordings to Sony Movie Studio 13 must trouble you a lot, right?  Comparing with the H.264, what advantages can H.265 bring to us? In general, H.265 has several big advantages over H.264, including better compression, delicate image and bandwidth saving. Small size, higher quality, that's the highlight h.265 codec brings to us. For more detailed differences, please read H.265 vs H.264 comparison table.
  Efficient way of converting H.265 to MPG to make it suitable for Sony Movie Studio 13. Among all available H.265 video converters in the market, not all video converting tools can hold the new H.265 codec videos well. Fortunately, the famous Pavtube Studio has claimed that their upgraded versionhas claimed the Pavtube Video Converter(version 4.8.2.0) can support the H.265 codec well. Let's get more details on how to work it well:
 How to Convert Samsung NX1 H.265 videos for working with Sony Movie Studio 13? Step 1. Load your NX1 H.265 recordings. Download, install and launch the NX1 H.265 Video Converter and open the main interface, normally, we can click the 'Add video' and 'Add from folder' to add the source recordings. Of course we can also drag the files in this program. Batch conversion is also available.
  Step 2.Choose suitable output for Sony Movie Studio 13 Then we are going to come to the top important step, select the best output one for Sony Movie Studio 13. Tap the 'Format' bar on left of the preview window, drop down the output list, nearly on the bottom of the list, we suggest to find the 'Adobe Premiere Pro/Sony Vegas'>>'MPEG-2 (*,mpg)' as the best. Also, MOV and WMV you can have a try.
  Tips: Encode other videos to H.265? Let me show you the way. Choose the 'HD Video' on the output list, could you see the 'H.265 HD Video (*.mp4)' there. That's what you want. What I need to mention you is H.265 codec on one hand brings the higher quality and smaller size, on the other hand, it also need much more time to wait for the conversion result. Step 3. Optional function for advanced users Still Pavtube studio keeps the 'Settings' item down for those who wanna more adjustments on their output videos. To adjust the video codec, video size, bitrates or frame rate or some audio channels, why not take around of this function?
  At the end of the page, if you have finished the preparation work, go back to the main interface, hit the big red button 'Convert' on the main interface, it's time to get our job started. More details about this upgraded version you can take this article review for a reference. Related articles:
Never miss to get Saving up to $44.1, MXF/MTS/M2TS/MKV/FLV/MOV Converter.etc at Pavtube Bundles Deals! Source: http://bestvideoking.blogspot.com/2014/12/nx1-h.265-to-sony-movie-movie-studio-13.html
At the end of the page, if you have finished the preparation work, go back to the main interface, hit the big red button 'Convert' on the main interface, it's time to get our job started. More details about this upgraded version you can take this article review for a reference. Related articles:
Never miss to get Saving up to $44.1, MXF/MTS/M2TS/MKV/FLV/MOV Converter.etc at Pavtube Bundles Deals! Source: http://bestvideoking.blogspot.com/2014/12/nx1-h.265-to-sony-movie-movie-studio-13.html
Summary: Have issues with importing 60p AVCHD MTS footage to Sony Vegas Pro on your Windows 8.1 or 8? Just follow the steps below to convert 60p MTS to Sony Vegas Pro compatible format(MPEG-2 format) to sovle it. Nowadays, more and more cameras and camcorders can give high-definition 1080 60p shootings. But we usually meet the problems while importing the 1080 60p AVCHD to Sony Vegas Pro (latest version 13 included) for postproduction. See also: Top 5 Video Editors Review - It is never hard for you to edit mts or m2ts files! Why does this happens? The reason behind that you can't edit 60p AVCHD MTS files in Sony Vegas Pro smoothly is due to the format and codec. AVCHD MTS is a delivery codec rather than editing codec and the 1080 60p is a non-standard format for NLE such as Sony Vegas Pro.  It is really bad news for Windows users. Is there any good way to make it though? Since Sony Vegas will not load 60p mts files directly, perhaps we can do it with the help of third-party software which helps to these 60p AVCHD clips to Sony Vegas Pro supported video formats like WMV format, making it possible for us to edit the 60p mts videos in Sony Vegas Pro smoothly. Among so much software on the market, it is strongly suggested using Pavtube 60p AVCHD Video Converter. I tried the trial and it worked so i bought it right away I have no complain, the program works fine in 60p mts to wmv conversion for editing in Sony Vegas Pro. Moreover, it allows you to do simple editing to the videos such as cropping, altering video dimension, adding special effect, and adjusting video or audio parameters like Video Resolution/Frame Rate or Audio Sample Rate freely as you like. It has never disappointed any users in due to its splendid performance and easy-to-use operation which goes as below:(P.S. If you only want to deal with AVCHD MTS footages on Windows Editors: Sony Vegas, Avid Media Composer, Adobe Premiere, Windows Movie Maker and Pinnacle Studio, etc, just try PavtubeMTS/M2TS Converter) Firstly, download and install this converter. Step 1. Click "Add" to load 60p mts video files or directly drag the files into file list.
  Step 2. Click "Format" bar to determine output format. For smoothly editing in Vegas, you are recommended to choose Adobe Premiere/Sony Vegas -> WMV (VC-1) (*.wmv), this format is best for Sony Vegas Pro editing.
  Step 3. If you would like to customize the video and audio parameters, you can click "settings", adjust the parameters as you want, like Video Codec, aspect ratio, bit rate, frame rate, Audio codec, sampling rate, bit rate, channels. (Optional) Step 4. Click "Convert" to start to convert 60p MTS to Sony Vegas Pro. With this MTS to Vegas Converter, it becomes easy for you to convert your 60p mts video to Sony Vegas Pro smoothly for editing. Related articles:
Good news! Pavtube Bundles Deals are coming! It's a time for taking a break from work and relaxing. And now you can enjoy your colorful time with good featured products at"Pavtube Bundles Deals". Go ahead and click the link to get your coupon. Save up to $44.1!Never miss!!!
Step 3. If you would like to customize the video and audio parameters, you can click "settings", adjust the parameters as you want, like Video Codec, aspect ratio, bit rate, frame rate, Audio codec, sampling rate, bit rate, channels. (Optional) Step 4. Click "Convert" to start to convert 60p MTS to Sony Vegas Pro. With this MTS to Vegas Converter, it becomes easy for you to convert your 60p mts video to Sony Vegas Pro smoothly for editing. Related articles:
Good news! Pavtube Bundles Deals are coming! It's a time for taking a break from work and relaxing. And now you can enjoy your colorful time with good featured products at"Pavtube Bundles Deals". Go ahead and click the link to get your coupon. Save up to $44.1!Never miss!!!
- MTS/M2TS Converter for Mac($29) + MXF Converter for Mac($29) = Only $29.9
- MTS/M2TS Converter for Mac($29) + MKV Converter for Mac($29) = Only $29.9
- MTS/M2TS Converter for Mac($29) + FLV/F4V Converter for Mac($29) = Only $29.9
- iMixMXF($45) + HD Video Converter for Mac($35) = Only $54.9 .....
Source: http://handycameratips.jimdo.com/2013/12/28/sony-vegas-workflow-with-mts-files/
Summary: Confused in converting MXF or P2 MXF files to MOV, MPG, MP4,AVI or FLV for editing or playing on Mac? Where does and MXF or P2 MXF come from? For most camcorder owners, they usually have a headache of the video format from their camcorders produce. For camcorders like Panasonic AG-HVX200, Sony PMW-350kit, Canon XF300, etc which produces MXF or P2 MXF files that can't be compatible for most players or editing software. In other words, it is so necessary for us to encode MXF/P2 MXF to those common video formats on Mac, for example: MOV, MPG, MP4, AVI or FLV.  A nice way to make MXF compatible with devices on Mac. You may have got a question: how can we encode MXF or P2 MXF to those common videos in an effective way? That's right, it is so cool that if there is indeed a strong converting tool can make it true, isn't it?Pavtube MXF/P2 MXF Converter for Mac is just the right one which has the features of converting MXF to most popular videos to play on different players on Mac. In additional, MXF Converter for Mac is also an outstanding audio extractor as well. With it, you can transform MXF to almost all of audio formats like MXF to MP3, MXF to WAV, FLAC, AAC, AC3, etc. See also: Top 5 Best MXF Converters for Mac Review Start the conversion from MXF to MOV, MPG, MP4, AVI or FLV. Firstly, Add the MXF files into this program with 'Add video' or 'Add from folder. Then pick the different choices for different editing systems and devices. For example below: - Select output formats from "iPhone", "iPad and Apple TV"and "iPod"categories in order to play MXF files in iPhone, iPad, iPod, iTunes and Apple TV; - Appoint "QuickTime Video (*.mov)"as output format from "Common Video" menu to play MXF files back on QuickTime; - Assign "ProRes Apple ProRes codec (*.mov)"as output format from "Final Cut Pro" menu so as to edit MXF file on Final Cut Pro
  Not for devices? Just click the 'Common Video' to choose the video you like. Including MOV, MPG, MP4, AVI or FLV. Then, 'Editor' is waiting for you if you want more advanced choices with output videos. 'Trim', 'Crop', 'Watermark' or 'Effect' items are offered here. Only get into the interface to learn more.
  Start conversion and wait for your output videos, if you still have problems in this process, welcome to leave us comments here. Other realted guides for you: ------* Convert Samsung NX1 H.265 videos to H.265 or H.264 MP4 video ------* Let’ s Change Sony NXCAM 3D MTS into SBS MP4 for a Playback ------* Share Tips on How to Enjoy HD MKV Movies on Apple TV/2/3 ------* Top 3 Best XAVC/XAVC S Video Converter for Mac Review ------* Make Sony a7 II XAVC S Accepted by Avid Media Composer on Mac OS X ------* KMPlayer Cannot Work or Play MP4/H.264 MKV Videos? Fixed! Never miss to get Saving up to $44.1, MXF/MTS/M2TS/MKV/FLV/MOV Converter.etc at Pavtube Bundles Deals! Clic: http://www.pavtube.com/Bundles-Deals.html
Summary: Have you ever got problems in editing Canon C300 footage when it all goes wrong? This paper can offer you some useful suggestions. Working with Canon C300, the output format MXF has provides us a high quality image enjoyment. Surely, if you wanna edit MXF video files in editing system, a free plug-in or MXF video converter can help you smoothly finish your work. Such as FCP or Premiere Pro. However, someone else has some other questions about MXF files.  Question 1.How to copy MXF files correctly? Well first, and this may go without saying, but if you're going to get an intern or producer to do it make sure they know what they're doing. Essentially you must copy the entire card structure (preferably not through dragging and dropping in the finder). Sony and Canon both have free browser apps that will let you back up your media. Or you could invest in something like Shotput Pro to duplicate your cards to multiple drives simultaneously. You are backing them up as you go, right? If that's not enough detail, just watch this great tutorial on a correct tapeless media workflow from Shane Ross. Question 2. What To Do If Your C300 Card Structure Is Broken? If for whatever reason your card structure doesn't come across intact, what can you do? Depending on your NLE you have various options. If you're in Adobe Premiere it doesn't matter, as it will read the MXF files just fine. First, you can try to 'fake it' out by recreating the C300 card structure (which should look like the example below). In the past I'm sure I've gotten lucky with it but its a pretty slim chance of actually working. FCPX needs a correct card structure so if you have to, transcoding in a 3rd party app is a feasible workaround Question 3. Is there any free app for converting C300 MXF files. Miro is a great free app (one of the few free apps I found) that actually works and works well. Miro Video Converter will allow you to grab the .MXF files and transcode them into Pro Res 422, DNxHD and AVC Intra 1080p and 720p. You can batch transcode as many of them as you like and it works pretty quickly. The files look great and were a higher quality but as Miro is a free app, there are a few catches.
  First, you cannot specify the output folder and it defaults to your MacHD > User > Movies folder. So you need to have enough space on your boot drive to transcode the footage too. This is also a problem if you have multiple files with the same name, (which I had on this edit with a two camera shoot) as this means you have to transcode one set at a time and move them out of the folder so as not to overwrite them with the next batch. Annoying. Question 4. Is there any tool that can answer the questions above, including copy files or broken structure? Pavtube iMixMXF or MXF Converter for Mac, a professional C300 MXF Converter with the functions of copying or converting video files together. Let's have a look here! Step 1. Download Mac C300 MXF video converter and launch. You can see this button on main interface if want to copy your MXF files. Also, tick the clips you like on the left list. From' Add from folder', there's no worries about broken structure.
  Step 2. For those who want to convert your videos to other formats, click the 'Format Button' to choose suitable items for FCP, iMovie, Avid or Premiere, etc. Also other phones or PC are included. Apple, Samsung, HTC, etc. What's more, Multi-track output can also be provided!
  Step 3. Additional 'Editor' for those primary users is a convenient item too. Trim, Crop, Text Watermark or Subtitle.
  Step 4. You wanna adjust your video size, bitrate or frame rate? Click 'Settings'and you'll know much!
  If you have done all above, 'Convert' to start your work. So nice a C300 MXF footage converter! Have you still need to worry about the problem with editing your C300 MXF footage when it all goes wrong? Read more:
HOOOOOOOOT NEWS: Pavtube 2014 Christmas Biggest Promotion is coming: - Up to 40% off gift: iMixMXF - Pay extra $9.9 to Get Another Converter from pavtube.com/products - Like our Facebook, get 50% off discount: https://www.facebook.com/pavtubefans/app_198826126804423 Expiring on Jan 31, 2015. Time-limited! Never Miss!
If you have done all above, 'Convert' to start your work. So nice a C300 MXF footage converter! Have you still need to worry about the problem with editing your C300 MXF footage when it all goes wrong? Read more:
HOOOOOOOOT NEWS: Pavtube 2014 Christmas Biggest Promotion is coming: - Up to 40% off gift: iMixMXF - Pay extra $9.9 to Get Another Converter from pavtube.com/products - Like our Facebook, get 50% off discount: https://www.facebook.com/pavtubefans/app_198826126804423 Expiring on Jan 31, 2015. Time-limited! Never Miss! 
This tutorial will give you a step by step instruction about how to import AVCHD files shoot at 50 frames in FCP by converting 50p mts to FCP 6/7/X supported Prores codec. Q: 50p AVCHD transcode to ProRes 422 problem Hi All, I have encountered a problem trying to Log and Transfer / transcode 1080 50p AVCHD footage (shot on a Sony FS100) to Apple ProRes 422 using FCP 7. Can anyone suggest a good workflow for this kind of transcode as I am struggling to find any solutions online. Thanks in advance. While you are pleased with the video quality of the recordings, the trouble with this is that Final Cut Pro can not recognize avchd files shoot at 50 frames, whether you transfer them directly from your camera/camcorder or from the folder which has been copied to Mac. How to import avchd files shoot at 50 frames into final cut pro turns out to be the first problem that AVCHD camera/camcorder users need to figure out.  To make FCP ingest 50p AVCHD files, here is an easiest and most effective solution: converting 50p AVCHD to ProRes- Final Cut Pro native format, then you can edit the converted ProRes MOV files in FCP and edit them on Mac. No worries, this MTS/M2TS Converter for Mac from Pavtube (Mac 50p MTS to FCP Converter) is the top Mac 50p MTS to FCP Converter, that can easily help you out with reliable efficiency and simple frank interface; no jitter, no slitter, all you need to do is a few clicks. Come and download Pavtube MTS/M2TS Converter for Mac and let's start! (View Best MTS/M2TS Converter for Mac Reviewed) Official Download: http://download.pavtube.com/mts-converter-mac/mtsconvertermac_setup.dmg Cnet Download: http://download.cnet.com/Pavtube-MTS-M2TS-Converter-for-Mac/3000-2194_4-76177029.html Softonic Download: http://pavtube-mts-m2ts-converter-for-mac.en.softonic.com/mac How to convert 50p AVCHD mts video clips to FCP Proes MOV on Mac Step 1. Install and launch this AVCHD Converter for Mac, click top left two icons to load individual videos or load the entire folder.
  Step 2. Apple ProRes MOV is the best format for Final Cut Pro, here you just need to choose "Final Cut Pro" option and select "Apple ProRes 422(*.mov)" or "Apple ProRes 422(H1) (*.mov)".
  P.S. If you need to edit in iMovie, please choose iMovie and Final Cut Express -> Apple InterMediate Codec (AIC) (*.mov). And for Avid MC, please choose Avid Media Composer -> Avid DNxHD (*.mov). (Learn more>>) And you can also click "Settings" to change the output video bitrate, frame rate, size, etc. all according to your needs. Step 3. Click the big red circle at the bottom right to start converting 50 frames AVCHD video to FCP MOV on Mac OS X. Wait for a while, the video will be ready to be edited with FCP 6/7/X on Mac smoothly and freely. And here is 50p MTS to iMovie, AVHCD to Premiere, AVCHD to Avid MC and 50p AVCHD files to QuickTime solutions. Maybe these articles can also help to you:
What's new? 1. Support MXF in XAVC video codec 2. Add H.264 baseline/main/high output profiles 3. Support H.265/HEVC decode 4. Support H.265/HEVC encode
P.S. If you need to edit in iMovie, please choose iMovie and Final Cut Express -> Apple InterMediate Codec (AIC) (*.mov). And for Avid MC, please choose Avid Media Composer -> Avid DNxHD (*.mov). (Learn more>>) And you can also click "Settings" to change the output video bitrate, frame rate, size, etc. all according to your needs. Step 3. Click the big red circle at the bottom right to start converting 50 frames AVCHD video to FCP MOV on Mac OS X. Wait for a while, the video will be ready to be edited with FCP 6/7/X on Mac smoothly and freely. And here is 50p MTS to iMovie, AVHCD to Premiere, AVCHD to Avid MC and 50p AVCHD files to QuickTime solutions. Maybe these articles can also help to you:
What's new? 1. Support MXF in XAVC video codec 2. Add H.264 baseline/main/high output profiles 3. Support H.265/HEVC decode 4. Support H.265/HEVC encode 
Are you still suffering no audio problem when loading Sony HDR-PJ430V mts in Premiere Pro CC? In this article, we will give you the best solution to import and edit PJ430V AVCHD MTS files in PPro CC without problems. I've had Sony HDR-PJ430V camcorder for about 2 weeks now. It does its primary job (recording videos) outstandingly and i can highly recommend this product if your primary concern is video capabilities. While it has some flaws that annoy me, if I drop a .mts file from my sony camera into Premiere Pro CC, it shows video but no sound? If I drop it into CS5.5 the sound works. I don't know why it happens.  People who are using MTS files with Adobe Premiere Pro(especially CC7) often have the similar problems Premiere Pro missing audio tracks for .MTS files. As far as I know, there are 3 ways that might help you resolve your work- Premiere Pro CC, Sony HDR-PJ430V MTS files, metadata and no audio:
- 1. Install an earlier version of premiere pro like 4 – 5 depending what version fits what you do……(DO NOT UPDATE!!!)
- 2. Import the ENTIRE CARD, very important, all the files from your card to your PC/Mac, the metadata should be located somewhere in a folder within the card, it’s not on the .mts file.
- 3. Convert MTS clips from Sony HDR-PJ430V into another format for Adobe Premiere Pro CC and relink against the transcoded version. It will get the audio back into Premiere. Might be a bit time consuming but it works.
In terms of the third method, we have made some searches ,and found that the Adobe Premiere Pro CC can edit the file formats of .mpeg2, .mov, etc. So, converting Sony HDR-PJ430V MTS file to MPEG-2 for Adobe Premiere Pro CC editing is a best choice. Steps to convert Sony HDR-PJ430V MTS videos to Premiere Pro CC acceptable format for correctly importing Here we recommend the easy-to-use yet professional application Pavtube MTS/M2TS Converter for Mac. Just download it and follow the simple steps below to transcode Sony HDR-PJ430V MTS for Premiere Pro CC editable format. With it, you can also convert any video shooting with AVCHD camcorders to popular video format like MKV, M4V, MOV, AVI, WMV, MP4, FLV, etc. The conversion is easy to handle and only with a few simple clicks, you can finish the conversion without facing any glitches. See also: Top 5 MTS/M2TS Converter for Mac Reviewed 1. Import Sony HDR-PJ430V MTS to the converter Run the MTS to Premiere Pro CC Converter and click the Add Video or Add from folder button to import the MTS videos from HDR-PJ430V to be converted. The converter supports converting multiple files at a time.  2. Choose MPEG-2 as the output format Click "Format" drop-down bar to select a proper video format. To edit Sony HDR-PJ430V AVCHD videos in Premiere Pro CC, then HD Video > MPEG-2 HD Video(*.mpg) or Adobe Premiere/Sony Vegas > MPEG-2 (*.mpg) is the suitable one.
  Note: you can also solve AVCHD importing Problem into FCP by selecting FCP native format: "Final Cut Pro > Apple Prores 422 (*.mov)" Step 3. Start Sony HDR-PJ430V MTS conversion with a click Hit the big Convert button and the conversion from Sony HDR-PJ430V MTS to Premiere Pro CC will begin immediately. Tips & Tricks: 1. Adjust audio and video settings The Mac MTS to Premiere Pro Converter enables users to adjust audio and video settings before transcoding Sony HDR-PJ430V AVCHD files to MPEG-2. Click "Settings" button, then you will enter the following interface, on which you are allowed to customize size, bit rate, frame rate, sample rate, and audio channel to your required ones. 2. Basic video editing (optional) This Mac MTS/M2TS Converter has a built-in video editor, so you can touch up the video with basic video editing functions. The supported video editing operations are: Trimming, cropping, appending artistic visual effects, adding watermarks and embed subtitles to the videos. And you can also deinterlace Sony 1080i AVCHD via ticking the “Deinterlacing” box in the Video Editor interface. Just note that this step is skippable if you want to keep the original video effects.
  After the conversion is complete, get the resulted files via clicking the Open button and then you can transfer and import Sony HDR-PJ430V MTS to Premiere Pro CC for further editing without any hassle. Forher guides about different editing tools, you can check the paper listed below.
To successfully get Canon Vixia HF R400 MTS files to iMovie for further editing, what should we do? The best solution is to transcode Canon AVCHD to a iMovie most compatible format. The Canon camera is a HF R400. My granddaughters birthday is this Saturday. I want to take pictures in HD and then edit my MTS video which is from my Canon HF R400 with iMovie. When I shot and tried to import, iMovie doesn't recognize the file. Is there a way to transcode Canon HF R400 MTS to iMovie? MTS progressive is a very popular format for us. It is not a standard format for many non-linear editors including iMovie. If you want to get Canon HF R400 mts files compatible with iMovie, you need to convert my AVCHD files from VIXIA R400 firstly.  After searching, I find this a powerful and easy-to-use Canon MTS Converter for Mac and I will introduce it to all of you. With reliable video quality, it seemed to be the best MTS Converter for iMovie. Now I am able to convert AVCHD footage from R400 Camcorder to AIC(Apple Intermediate Codec) for smoothly iMovie editing. No need to set up it specifically, move your mouse and do a few clicks. My iMovie can successfully allow for easy and direct importing of videos from my R400 camcorder, it is very unreliable and unstable. Free download a free version before purchase and let’e move on! 1. Keep your Canon HF R400 on and connect it to Mac, your camcorder will show as a hard drive on desktop which means your mac recognized it now. Launch this Canon MTS to iMovie Converter. Click top left icon “Add videos” to load individual mts files, or try the second one “Add from folder” to load the entire folder.
  2. You can find many presets in “Format” drop-down list. Choose “iMovie and Final Cut Express > Apple InterMediate Codec(AIC)(*.mov)” as the output video format.
  3. Click “Settings”, you can find some other settings such as Size, Bitrate, Frame Rate and son on. The video quality is corresponding to bitrate, the higher bitrate you choose the better video quality you will get. You can check the file size easily here. 4. Start converting Canon Vixia R400 AVCHD to AIC for iMovie Click the red convert icon at right bottom and start to convert Canon Vixia HF R400 AVCHD to AIC MOV for iMovie. You can check Shut down computer after conversion if you are doing a batch conversion and do not want to wait on the front of computer. Wait for some time, now you get the converted videos for importing/editing in iMovie. More topics: Convert HD Videos to Xbox 360/One for playback HEVC Workflow: Encode H.264 MP4 to H.265 MP4 on PC Samsung NX1 Exported to H.265 or H.264? Sony AX100 XAVC S-Exported H.265 Codec Videos for Editing Workflow: Samsung NX1 4K H.265 to Sony Movie Studio 13 Permalink to Professionals Favorite H.265/HEVC Video Encoder/Decoder – Smaller Size and Higher Quality Good news! Pavtube Bundles Deals are coming! It's a time for taking a break from work and relaxing. And now you can enjoy your colorful time with good featured products at"Pavtube Bundles Deals". Go ahead and click the link to get your coupon. Save up to $44.1!Never miss!!! MTS/M2TS Converter for Mac($29) + MXF Converter for Mac($29) = Only $29.9 MTS/M2TS Converter for Mac($29) + MKV Converter for Mac($29) = Only $29.9 MTS/M2TS Converter for Mac($29) + FLV/F4V Converter for Mac($29) = Only $29.9 iMixMXF($45) + HD Video Converter for Mac($35) = Only $54.9 ......
Have you got a Sony PMW F5 CineAlta 4K Cinema Camera? Do you wanna edit and play XAVC on FCP? To get Sony F5 XAVC codec compatible, you need to transcode F5 XAVC footage to Prores MOV format. Here you will find the way. Currently, Apple Inc is distributing its best effort to target its users with a latest free update to FCPX which will be featured to support Sony's brand new XAVC codec up to 4K resolution, and the option to display ProRes Log C files from the Arri Alexa in Rec. 709. We can have a quick review of the key features and fixes from Apple as below: 1.Support for Sony XAVC codec up to 4K resolution 2.Option to display ProRes Log C files from ARRI ALEXA cameras with standard Rec. 709 color and contrast levels 3.Resolves an issue where some third-party effects generated green frames during render 4.Resolves performance issues that could occur with certain titles and effects 5.Ability to use key commands to adjust Clip Appearance settings in the timeline  This is good news to a lot of FCP7 refugees but before it comes true, the users of FCP 6/7 will still have to face the problem of handling the XAVC footages coming along with Sony PMW-F5 camcorder, which behaves as follows: they can edit PMW-f5 footage in FCP and other popular editors without any problem, because both FCP 6 and FCP 7 cannot recognize XAVC at all. For the purpose of converting XAVC footages to FCP for editing, a good xavc converter mac ( Pavtube HD Video Converter for Mac ) is required. With it we can effortlessly and flawlessly transcode Sony XAVC footage to ProRes MOV for Final Cut Pro 6/7 or FCP X. It is safe to install and easy to use. Below will show you how to transcode Sony PMW-F5 XAVC footage to ProRes MOV in details. Convert/Import Sony PMW-F5 AVCHD to Final Cut Pro for editing smoothly with Apple ProRes Codec on Mac Step 1. Free Download the Mac Sony XAVC Transcoder for FCP to your Mac. Install and run it. It's excellent Sony video converter which can convert nearly all canon cameras' videos to any formats you need, such as Apple Prores 422 MOV, Apple InterMediate Codec MOV, QuickTime MOV, etc.
 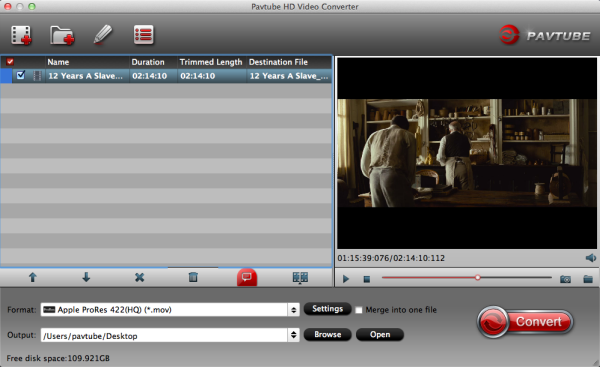 Step 2. Click format bar to choose output format for use in FCP 6/7 or FCP X. ChooseFinal Cut Pro -> Apple ProRes 422 HQ(*.mov).
 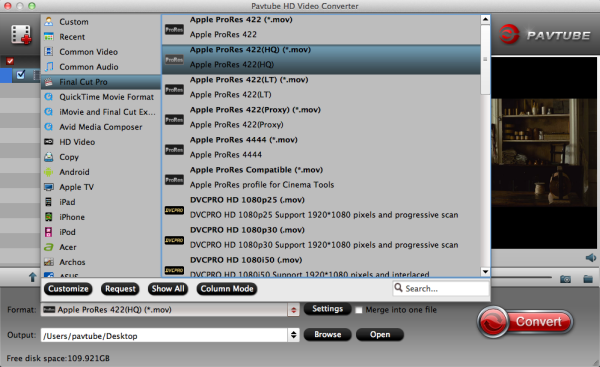 Step 3. Click "Convert" button to start the conversion from Sony F5 XAVC footage to FCP Apple ProRes HQ MOV on Mac OS. After the workflow, you can go to the output folder to find the converted video files. Now you are free to import/edit Sony PMW-F5 XAVC videos in Final Cut Pro 6/7 or FCP X under Mac without problems. Tips: Before you try to do the conversion, if you are also a FCP X user, please make sure that you have installed the Apple ProRes Codec manually since the FCP X asks users to install it by themselves. More tips for you: UPLOAD SONY 4K XAVC TO YOUTUBE/GOOGLE/MYSPACE Let’s Import Samsung NX1 H.265 Recordings to Avid Media Composer for Editing Troubled in Editing Sony a7 II XAVC S Footage in Premiere Elements 13/12? FFmpeg Alternatives: Encode H.265/HEVC Videos on Windows 8.1/8/7/XP Let’s Ingest Sony a7 II XAVC S Footage to DaVinci Resolve on Mac OS X Nicely Upload Sony Handycam MTS Files to YouTube and Vimeo HOOOOOOOOT NEWS: Pavtube 2014 Christmas Biggest Promotion is coming: - Up to 40% off gift: iMixMXF - Pay extra $9.9 to Get Another Converter from pavtube.com/products - Like our Facebook, get 50% off discount: https://www.facebook.com/pavtubefans/app_198826126804423 Expiring on Jan 31, 2015. Time-limited! Never Miss!
This guide will tell you how to transcode Canon EOS H.264 MOV to Premiere Pro for editing without any codec problem. Q1: Anyone know of a good way to get 7D footage into Adobe Premiere CS4 without losing quality? I can't put in .mov into premiere, it won't support the Canon format for some reason. What's the best way to convert the files or get Premiere to recognize it? Would love any suggestions! Thanks! Q2: I am buying a Canon 60D and 50mm lens next month, I am planning on filming and then editing my own 1080p mov videos. What are the best settings that I need to notice when shooting? Currently I am using Adobe Premiere CS5. Q3: Hello, I have a very urgent problem in the cut of my shots with the Canon EOS 5D Mark II in Adobe Premiere CS6. As soon as I try to think. Mov files to import my Premiere Project to inform me with the premiere of this format is not supported. Have come to me already downloaded QuickTime Player, Nero, Lite Codec Pack Full, at s.den codec, but nothing works. I'm Pretty desperate, someone has any idea what's the problem?  Canon EOS DSLR Cameras are more and more popular and valuable with improved viewfinder, a number of new in-camera creative options and filters, plus HDMI output for viewing images on an HDTV. But for some fairly new Canon users, video editing and encoding is something they are doing for a longer time. As the above quesitons, you can see many folks will have no idea of what the limitations of the "MOV video format from Canons DSLRs and Premeiere Pro". Why can't you smoothly importing Canon EOS .mov footage in Premiere Pro? As Canon EOS DSLR use H.264 codec for video compressing, it is a most advanced codec that compresses video in highest compression ratio, but not so acceptable for Premiere Pro (or other NLE like Avid MC, FCP, iMovie and FCE). So if you want to get fluent editing workfolw with Canon MOV files in Premiere Pro (including Premiere Pro CS4/5/6) and keep the best video quality, you will have the need to convert Canon MOV to Premiere best supported AVC .mov format. It will be the best way to get Canon .mov footage into Adobe Premiere Pro without losing quality, you can follow the tutorial below. Free Download Pavtube HD Video Converter for Mac, it's an excellent Canon MOV to PPro Converter. Follow the prompts to install the program. Click "Finish" when the installation is complete, and Pavtube MOV to Premiere Converter will launch automatically. 1. Click "Add video" to load Canon EOS DSLR MOV video files or directly drag the files into file list. By default, the files are selected. If you would like to join all the selected files together, check the box of Merge into one. You could view the video files in preview window, simply highlight the file and click play button.
 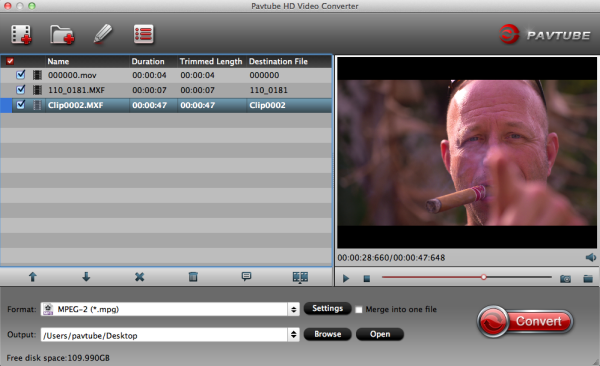 2. Click “Format” bar to and choose “Adobe Premiere/Sony Vegas > MOV (AVC)(*.mov)" or "MPEG-2 Video (*.mpg)” as output format. Or you can also select “Final Cut Pro -> Apple ProRes 422 (*.mov)”. It is the best format for editing in Premiere Pro.
 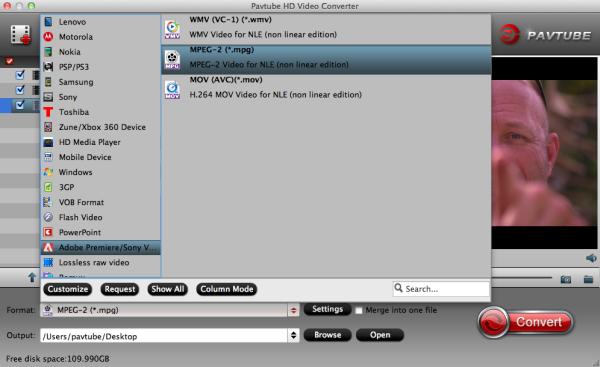 Optional - If you would like to customize the video and audio parameters, you can click "settings", adjust the parameters as you want, like Video Codec, aspect ratio, bit rate, frame rate, Audio codec, sampling rate, bit rate, channels. 3. Click "Convert" to start transcoding Canon EOS H.264 MOV to MPEG-2/AVC MOV for Premiere Pro editing without codec problems. Click here to learn: How to import Media Files to Premiere Pro on Mac. The software can help you to encode Canon EOS H.264 MOV to AVC MOV video with keeping the best video quality and convert at a short time if the file not so big. It can also help you convert Canon EOS 650D, 50D/60D/7D, 5D Mark II/III,100D/700D video files. Now just buy or download and have a try. Additional editing features of the Pavtube MOV to Premiere Converter: 1. Trim a section of the 6D clip- click 'Editor', switch to 'Trim' tab, and input time point in start and end box. 2. Combine Canon MOV footgae together- check the files to be merged in file list and check 'Merge into one' box beside 'Settings' button. 3. Deinterlace- click 'Editor', switch to 'Effect' tab, find 'Deinterlacing' box, and check it to eliminate interlacing lines. 4. If you want to update EOS MOV cilps to Myspace, Flikr, YouTube, etc, just choose "Flash Video>>FLV" instead. Maybe these articles can also help to you : Surprise for Pavtube Upgraded Windows Products! H.265/HEVC or XVAC Codec Supported! Work MP4 Files with Adobe Premiere Pro, Premiere Elements, After Effects Newest Way of Editing Samsung NX1 H.265 Footage in Adobe Premiere Pro/Sony Vegas How to Get AVCHD MTS Workflow with DaVinci Resolve (Lite) Two Assistants: Encode H.265/HEVC Videos on Windows 8.1/8/7/XP Tips on Ingesting Sony PMW-300K1 MXF to Sony Vegas Pro/Sony Movie Studio Good News! On December 25, 2014, Pavtube Studio has announced this 2014 Christmas Deal, to celebrate this biggest festival in the end of the year. In order to let customers enjoy better about this fascinating holiday with Pavtube , special offers and 100% off discount is available on this page. Customers who interested in photography or movie making can benefit from this special event page.
