Some users are in trouble using DivX codec in Sony Vegas, this article will show you the solution to open DivX to Sony Vegas for editing using a DivX Converter. As a Windows based audio video editing program, it stands to reason that Sony Vegas should import, open and play AVI (a common video format under Windows). However, various issues occur when importing, such as vegas pro 10 and Divx issue:  Q1: After upgrading to Vegas Pro 10.0a 64-bit, I can no longer open in the timeline or trimmer any file encoded with the DivX codec. Further, I can no longer customize an .avi render to use the DivX codec. I upgraded the DivX Pro codec to 6.9.2, as part of the DivX Pro 8 bundle. That was no help. Is there some "registration" of the codecs that must be accomplished before Vegas Pro 10.0a will recognize and use them? Q2: I have over 200 AVI files that I want to edit them with Vegas 10, most are divx. However, I can't even import divx files into Vegas! Only the audio content is shown in the timeline. Then I tried Virtualdub and that didn't work either please help. Then how to use DivX codec in Sony Vegas Pro? In fact,Sony Vegas doesn't support DivX codec. That means if you want to import DivX to Sony Vegas Pro for editing, you will be failed. In order to edit your DivX in Sony Vegas smoothly, you should transcode DivX to MPEG-2/WMV format, which is best supported by Vegas Pro. Pavtube Divx Video Converter is the best choice to achieve your goal, I have used this tools for some time, it can deal nearly all kinds of videos filed including DivX files for Sony Vegas Pro easily, that is to convert Divx video to MPEG-2/WMV format, and then you can edit DivX files smoothly in Sony Vegas Pro. Now, we just intro an really good and easy way to help you convert and import your Divx files to Sony Vegas. Step 1. Download DixX to Vegas Pro converter, follow the prompts to install the program. Click "Add" to load DixX video files or directly drag the files into file list. If you want to join several DivX files together, check the "Merge into one file" box. Step 2. Click "Format" bar to determine output format. For smoothly editing in Sony Vegas Pro, you are recommended to choose Adobe Premiere/Sony Vegas -> WMV (VC-1) (*.wmv) or MPEG-2(*.mpg), this format is best for Sony Vegas Pro editing.
  Step 3. If you would like to customize the video and audio parameters, you can click "settings", adjust the parameters as you want, like Video Codec, aspect ratio, bit rate, frame rate, Audio codec, sampling rate, bit rate, channels.
  Step 4. Click "Convert" to start to convert DivX-formatted videos to Sony Vegas Pro. With this DixX to Sony Vegas Pro converter, it becomes easy for you to convert DivX AVI video to Sony Vegas Pro 12 smoothly for editing. Read more:
Good News: Pavtube Studio has announced this new update version. All Win versions have been updated to 4.8.2, which add XAVC, H.265/HEVC decode and encode. What new features have they got? Click here.
Step 4. Click "Convert" to start to convert DivX-formatted videos to Sony Vegas Pro. With this DixX to Sony Vegas Pro converter, it becomes easy for you to convert DivX AVI video to Sony Vegas Pro 12 smoothly for editing. Read more:
Good News: Pavtube Studio has announced this new update version. All Win versions have been updated to 4.8.2, which add XAVC, H.265/HEVC decode and encode. What new features have they got? Click here.  Source: http://digisns.com/2014/12/convert-bandicam-avi-to-sony-movie-studio/
In this article, you will learn the best way to import TiVo TV shows to QuickTime for playback smoothly on Mac Mavericks. Just follow it. You may have recoreded some TV shows and wanna enjoy and share the tivo files in QuickTime with family or friends at home. Howver, the Tivo files are saved by digital video recorders with copyright protection, which make it hard to play Tivo videos in QuickTime. In fact, QuickTime don't support TiVo files. And in that case, you need a Mac TiVo to QuickTime Converter to transcode TiVo to a format that QuickTime can recognize. To convert TiVo to QuickTime on Mac Mavericks successfully and quickly, an easy-to-use yet efficient tool-Pavtube Tivo to QuickTime Converter for Mac is highly recommended. It provides super-fast converting speed and high quality output video. Furthermore, it has optimized presets for QuickTime, which can save your much worry. This guide will show you how to convert Tivo to QuickTime mov for playing with QuickTime on Mac Mavericks.  Before transcoding TiVo shows, you need to transfer recorded TiVo shows from TiVo DVR to your Mac. To transfer TiVo shows to Mac, you need to use a TiVo Desktop Software for Mac. When your TiVo is connected to your home network, Mac TiVo Desktop provides you with a list of available shows for transferring to your Mac. After transfer TiVo files to your Mac, you can free download the Mac TiVo to QuickTime Converter. Install and run the application. Do as follows. Step 1. Import TiVo to the program. First click "Option" button, enter Media Access Key. Then, load TiVo files to the TiVo to QuickTime Converter on Mac,click top left two icons to load individual videos or load the entire folder.
 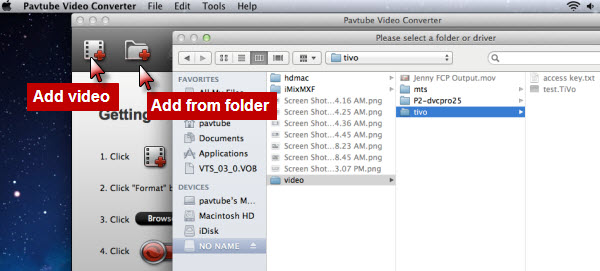 For the first time loading TiVo clips, the program asks "If you'd like to import *.tivo file(s)", please enter the correct Media Access Key and import the file(s) again.
 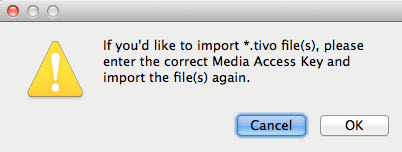 Click "OK", the "Options" dialog box appears. Fill in your Media Access Key, click "OK".
 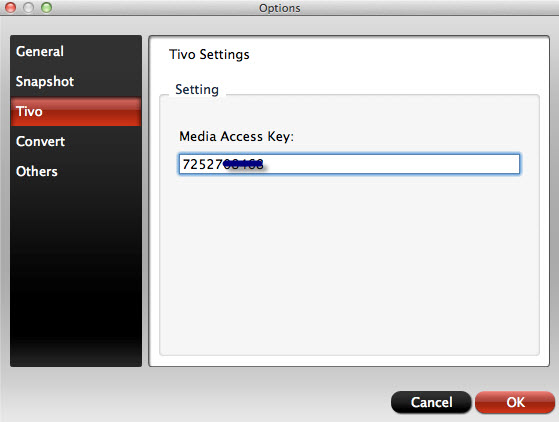 Return to the program and load your .TiVo shows again. If you want, you can merge several Tivo clips by ticking "Merge into one file" box. If the supposed size of the input files is 1GB, then the memory space should be up to 40GB
Step 2. Choose Common Video> MOV-QuickTime(*.mov) as the best video format for playing Tivo footage on QuickTime. 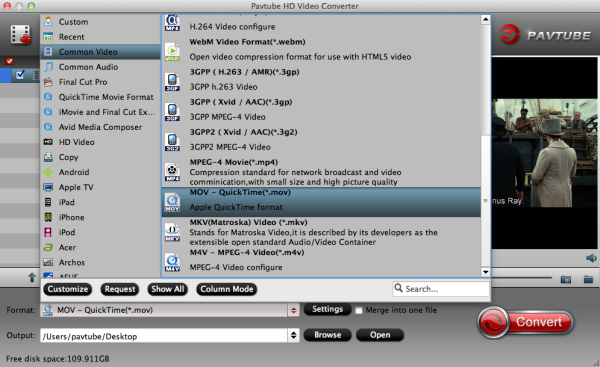 Optional - You can also click "Settings" to change the output video bitrate, frame rate, size, etc. all according to your needs. Step 3. Start TiVo shows to QuickTime MOV conversion on Mac Mavericks. When everything is done, click the "Convert" button at the bottom-right corner to finish the conversion . While you wait,have a coffee or take a nap and let Video Converter for Mac do the work in the background. After conversion, you can click "Open" to find the output quicktime mov file, then you can transfer the video files to QuickTime Player for playback smoothly. Just enjoy and watch .Tivo files with QuickTime in high quality now, just have a try! More Related Guides:
HOOOOOOOOT NEWS: Pavtube 2014 Christmas Biggest Promotion is coming: - Up to 40% off gift: iMixMXF - Pay extra $9.9 to Get Another Converter from pavtube.com/products - Like our Facebook, get 50% off discount: https://www.facebook.com/pavtubefans/app_198826126804423 Expiring on Jan 31, 2015. Time-limited! Never Miss!
Optional - You can also click "Settings" to change the output video bitrate, frame rate, size, etc. all according to your needs. Step 3. Start TiVo shows to QuickTime MOV conversion on Mac Mavericks. When everything is done, click the "Convert" button at the bottom-right corner to finish the conversion . While you wait,have a coffee or take a nap and let Video Converter for Mac do the work in the background. After conversion, you can click "Open" to find the output quicktime mov file, then you can transfer the video files to QuickTime Player for playback smoothly. Just enjoy and watch .Tivo files with QuickTime in high quality now, just have a try! More Related Guides:
HOOOOOOOOT NEWS: Pavtube 2014 Christmas Biggest Promotion is coming: - Up to 40% off gift: iMixMXF - Pay extra $9.9 to Get Another Converter from pavtube.com/products - Like our Facebook, get 50% off discount: https://www.facebook.com/pavtubefans/app_198826126804423 Expiring on Jan 31, 2015. Time-limited! Never Miss!  Source: http://onebestsoft.com/play-videos-on-quicktime/
Hello everyone, I have some great news Pavtube Studio just released updates for all Windows products! This event include:
Pavtube HD Video Converter
Pavtube MTS/M2TS Converter
Pavtube MXF Converter
Pavtube MXF MultiMixer
Pavtube Video Converter
Pavtube MKV Converter
Pavtube FLV Converter
 What's new?
1. Support MXF in XAVC video codec
2. Add H.264 baseline/main/high output profiles
3. Support H.265/HEVC decode
4. Support H.265/HEVC encode
What's new?
1. Support MXF in XAVC video codec
2. Add H.264 baseline/main/high output profiles
3. Support H.265/HEVC decode
4. Support H.265/HEVC encode
see also:
http://www.video-pedia.com/2014/12/25/pavtube-support-h265-hevc-encode-decode/
********************************************************************
Other Good News! Pavtube Bundles Dealsare coming! If you want to import/preserve/mix multi-track MXF in MKV/MP4/MOV formats, get multi-track Apple Prores MOV for further editing in Final Cut Pro (X), the following bundled software is your best choice:
 Video Converter($35) + MXF MultiMixer($45) = $54.9, Save $25.1 (buy link)
Video Converter for Mac($35) + iMixMXF($45) = $54.9, Save $25.1 (buy link)
MXF MultiMixer/iMixMXF Key Features:
-Import/preserve/mix multi-track MXF in MKV/MP4/MOV formats.
-Output multi-track Apple Prores MOV for further editing in Final Cut Pro (X).
-Support DVCPRO/HDV/Avid DNxHD/AIC output
-Convert MXF to any other formats for editing, playing, or broadcasting.
-Merge/split/trim/crop MXF footages.
Video Converter for Windows/Mac Key Features:
-Convert from and to any common SD/HD video and audio format.
-Support Apple ProRes/DVCPRO/HDV/Avid DNxHD/AIC encoding.
-Output formats for Windows/Mac editing software, e.g. FCP, iMovie, FCE, Avid, Adobe Premiere, Sony Vegas Pro, etc.
-Output formats for different playback devices, hdtv, hd media players, etc.
Go ahead and click the link to get your coupon. Save up to $44.1! Never miss!!!
********************************************************************
Good News Two! Pavtube 2014 Christmas promotional activities began! Just click "Share on Facebook" button, insert "#PavtubeChristmas2014",choose "Public", and click "Share Link". Then send us the screenshot by email to videowinsupport@pavtube.com or videomacsupport@pavtube.com, you will receive a 50% OFF discountlink of any converter from Pavtube within 24 hours on week days. Please do not forget to invite your families and friends to join in, and we'll appreciate your action! The event link is:http://www.pavtube.com/christmas-2014-specials.html
Video Converter($35) + MXF MultiMixer($45) = $54.9, Save $25.1 (buy link)
Video Converter for Mac($35) + iMixMXF($45) = $54.9, Save $25.1 (buy link)
MXF MultiMixer/iMixMXF Key Features:
-Import/preserve/mix multi-track MXF in MKV/MP4/MOV formats.
-Output multi-track Apple Prores MOV for further editing in Final Cut Pro (X).
-Support DVCPRO/HDV/Avid DNxHD/AIC output
-Convert MXF to any other formats for editing, playing, or broadcasting.
-Merge/split/trim/crop MXF footages.
Video Converter for Windows/Mac Key Features:
-Convert from and to any common SD/HD video and audio format.
-Support Apple ProRes/DVCPRO/HDV/Avid DNxHD/AIC encoding.
-Output formats for Windows/Mac editing software, e.g. FCP, iMovie, FCE, Avid, Adobe Premiere, Sony Vegas Pro, etc.
-Output formats for different playback devices, hdtv, hd media players, etc.
Go ahead and click the link to get your coupon. Save up to $44.1! Never miss!!!
********************************************************************
Good News Two! Pavtube 2014 Christmas promotional activities began! Just click "Share on Facebook" button, insert "#PavtubeChristmas2014",choose "Public", and click "Share Link". Then send us the screenshot by email to videowinsupport@pavtube.com or videomacsupport@pavtube.com, you will receive a 50% OFF discountlink of any converter from Pavtube within 24 hours on week days. Please do not forget to invite your families and friends to join in, and we'll appreciate your action! The event link is:http://www.pavtube.com/christmas-2014-specials.html

Using MXF footage on FCP is a big problem for people that are not familiar with the MXF format. If you're a FCP and Sony PMW-200 camcorder user, we'll recommend using iMixMXF to transcode PMW-200 XDCAM MXF to ProRes HQ 422 encoded MOV files preserving multiple tracks and channels, so as to import the MXF footage to FCP for editing. A camcorder can record the persons you may have met, and record your friends' and family's smile. Additionally, it might help you remenber the location you may have been, any time you develop older you may appear back the your younger time. This really is good point to the majority of us, so get a camcorder is cool factor. Let's possess a appear at Sony XDCAM PMW-200. The PMW-200 can record in HD442, HD440 and DVCAM formats, which implies that it can be completely compatible with all previous and present XDCAM workflows, and either UDF or FAT file formats is often applied with suitable recording media. A range of recording formats for instance 50Mbps/35Mbps MXF, 35Mbps/25Mbps MP4 and DVCAM are readily available for any wide array of applications and workflows.  As the PMW-200 records MPEG HD422 codec MXF format, it's not well for editing in FCP on Mac Mountain Lion 10.8, you will encounter importing/video/audio problems when you want to import Sony XDCAM MXF to FCP on Mac, the best way is to transcode Sony PMW-200 MXF to Apple ProRes 422 HQ codec MOV format, here you can try Pavtube iMixMXF, it has presetted output format for FCP with ProRes 422 HQ codec. As a professional MXF Converter, Pavtube iMixMXF provides your requirements for preserving and mixing MXF multi-tracks/channels, converting Sony PMW-200 XDCAM MXF files to Apple ProRes MOV for FCP preserving multiple tracks and channels. Apart from multi-track preserving, Pavtube iMixMXF can also mix multi tracks into one track. This feature help you mix the audios of interviewer, interviewee, surroundings, or editors'/directors' comments into one. It also features multi-track MKV/MP4/MOV video formats and various popular formats for professional editing in editing programs (e.g. FCE, iMovie, Adobe Premiere Pro CC/CS, Avid Media Composer, iPhoto, DaVinci Resolve, Kdenlive, Keynote, etc.), and free playback on Mac/iOS/Android/Windows devices, HDTV, HD Media Players, PS4, PS3, PSP, etc. (See also: 2015 Top 5 Excellent MXF Converter for Mac Review) Official Download: http://www.pavtube.com/imixmxf-mac/ Softonic Download: http://pavtube-imixmxf.en.softonic.com/mac Soft32 Download: http://pavtube-imixmxf.soft32.com/ User's testimonial "I am using a trial version of the iMixMXF to convert 50Mbps 1920X1080 23.98 MPEG HD422 XDCAM material shot on a Sony PMW-200 to ProRes HQ 422 .mov files. The computer is a 2.66 GHz Intel Core 2 Duo MacBook pro running OS 10.6.8 with 4GB ram. I loaded from a folder and I clicked the option to transfer all the files in the folder. For 22GB of material the transcoding time is very short, thank yor for your recommendation." Here's the main interface:
 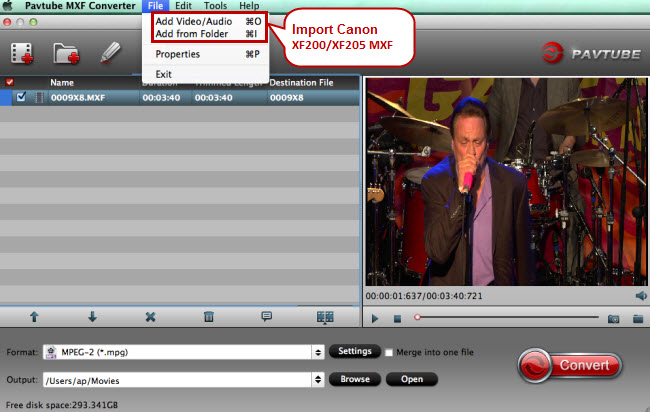 With this software, you can directly convert Sony PMW-200 MXF to multi-track ProRes 422 HQ for output. Here is the output profile.
 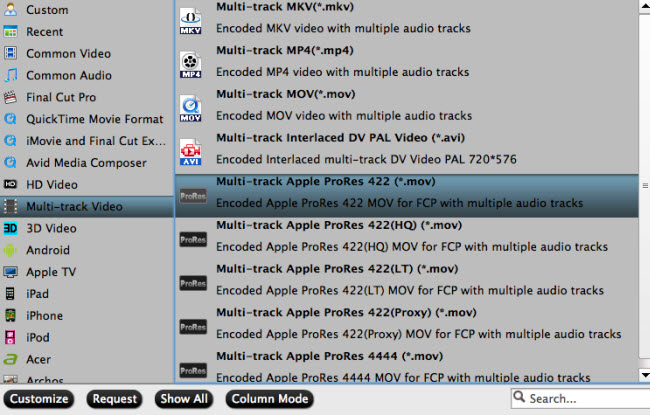 You are available to choose rich formats for output. Don't hesitate, just have a try! HOOOOOOOOT NEWS: Pavtube 2014 Christmas Biggest Promotion is coming: - Up to 40% off gift: iMixMXF - Pay extra $9.9 to Get Another Converter from pavtube.com/products - Like our Facebook, get 50% off discount: https://www.facebook.com/pavtubefans/app_198826126804423 Expiring on Jan 31, 2015. Time-limited! Never Miss! Other realted guides for you:
Summary: If you have the common "iMovie no sound problem" issue, your iMovie project appears to be missing one or more audio tracks when you play, import, or export a project, just read this article, you will find the best solution here.  Q1: Want to edit in imovie and there is no audio! Can't get it to play full screen. Won't open. Wont show clip in viewer either. I have tried restarting imovie. havee restarted Macbook pro) Q2: Completed my first movie in iMovie '11 and I'm having an audio problem. Searched and found many audio problems in iMovie-- too bad because it's a pretty easy program to work with! Q3: I'm making a movie on my Mac Mini and I am struggling with this audio bug using iMovie 11. I'm seeing this issue that I cannot solve. Any clues here? Thanks in advance. As above, "iMovie no sound" is a common problem asked by many mac users. What's the problem? This may lie in the unsupported codec and format of the video files that imports into iMovie. From Apple forum we know that many common vidoe codes and formats are not a suitable and native for iMovie, so you are suggested to transocde all kinds of videos to AIC (Apple Intermediate Codec), the favorite editing codec of iMovie in advance. This may be te easy solution! Pavtube HD Video Covnerter for iMovie can fix this iMovie no sound, which supports converting videos for using in iMovie with no limition. You can do it on All major Mac OS X operating systems, like Mountain Lion, Lion, Snow Leopard, Mavericks 10.9 and latest Yosemite. (Top 5 Best HD Video Converter for Mac Review) Steps: Convert and import videos to iMovie without losing sound issue Step 1: Run Pavtube HD Video Converter for Mac and video clips to it You can click either "Add Video" button or "Add from folder" button to load source files. If you want to combine the loaded video clips into one file, simply tick off the checkbox before "Merge into one file".
  Step 2: Select "Apple InterMediate Codec (AIC) (*.mov)" as target format In order to convert video to AIC for use in iMovie, simply hit "Format" menu and follow "iMovie and Final Cut Express" > "Apple InterMediate Codec (AIC) (*.mov)". See also: How to preserve multiple audio tracks for FCP X?
 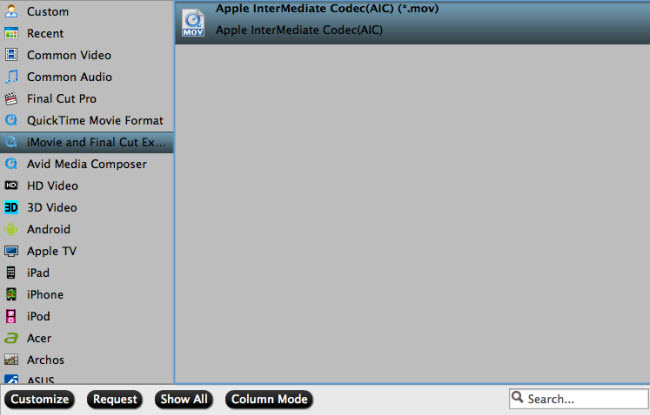 Settings:
 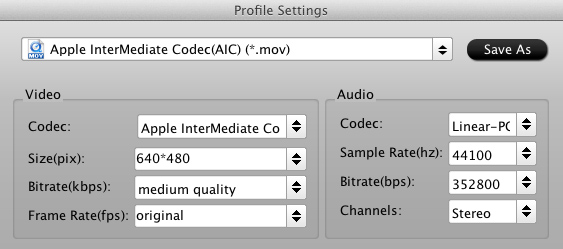 Step 3: Start all kinds of videos to AIC MOV conversion Click the big button "Convert" to start all kinds of videos to AIC Conversion. As soon as the conversion is completed, you are able to click "Open" button to get the generated AIC MOV files for use in iMovie. Step 4: Import converted videos to iMovie. Launch iMovie, and then choose "File > Import > Movies" to import the converted videos to iMovie for further editing. The audio of the video file will ok in iMovie and you will not have any "iMovie no sound" problem. Now you you can edit you video projects in iMovie without any hassle. Find more iMovie Solutions here. Read also:
Good News! On December 25, 2014, Pavtube Studio has announced this 2014 Christmas Deal, to celebrate this biggest festival in the end of the year. In order to let customers enjoy better about this fascinating holiday with Pavtube , special offers and 100% off discount is available on this page. Customers who interested in photography or movie making can benefit from this special event page.
Step 3: Start all kinds of videos to AIC MOV conversion Click the big button "Convert" to start all kinds of videos to AIC Conversion. As soon as the conversion is completed, you are able to click "Open" button to get the generated AIC MOV files for use in iMovie. Step 4: Import converted videos to iMovie. Launch iMovie, and then choose "File > Import > Movies" to import the converted videos to iMovie for further editing. The audio of the video file will ok in iMovie and you will not have any "iMovie no sound" problem. Now you you can edit you video projects in iMovie without any hassle. Find more iMovie Solutions here. Read also:
Good News! On December 25, 2014, Pavtube Studio has announced this 2014 Christmas Deal, to celebrate this biggest festival in the end of the year. In order to let customers enjoy better about this fascinating holiday with Pavtube , special offers and 100% off discount is available on this page. Customers who interested in photography or movie making can benefit from this special event page.  Source: http://1080p-video-tool.blogspot.com/2013/07/solve-imovie-no-sound-problem.html