Summary: If you have the common "iMovie no sound problem" issue, your iMovie project appears to be missing one or more audio tracks when you play, import, or export a project, just read this article, you will find the best solution here.  Q1: Want to edit in imovie and there is no audio! Can't get it to play full screen. Won't open. Wont show clip in viewer either. I have tried restarting imovie. havee restarted Macbook pro) Q2: Completed my first movie in iMovie '11 and I'm having an audio problem. Searched and found many audio problems in iMovie-- too bad because it's a pretty easy program to work with! Q3: I'm making a movie on my Mac Mini and I am struggling with this audio bug using iMovie 11. I'm seeing this issue that I cannot solve. Any clues here? Thanks in advance. As above, "iMovie no sound" is a common problem asked by many mac users. What's the problem? This may lie in the unsupported codec and format of the video files that imports into iMovie. From Apple forum we know that many common vidoe codes and formats are not a suitable and native for iMovie, so you are suggested to transocde all kinds of videos to AIC (Apple Intermediate Codec), the favorite editing codec of iMovie in advance. This may be te easy solution! Pavtube HD Video Covnerter for iMovie can fix this iMovie no sound, which supports converting videos for using in iMovie with no limition. You can do it on All major Mac OS X operating systems, like Mountain Lion, Lion, Snow Leopard, Mavericks 10.9 and latest Yosemite. (Top 5 Best HD Video Converter for Mac Review) Steps: Convert and import videos to iMovie without losing sound issue Step 1: Run Pavtube HD Video Converter for Mac and video clips to it You can click either "Add Video" button or "Add from folder" button to load source files. If you want to combine the loaded video clips into one file, simply tick off the checkbox before "Merge into one file".
  Step 2: Select "Apple InterMediate Codec (AIC) (*.mov)" as target format In order to convert video to AIC for use in iMovie, simply hit "Format" menu and follow "iMovie and Final Cut Express" > "Apple InterMediate Codec (AIC) (*.mov)". See also: How to preserve multiple audio tracks for FCP X?
 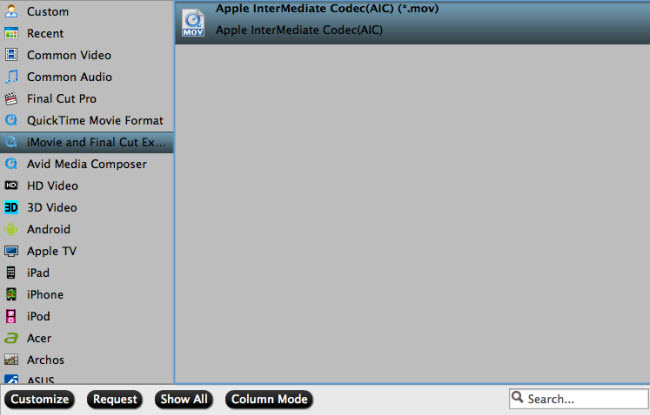 Settings:
 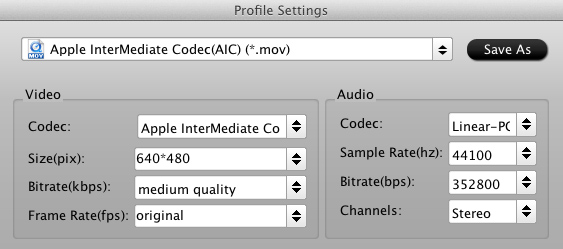 Step 3: Start all kinds of videos to AIC MOV conversion Click the big button "Convert" to start all kinds of videos to AIC Conversion. As soon as the conversion is completed, you are able to click "Open" button to get the generated AIC MOV files for use in iMovie. Step 4: Import converted videos to iMovie. Launch iMovie, and then choose "File > Import > Movies" to import the converted videos to iMovie for further editing. The audio of the video file will ok in iMovie and you will not have any "iMovie no sound" problem. Now you you can edit you video projects in iMovie without any hassle. Find more iMovie Solutions here. Read also:
Good News! On December 25, 2014, Pavtube Studio has announced this 2014 Christmas Deal, to celebrate this biggest festival in the end of the year. In order to let customers enjoy better about this fascinating holiday with Pavtube , special offers and 100% off discount is available on this page. Customers who interested in photography or movie making can benefit from this special event page.
Step 3: Start all kinds of videos to AIC MOV conversion Click the big button "Convert" to start all kinds of videos to AIC Conversion. As soon as the conversion is completed, you are able to click "Open" button to get the generated AIC MOV files for use in iMovie. Step 4: Import converted videos to iMovie. Launch iMovie, and then choose "File > Import > Movies" to import the converted videos to iMovie for further editing. The audio of the video file will ok in iMovie and you will not have any "iMovie no sound" problem. Now you you can edit you video projects in iMovie without any hassle. Find more iMovie Solutions here. Read also:
Good News! On December 25, 2014, Pavtube Studio has announced this 2014 Christmas Deal, to celebrate this biggest festival in the end of the year. In order to let customers enjoy better about this fascinating holiday with Pavtube , special offers and 100% off discount is available on this page. Customers who interested in photography or movie making can benefit from this special event page.  Source: http://1080p-video-tool.blogspot.com/2013/07/solve-imovie-no-sound-problem.html
Handycam is a Sony brand used to market its camcorder range, including HDR-XR350V, HDR-CX350V,HDR-CX300, HDR-XR200V, HDR-XR520V, HDR-FX1000, HDR-CX520V, HDR-FX7, etc. Sony Handycam records High Definition video in record AVCHD MTS file format, which is a high-definition MPEG, AVC, H.264 transport stream video file format.  When you captured the shootings, the first thing you may try to do is transfer those AVCHD .mts clips from Sony Handycam to Windows/Mac, and then enjoy it. Here shows the instruction about Sony Handycam video transfer: 1. Connect your camcorder to your computer through the USB or firewire port. Note: Older camcorders will typically use firewire while more recent camcorders typically use USB 2.0. Your camcorder will come with the appropriate cable to connect it. 2. Put your camcorder in "play" mode. The switch on your camcorder should be directly beside where you power it on to record videos. You are almost done! However, if you want to play the mts files from Handycam camcorder on most computers or Android/IOS/Windows 8 devices and share them with others on Youtube or Vimeo, the most effective method is to convert Sony Handycam .MTS to .MP4 format on Windows/Mavericks, which is recognizable and compatible with virtually all media player, operating systems and protable devices. Pavtube Video Converter - The champion of easiest and fastest conversion. The top Sony Handycam MTS to MP4 converter program that makes the process easy and give you files that are playable on any portable device you can choose, which can help you convert MTS from your Handycam camcorder to MP4, and convert videos from your computer or downloaded from the Internet to target readable format in which you want the video to be played. Just import the video, pick your preferred format, and hit convert, and you're ready to transfer that video to your mobile device, or upload to Youtube/Vimeo. It's an easy job to personalize videos and make them special and different. You can merge multiple MTS video files into one singe long MP4 video, add your own audio/subtitle/watermark to your video, clip or crop video and add special effects. The Top-ranked Video Converter is also able to extract audio from video files and save into MP3, AAC, WMA, OGG, Apple Lossless Audio and more formats. And it supports converting audio files directly as well! If you are still seeking a easy and fast conversion, Pavtube Video Converter will be the best choice. For Mac user, please try Video Converter for Mac. Guide to convert Sony Handycam AVCHD videos on MP4 for playback and sharing 1. Install and run the best Sony Handycam MTS to MP4 Converter, choose the one according to your operating platform. Transfer Sony HandyCam video to hard drive, and then click "Import" to add the mts files you need into the program.
 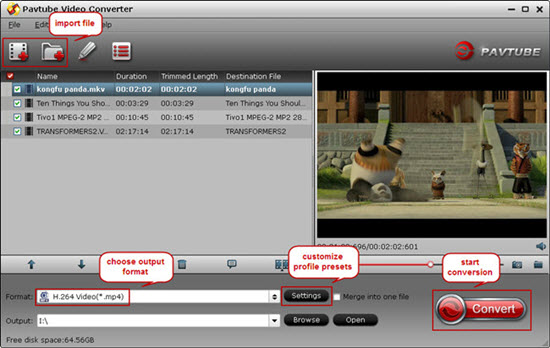 Note: This great Sony Handycam MTS Video Converter is GPU video card enabled, which means you could encode or decode source videos by ticking off below one or two buttons to accelerate largely accelerate video encoding speed when transcoding/converting/ripping video files from one format to another by using H.264 codec.
  2. Click "Format" column and choose the output format, you can choose MP4 format for output. This is the perfect format for playing on Tablets/Smartphones and sharing on website.
  Note: In case you cannot find the perfect format for your device, this video converter offers several common profiles for Android and Windows devices so that you could still play HD videos on your smartphone or tablet with small profile adjustments.
  3: Click settings button to adjust the output video's parameters, such as bitrate, resolution, etc. 4. You can edit the Sony Handycam MTS videos in this program before converting to other formats on Windows 10, Windows 8.1/8. Trim, crop, add watermark or adjust effect as you want.
  5. Start converting Sony HandyCam AVCHD video to MP4 for Win/Mac Mavericks. In this way, you can convert Sony handycam recorded MTS footages to playback or sharing. Please take a try now, hope it will do a great favor for you. You can find more related guides in Sony Column. Overall, it's a good program, and worth checking out if you often want to convert video files to play on other devices, tv, media players or edit video in Avid Media Composer, Adobe Premiere, Pinnacle Studio, Windows Movie Maker, Sony Vegas Pro 13, Sony Movie Studio 13 Platinum, Avid Xpress Pro, MAGIX Movie Edit Pro HD, Corel VideoStudio Pro, Cinelerra, Sorenson Squeeze and so on. See also:
Good News! Pavtube Bundles Dealsare coming! If you want to import/preserve/mix multi-track MXF in MKV/MP4/MOV formats, get multi-track Apple Prores MOV for further editing in Final Cut Pro (X), the following bundled software is your best choice:
5. Start converting Sony HandyCam AVCHD video to MP4 for Win/Mac Mavericks. In this way, you can convert Sony handycam recorded MTS footages to playback or sharing. Please take a try now, hope it will do a great favor for you. You can find more related guides in Sony Column. Overall, it's a good program, and worth checking out if you often want to convert video files to play on other devices, tv, media players or edit video in Avid Media Composer, Adobe Premiere, Pinnacle Studio, Windows Movie Maker, Sony Vegas Pro 13, Sony Movie Studio 13 Platinum, Avid Xpress Pro, MAGIX Movie Edit Pro HD, Corel VideoStudio Pro, Cinelerra, Sorenson Squeeze and so on. See also:
Good News! Pavtube Bundles Dealsare coming! If you want to import/preserve/mix multi-track MXF in MKV/MP4/MOV formats, get multi-track Apple Prores MOV for further editing in Final Cut Pro (X), the following bundled software is your best choice:  Video Converter($35) + MXF MultiMixer($45) = $54.9, Save $25.1 (buy link) Video Converter for Mac($35) + iMixMXF($45) = $54.9, Save $25.1 (buy link) MXF MultiMixer/iMixMXF Key Features: -Import/preserve/mix multi-track MXF in MKV/MP4/MOV formats. -Output multi-track Apple Prores MOV for further editing in Final Cut Pro (X). -Support DVCPRO/HDV/Avid DNxHD/AIC output -Convert MXF to any other formats for editing, playing, or broadcasting. -Merge/split/trim/crop MXF footages. Video Converter for Windows/Mac Key Features: -Convert from and to any common SD/HD video and audio format. -Support Apple ProRes/DVCPRO/HDV/Avid DNxHD/AIC encoding. -Output formats for Windows/Mac editing software, e.g. FCP, iMovie, FCE, Avid, Adobe Premiere, Sony Vegas Pro, etc. -Output formats for different playback devices, hdtv, hd media players, etc. Go ahead and click the link to get your coupon. Save up to $44.1! Never miss!!!
This guide introduces the quickest and easiest way to convert TS video to MP4 format, so that you can play TS video on portable devices and media players freely.  What is TS file? TS is abbreviations for Transport Stream, which is specified in MPEG-2. And it is a standard format for transmission and storage of audio, video, and data, and is used in broadcast systems such as DVB and ATSC. Transport stream specifies a container format encapsulating packetized streams, with error correction and stream synchronization features for maintaining transmission integrity when the signal is degraded. What problems we have with .ts video files? Hi, I am looking for a tool able to convert some ts files to mp4. These ts files contain a H264 (mpeg4 avc) video stream and a AAC sound track. Only the ts container shall be converted to mp4, not the video nor audio stream which shall stay untouched. I tried many tools but all of them encode the video and audio stream. avidemux should be able to do the job since there is an option "copy" for both video and audio but unfortunately it always crashs. Any great program recommended? And how to encode these videos without de-synchronisation. As .ts is not compatible with many portable devices and media players, if you would like to easily playback these .ts video files you have recorded, you'd better transcode these TS videos to a common format which is suitable for watching, like the MP4 format. Software required: To convert your TS file to MP4 format, I recommend this TS Video Converter, which is exactly the software specially made for compressing/encoding TS file to MP4 file format for most players quickly and easily and with excellent video quality. You can also edit TS video before TS to MP4 conversion, you can trim TS videos, join TS videos together, increase the volume of TS files, increase the video quality of TS files, rotate TS files, add effect/watermark/subtitles to TS video and etc. Becides that, it's capable of converting TS to MKV, convert TS to AVI, convert TS to WMV, convert TS to MPEG, convert TS to FLV, convert TS to VOB, convert TS to DivX, convert TSV to AVI, and convert TS files to many other video formats. The nice TS to MP4 Converter can also convert TS to MP3, ALAC, AIFF, FLAC, OGG and more, it's easy of use and choices for decode/encode to all popular formats. With the professional TS to MP4 Converter, you can easily play TS files in iTunes, QuickTime, iPad, iPhone, Surface, Android, Windows Media Player, upload TS files to YouTube and edit TS files in Sony Vegas Pro, Avid, Premiere, Windows Movie Maker, etc. Note: its Mac version is renamed as TS Video Converter for Mac. Now download TS to MP4 Converter, install and run it. And then follow the steps below: Guide: Convert TS format to MP4 format Mac without losing the video quality Step 1: Launch Pavtube Video Converter Ultimate; import .ts video. Free download the best TS to MP4 Converter and run it to add the TS footages.
 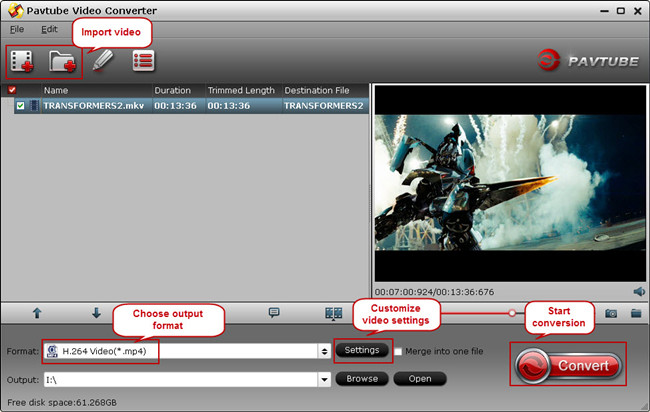 Step 2: Choose format. Hit "Format" drop-down list and choose "HD Video> H.264 HD Video(*.mp4)" as the most widely used format for playback on smartphones, tablets and media players.
 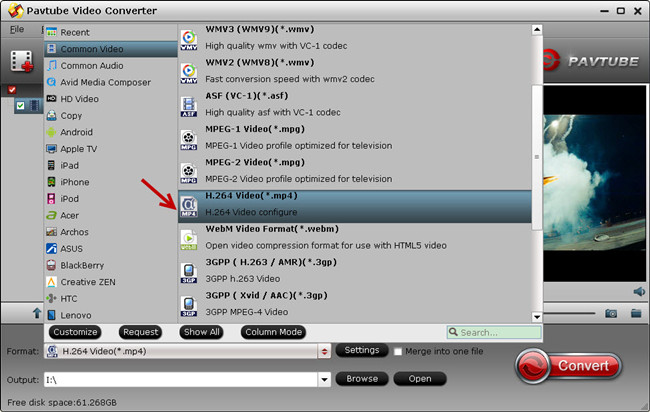 Step 3: Adjust output settings (Optional) You can click "Settings" (besides "Format") to change target video size, bitrate, frame rate and other specs. Change the size to "Original" to get full size picture that can be playback clearly. And the higher bitrate you choose, the better video quality will be. Step 4: Start the TS to MP4 conversion. Back to the main interface and hit the "Convert" to start converting TS to HD MP4 on your PC/Mac; this converter will start all the tasks in batch. Wait for a while till the conversion completed; click "Open output folder" to quick locate the converted files. Now play the converted .mp4 movies on you device and share them with your family and friends. Have a good time! See Also:
HOOOOOOOOT NEWS: Pavtube 2014 Christmas Biggest Promotion is comeing ----------Up to 40% off gifs, --------Pay extra $9.9 to Get Another Video Converter, --------Facebook 50% off discount, take a look at Pavtube 2014 Christmas Deals. The most popular software is at 50% off Discount expiring on Jan 10, 2015. Time-limited! Never Miss! Good News! Pavtube 2014 Christmas promotional activities began! Just click "Share on Facebook" button, insert "#PavtubeChristmas2014",choose "Public", and click "Share Link". Then send us the screenshot by email to videowinsupport@pavtube.com or videomacsupport@pavtube.com, you will receive a 50% OFF discountlink of any converter from Pavtube within 24 hours on week days. Please do not forget to invite your families and friends to join in, and we'll appreciate your action! The event link is:http://www.pavtube.com/christmas-2014-specials.html
Step 3: Adjust output settings (Optional) You can click "Settings" (besides "Format") to change target video size, bitrate, frame rate and other specs. Change the size to "Original" to get full size picture that can be playback clearly. And the higher bitrate you choose, the better video quality will be. Step 4: Start the TS to MP4 conversion. Back to the main interface and hit the "Convert" to start converting TS to HD MP4 on your PC/Mac; this converter will start all the tasks in batch. Wait for a while till the conversion completed; click "Open output folder" to quick locate the converted files. Now play the converted .mp4 movies on you device and share them with your family and friends. Have a good time! See Also:
HOOOOOOOOT NEWS: Pavtube 2014 Christmas Biggest Promotion is comeing ----------Up to 40% off gifs, --------Pay extra $9.9 to Get Another Video Converter, --------Facebook 50% off discount, take a look at Pavtube 2014 Christmas Deals. The most popular software is at 50% off Discount expiring on Jan 10, 2015. Time-limited! Never Miss! Good News! Pavtube 2014 Christmas promotional activities began! Just click "Share on Facebook" button, insert "#PavtubeChristmas2014",choose "Public", and click "Share Link". Then send us the screenshot by email to videowinsupport@pavtube.com or videomacsupport@pavtube.com, you will receive a 50% OFF discountlink of any converter from Pavtube within 24 hours on week days. Please do not forget to invite your families and friends to join in, and we'll appreciate your action! The event link is:http://www.pavtube.com/christmas-2014-specials.html  source:http://videostepconvertmap.blogspot.com/2014/12/how-do-i-convert-ts-files-into-mp4-for.html
Fall in trouble when editing Sony 4K XAVC videos in Premiere Elements 13? If so, follow the easy workaround here. Adobe Premiere Elements with stunning features is popular video editing software for us. The point here, sometimes, you will find it's a painful experience when loading Sony 4K XAVC files into Premiere Elements 13. And there are some frequently asked question quoted as below.  Q1: Does Premiere Elements 13 Support 4K video? Somehow my previous question disappeared. Does this program support 4K to burn to 4K Blu Rays? Q2: Sony F55 4K XAVC footage to Premiere Elements 13 crash? I've tried to get some 4K XAVC footage from an F55 to work in Premiere Elements 13. It imports, but when I try to do anything with it, it crashes. As far as I know, Premiere Elements 13 has project presets for the video with the resolution of 3840 x 2160 (a 4K resolution) under NTSC only. It also offers export of the 3840 x 2160 resolution under Publish+Share/Computer/XAVC-S. However, there is no burn to Blu-ray with any 4K resolution. The compatibility between 4K videos and Adobe Premiere Elements is still an unsolved mystery in that some persons can import 4K videos into Elements, while the others can not: On the one hand, the computer configuration and operation environment should play an important role on this aspect. On the other hand, bypassing 4K issue, XAVC, as a newly high compressed video format, is not supported by most NLEs, including Premiere Elements, FCP, iMovie, Avid Media Composer, iPhoto, etc. So to get rid of the issue, the first step we need to do is to make 4K XAVC files editable in Premiere Elements 13. Here we suggest you give a go with Pavtube XAVC Video Converter for Mac or Windows which work smoothly in converting Sony 4K XAVC to a more "edit" friendly codec for Premiere Elements 13 like MPEG-2/AVC MOV. The most attractive thing is that it can downscale your 4K videos into common 1080p so that NLEs can afford well. If you're troubled by the similar problem, just download the right version and follow the guide below to start conversion. (Learn more: Top 3 Best XAVC/XAVC S Video Converter for Mac Review) Before processing: Back up/Transfer the 4K XAVC footage to Mac computer - copy the whole video folder to your computer hard drive, not just the individual .xavc files. Step 1. Install Launch the Mac XAVC to Premiere Elements Converter. Click "Add Video" and browse to Sony XAVC clips and the software will add it to file list. Repeat the operation to load multiple XAVC videos. Or you may click the "Add Folder" button to import all the XAVC files in the file structure.
  Step 2. Click on "Format" and choose "MPEG-2 (*.mpg)" or "MOV(AVC) (.mov)" from "Adobe Premiere/Sony Vegas> " as the best codec for editing Sony 4K XAVC in Premiere Elements 13. What's more, you can also transcode XAVC to FCP, iMovie, Davinci Resolve, Avid for editing or to QuickTime and various multimedia devices for playback.
  Step 3. Click on "Settings" to redefine output quality. You can also set a different video resolution (1920x1080/1440x1080/1280x720/720x480), frame rate (24p/30p), bitrate, audio channels, etc. For users who would like to retain exactly the same settings (without any quality loss), set target settings the same to source video. Step 4. Click "Convert" to start transcode 4K XAVC to MPEG-2/MOV for Premiere Elements 13 editing on Mac/PC. Once you get the converted .MOV/.MPG file, you can import videos to Premiere Elements. Now you can edit your Sony 4K XAVC videos in Premiere Elements 13 with ease. Read Also:
Good news! Pavtube Bundles Deals are coming! It's a time for taking a break from work and relaxing. And now you can enjoy your colorful time with good featured products at "Pavtube Bundles Deals". Go ahead and click the link to get your coupon. Save up to $44.1! Never miss!!! MTS/M2TS Converter for Mac($29) + MXF Converter for Mac($29) = Only $29.9 MTS/M2TS Converter for Mac($29) + MKV Converter for Mac($29) = Only $29.9 MTS/M2TS Converter for Mac($29) + FLV/F4V Converter for Mac($29) = Only $29.9 iMixMXF($45) + HD Video Converter for Mac($35) = Only $54.9 ...... 
Does iMovie 11 properly handle 60fps video now? If you are currently having 60fps files and iMovie import issue, the post will tell you why iMovie not importing 60fps HD videos and offer the best and fasest solution.  Got one camcorder, like Sony NEX-5N, NEX7, A99, A65, Panasonic HC-V720, HDC-TM90 to record 1920*1080 Full HD MTS footage up to 60fps (50fps for PAL) and have met the incompatible erros when you tried importing 60fps videos to iMovie 8/9/11 for further editing? From googling, we find many users have the same issues: Question1. "Whilst away snowboarding on my most recent trip, I recorded most days in 720p / 60fps (as it looks ultra smooth) and have just over 54Gb of footage; divided into five folders on my iMac (one for each day) with about 20 .mp4 files in each one. I assumed I could put together something decent on iMovie 11. Some Googling revealed that iMovie 10 does not support 60FPS. Is that right? And then how to get imovie easily working with these 60fps video? Any help would be appreciated." Qustion 2. "I am a novice iMovie 11 user. I have footage in a 60fps camera that I imported into iMovie. When I import it, either with or without optimization, the video is very jumpy and the audio doesn't time with the footage at all. But 30fps footage imports into iMovie correctly. Is there any way to import the 60fps video correctly so that I don't have this problem, even if it means downgrading the quality?" In fact, iMovie can't support the format 1080p@60fps because it is a nonstandard frame rate. If you want to natively ingest and edit the 60fps videos in iMovie, you have to firstly transcode 60fps footage it to a compatible frame rate with a native format by iMovie, like AIC. It means that you have to use a professional HD Video Converter for Mac to encode the 60fps video to Apple IntermediateCodec(AIC) yourself at 60p, and iMovie will let you edit a 24p or 30p project. Note that even if you shift your footage to AIC at 60p, iMovie will downgrade it to 24fps or 30fps on export (depending on what you chose), but it still doesn't look bad at all. It will just use the extra frames to make it smoother. If you shoot in 60fps and slow it down to 30fps, you are still using 30 frames to fill 30 frames. It will be much smoother. If you attempt to transcode 60p video to AIC for using with iMovie, we would recommend Pavtube HD Video Converter for Mac - Top 60fps HD Video to iMovie Converter. Main features: This software is best Mac HD Video Converter that can transcode any kinds of HD Video files to Apple InterMediate Codec (AIC), Apple ProRes 422 codec, DNxHD codec, MPEG, WMV, AVI, MOV, etc. for puting into iMovie, FCP, Adobe, Avid, iPhoto, DaVinci Resolve, Kdenlive, Keynote, Aperture 3, etc. NLE's for editing, and enables users to custom video and audio settings like frame rate, bit rate, resolution, sample rate and audio channel at will. These output formats are specially presetted, so the conversion quality is guaranteed, you can get lossless video conversion with this tool. (Learn more:Pavtube HD Video Converter for Mac 3.6.1 Review) Here is step by step guide: How to get 1080p/60fps videos to iMovie for editing? Step 1. Download, install and launch this 60fps HD Video to iMovie Converter. Import the 60fps footage to the Mac converter by clicking the "Add Video" or "Add from folder" button.
  Step 2. Click "format" bar to choose the output format. If yo want to edit 1080 60fps video in iMovie 8/9/11, please choose iMovie and Final Cut Express -> Apple InterMediate Codec(AIC) (*.mov). This is best format for iMovie editing on Mac, once converted, you won't need to render.
  Step 3. You can click "Settings" to customize the output parameters, adjust the resolution, bitrate as you want. To export 60p video, simply set the video frame rate at 60p; to export 30p video, simply set the video frame rate at 30p. Step 4. Click "Convert" button to start converting 1080p 60fps video to AIC .mov - the best suited editing format for using within Apple iMovie Version 11, 8, or 9. After the conversion, you can import footages to iMovie. It's just a piece of cake to edit 60fps HD video files in iMovie? Just have a try! Good luck, and let us know if your problem is fixed. ;-) Also read:
Source: http://handycameratips.jimdo.com/2014/12/10/edit-60fps-video-in-imovie/
Step 3. You can click "Settings" to customize the output parameters, adjust the resolution, bitrate as you want. To export 60p video, simply set the video frame rate at 60p; to export 30p video, simply set the video frame rate at 30p. Step 4. Click "Convert" button to start converting 1080p 60fps video to AIC .mov - the best suited editing format for using within Apple iMovie Version 11, 8, or 9. After the conversion, you can import footages to iMovie. It's just a piece of cake to edit 60fps HD video files in iMovie? Just have a try! Good luck, and let us know if your problem is fixed. ;-) Also read:
Source: http://handycameratips.jimdo.com/2014/12/10/edit-60fps-video-in-imovie/