Trapped in the trouble of H.265 footage shot by Samsung NX1 camcorder? How much do you know about the latest codec H.265? Do you think it is only the upgraded version of the former H.264? Whatever, this new H.265 footage seems not so friendly with Adobe Premiere Pro and Sony Vegas Pro, so we need to find some solutions to get rid of the trouble. In this article you can receive some efficient solutions here.  Professional explanation of H.265/HEVC codec: H.265/High Efficiency Video Coding (HEVC) is a video compression standard, a successor to H.264/MPEG-4 AVC (Advanced Video Coding), that was jointly developed by the ISO/IEC Moving Picture Experts Group (MPEG) and ITU-T Video Coding Experts Group (VCEG). HEVC is said to double the data compression ratio compared to H.264/MPEG-4 AVC at the same level of video quality. (Let's Have an Intensive Talking on H.265/HEVC) What's the Prospect and benefit of H.265 codec? H.265 is the codec of the future, we have advanced to that time, and rolling a way back machine back to now, by giving to users an affordable and easy HEVC video converter. See the results yourself With the H.265 encoder incorporated on Cinec we achieved the following result, by converting a ProRes file of 550MB to a H.265 5MB file with almost no noticeable difference at normal screens, look yourself. See Also: Professionals Favorite H.265/HEVC Video Encoder/Decoder – Smaller Size and Higher Quality Key features of Samsung NX1 camcorder:
- 4K (DCI 4K & UHD) video recording using H.265 codec
- Can output 4:2:0 8-bit 4K video over HDMI
- Stripe pattern AF illuminator with 15m range
- Weather-resistant magnesium alloy body
- USB 3.0 interface
- Optional battery grip
What a pity that the output footage H.264 cannot be accept well by Adobe Premiere/Sony Vegas! In order to get a nice watching of these videos, we need to do some changes. Luckily, we have the PavtubeNX1 H.265 Video Converter, with the upgraded version 4.8.2.0, it can work the H.265/HEVC codec well. As we all know the best codec for Adobe Premiere and Sony Vegas is MPEG-2, so we just transcode our NX1 H.265 footage to MPEG, right? Let's do it! See also: Adobe Premiere Pro Supported Formats Guide on how to transcode H.265 from Samsung NX1 to MPEG for editing in Adobe Premiere Pro and Sony Vegas Pro. Step 1. Load your H.265 files into this best H.265 Video converter. Install Pavtube H.265 Video converter on your PC, then load your H.265 files from NX1 by clicking 'Add video' and 'Add from folder', or just drag-and-drop your NX1 H.265 files in this interface. 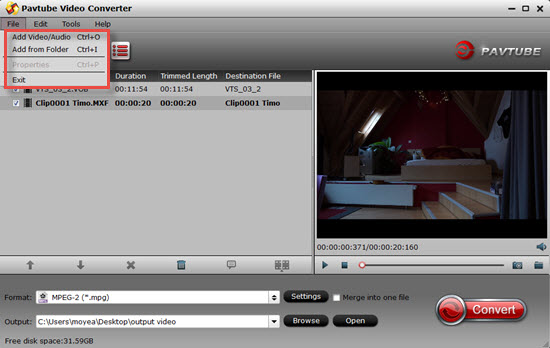 Step 2. Choose "MPEG-2 (*.mpg)" as your output format Come to the output list, just select the suitable formats for Adobe and Sony Vegas. Tap the 'MPEG' in the searching box is okay. Or drop down the list, nearly on the bottom of the list, we can find the 'Adobe Premiere Pro/Sony Vegas' >>'MPEG-2 mpg' there. Just as follows:
  Tips: Encode your original videos to H.265 codec for enjoying with nice effects? On the output list, select the 'HD Video'>>'H.265 HD Video(*.mp4) there. I have to mention you that though H.265 coded has the higher definition, it will take you much more time to work with. (Convert H.264, MP4, MOV, AVI, MKV, FLV to H.265 video)
 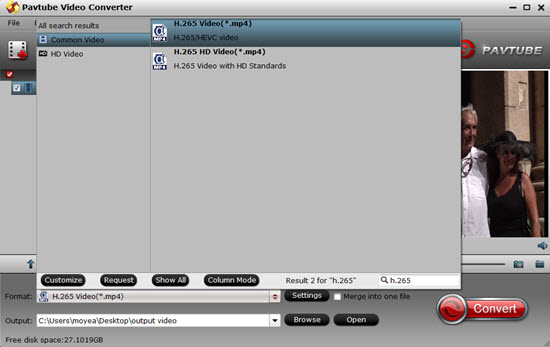 According to the workflow, usually for those advanced users, it is not a bad idea to adjust the output videos in the 'Settings' button. Such as the 'video codec', video size, bitrates or even the audio channels. Surely you can leave the default as usual.
 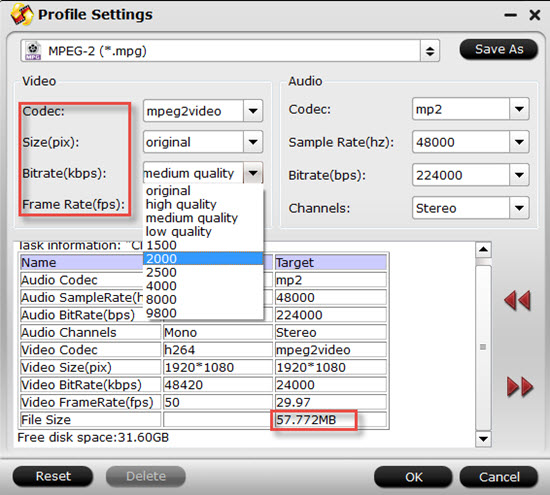 At the end of this paper, if you have finished the preparation, back to the main interface, just hit the 'Convert' to get this NX1 H.265 to MPEG-2 conversion started. Or any other suggestions or better methods you can leave the message below, okay? Additionally, we also found a third-party plug-in released by Cinemartin, it is initially for Adobe Premiere Pro which allows users to export sequence timeline to all versions of prores or HEVC/H.265. Just look the short videos below as referene Youtube guides video url: https://www.youtube.com/watch?v=JaZDpXwoT_o More related:
Never miss to get Saving up to $44.1, MXF/MTS/M2TS/MKV/FLV/MOV Converter.etc at Pavtube Bundles Deals!
At the end of this paper, if you have finished the preparation, back to the main interface, just hit the 'Convert' to get this NX1 H.265 to MPEG-2 conversion started. Or any other suggestions or better methods you can leave the message below, okay? Additionally, we also found a third-party plug-in released by Cinemartin, it is initially for Adobe Premiere Pro which allows users to export sequence timeline to all versions of prores or HEVC/H.265. Just look the short videos below as referene Youtube guides video url: https://www.youtube.com/watch?v=JaZDpXwoT_o More related:
Never miss to get Saving up to $44.1, MXF/MTS/M2TS/MKV/FLV/MOV Converter.etc at Pavtube Bundles Deals!  Source: http://1080p-video-tool.blogspot.com/2014/12/edit-nx1-h.265-footage-in-premiere.html
Summary: Why cannot we directly watch MKV FLAC files on our PC/Mac? How about converting them to the common audios AC3 5.1 in MP4/M4V, which can both be the suitable one on PC/Mac? Let's see more details! The common MKV files we see are coded with H.264 video and AAC audio. As the demand of high quality audio enjoyment, more and more MKV files are codec with DTS AC3, FLAC audio. MKV FLAC can give people extraordinary listening experience as audio coded is used the lossless audio format FLAC. Such as play our MKV files to QuickTime or on VLC player? Here is the truth that we need to convert our MKV FLAC to AC3/AAC 5.1 on PC/Mac for nice enjoyment with no difficulties.  Why we need to convert MKV FLAC to AC3 5.1 for playback on PC/Mac? MKV FLAC can give people extraordinary listening experience as audio codec used the lossless audio format FLAC. However, the compatibility of MKV FLAC is quite limited. If you want to play MKV with FLAC audio on other devices, you will need to convert MKV FLAC to AC3 in MP4/M4V/MKV. Encoding channel to AC3 5.1 channel is not a bad idea for playback on PC/Mac.
Solutions to solve the problems of converting MKV FLAC files to AC3 5.1 on PC/Mac: Cause we have some problems in smoothly playing our MKV FLAC on our computers, do you have any third-party tools that can handle the audios well? Though there are some audio assistants that could work your job, with the bundled-plug-ins or apps you have to download together, you will be confused a lot, right? Fortunately, we have the Pavtube Video Converter for Windows/Mac, which has the ability of converting our various audio files to be compatible for popular media players. Specific guide on how to turn our MKV FLAC files to AC3 5.1 for a nice playback: Step 1. Download and install the MKV FLAC to AC3 5.1 converter on PC, then we need to load our original files in with 'Add video' and 'Add from folder' buttons on the left corner. Just drag them in is also a good idea.  Step 2.How to convert your Audios from FLAC to AC3 5.1? Click the 'Format' bar to get into the output list. Come to the 'Common Audio' column to find the correct item 'AC3-Dolby Digital AC-3(*.ac3)' as the best output one. Just take the following screen shot as follows.
 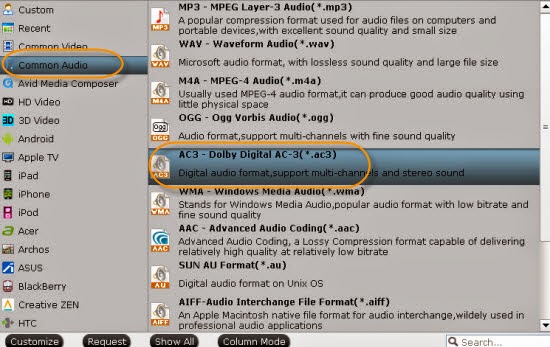 Notes: If you wanna convert your original MKV formats, we suggest you open the 'Common Video' on the output list, could your find the 'MP4' or 'M4V' as output there? Just select them as suitable ones if you want. Step 3. When we come to the 'Settings', we can adjust our audio channels which means we can change our audio channel to 5.1 we need. What's more, we can here adjust our video size, bitrates or frame rate to the meet our requirements on media players.
 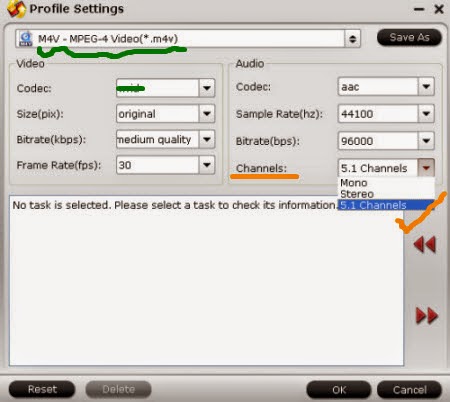 Finally, go back to the main interface, click the 'Convert' button to end your conversion work. With this MKV FLAC to AC3 5.1 audio assistant, we are surprise to handle the audio converting job well. So now, do you know clearly about it? More related:
************************************************************* Good News! Pavtube Bundles Dealsare coming! If you want to import/preserve/mix multi-track MXF in MKV/MP4/MOV formats, get multi-track Apple Prores MOV for further editing in Final Cut Pro (X), the following bundled software is your best choice: Video Converter($35) + MXF MultiMixer($45) = $54.9, Save $25.1 (buy link) Video Converter for Mac($35) + iMixMXF($45) = $54.9, Save $25.1 (buy link) MXF MultiMixer/iMixMXF Key Features: -Import/preserve/mix multi-track MXF in MKV/MP4/MOV formats. -Output multi-track Apple Prores MOV for further editing in Final Cut Pro (X). -Support DVCPRO/HDV/Avid DNxHD/AIC output -Convert MXF to any other formats for editing, playing, or broadcasting. -Merge/split/trim/crop MXF footages. Video Converter for Windows/Mac Key Features: -Convert from and to any common SD/HD video and audio format. -Support Apple ProRes/DVCPRO/HDV/Avid DNxHD/AIC encoding. -Output formats for Windows/Mac editing software, e.g. FCP, iMovie, FCE, Avid, Adobe Premiere, Sony Vegas Pro, etc. -Output formats for different playback devices, hdtv, hd media players, etc. Go ahead and click the link to get your coupon. Save up to $44.1! Never miss!!! Source: http://bestvideoking.blogspot.co ... p4-m4v-ac3-5.1.html
Finally, go back to the main interface, click the 'Convert' button to end your conversion work. With this MKV FLAC to AC3 5.1 audio assistant, we are surprise to handle the audio converting job well. So now, do you know clearly about it? More related:
************************************************************* Good News! Pavtube Bundles Dealsare coming! If you want to import/preserve/mix multi-track MXF in MKV/MP4/MOV formats, get multi-track Apple Prores MOV for further editing in Final Cut Pro (X), the following bundled software is your best choice: Video Converter($35) + MXF MultiMixer($45) = $54.9, Save $25.1 (buy link) Video Converter for Mac($35) + iMixMXF($45) = $54.9, Save $25.1 (buy link) MXF MultiMixer/iMixMXF Key Features: -Import/preserve/mix multi-track MXF in MKV/MP4/MOV formats. -Output multi-track Apple Prores MOV for further editing in Final Cut Pro (X). -Support DVCPRO/HDV/Avid DNxHD/AIC output -Convert MXF to any other formats for editing, playing, or broadcasting. -Merge/split/trim/crop MXF footages. Video Converter for Windows/Mac Key Features: -Convert from and to any common SD/HD video and audio format. -Support Apple ProRes/DVCPRO/HDV/Avid DNxHD/AIC encoding. -Output formats for Windows/Mac editing software, e.g. FCP, iMovie, FCE, Avid, Adobe Premiere, Sony Vegas Pro, etc. -Output formats for different playback devices, hdtv, hd media players, etc. Go ahead and click the link to get your coupon. Save up to $44.1! Never miss!!! Source: http://bestvideoking.blogspot.co ... p4-m4v-ac3-5.1.html
Summary: If you have problems with editing Sony PMW-100 HD422 MXF media files in Adobe Premiere Pro, you can get the best solution here to fix in how to import Sony PMW-100 XDCAM HD422 MXF in Adobe Premiere Pro smoothly. Just freely convert original MXF to MPG, which could be the best one for Adobe Premiere Pro.  Sony PMW-100 XDCAM HD422 Handheld Camcorder is a comfortable companion for Sony's entire XDCAM line, including the optical-disc models and the camcorders, like this one, that record HD video to SxS cards. You can easily integrate the PMW-100 into both XDCAM EX and XDCAM Professional Disc workflows. The handy PMW-100 offers broadcast-quality 50 Mb/s MPEG-2 recording at 1920 x 1080 in a very compact form factor. However, it seems difficulty for us to edit Sony MXF in some NLEs, such as iMovie/FCE, Avid MC, etc. Sony PMW-100 50Mbps MXF recordings can bring you better quality and make it easy for broadcasting, but as this XDCAM MXF format is not well supported by Premiere Pro, most users may encounter many audio and video problems, such as bitrate unsupported, and synchronization program. So how to edit Sony PMW-100 MXF files in Premiere Pro smoothly? The best workaround for us is to convert Sony PMW-100 MXF to Adobe Premiere Pro most compatible format, like .MOV, and it will make the editing work much smooth and easier. First of all, we highly recommend the Sony XDCAM MXF Converter ( Pavtube MXF Converter Mac ) for you, which allows you to convert/transcode Sony PMW-100 XDCAM HD422 MXF files to Premiere Pro easily and quickly that you just need a few clicks. Below, we give you the step-by-step guide. Before follow the guide, you need to download and install the best Sony XDCAM MXF to PPro Converter on your Mac OS X Lion.
 Step 1. After downloading, install and run this MXF to Premiere Pro Converter, just copy the MXF files from PMW-100 right to your hard drive, import the files to the software.
  Step 2. Click "Format" bar to choose the output format. Click and choose "Format > Adobe Premiere/Sony Vegas > MOV (AVC)(*.mov) or MPEG-2 Video (*.mpg)" as output format. The XDCAM MXF Converter for Mac will convert Sony PMW-100 MXF videos to MOV/MPG with the original video resolution.
  Step 3. You can click "Settings" button to adjust the parameters, such as resolution, bitrate, etc. Step 4. Click "Convert" button to start converting Sony PMW-100 MXF to MOV/MPG for importing to Premiere Pro on Mac. After the conversion is finished, just run Adobe Premiere Pro and import the .mpg or .mov files for editing. You will find the output video work perfectly on Adobe Premiere Pro. PS. If you do not know how to import video to Adobe, please reference the following guide: Adobe Premiere Pro workflow: How to import Media Files to Premiere Pro on Mac More Related guides:
Good news! Pavtube Bundles Deals are coming! It's a time for taking a break from work and relaxing. And now you can enjoy your colorful time with good featured products at"Pavtube Bundles Deals". Go ahead and click the link to get your coupon. Save up to $44.1!Never miss!!!
Step 3. You can click "Settings" button to adjust the parameters, such as resolution, bitrate, etc. Step 4. Click "Convert" button to start converting Sony PMW-100 MXF to MOV/MPG for importing to Premiere Pro on Mac. After the conversion is finished, just run Adobe Premiere Pro and import the .mpg or .mov files for editing. You will find the output video work perfectly on Adobe Premiere Pro. PS. If you do not know how to import video to Adobe, please reference the following guide: Adobe Premiere Pro workflow: How to import Media Files to Premiere Pro on Mac More Related guides:
Good news! Pavtube Bundles Deals are coming! It's a time for taking a break from work and relaxing. And now you can enjoy your colorful time with good featured products at"Pavtube Bundles Deals". Go ahead and click the link to get your coupon. Save up to $44.1!Never miss!!!
- MTS/M2TS Converter for Mac($29) + MXF Converter for Mac($29) = Only $29.9
- iMixMXF($45) + HD Video Converter for Mac($35) = Only $54.9 .....
Summary: This article aims to guide you how to import Sony XDCAM EX MP4 to Final Cut Pro 7/X without rendering on Mac OS 10.8 by convert Sony XDCAM MP4 to Prores with Pavtube Sony HD Video Converter. Do you knwn any details on the process of transcoding MP4 to ProRes MOV? Just be a good reader below.
More Related: XACAM to Adobe? XDCAM to iMovie/FCE? Why not take as reference if you need?
Sony XDCAM EX camcorders like PMW-EX3, PMW-200, PMW-EX1, PMW 150, etc are great for us to take high quality full HD videos. If you have got one and often use it to record 1080p video, you may have the need to edit the generated XDCAM EX MP4 files in Final Cut Pro on Mac. But after test, we find that this MP4 format can't even be played on Mac OS 10.8 and when loading these MP4 files in FCP X, it shows with a black screen. Many fresh users don't know what to do. But don't worry. Just follow me to learn how to import .mp4 files from Sony XDCAM to FCP X.
 Question : I'm having trouble importing Sony camera footage. FCP X does not accept Sony XDCAM MP4 footage. I'd like to just convert the MP4 to ProRes, instead of using this XDCAM program. Is there a way? And is there a reason why Sony footage files suck when used with FCP X?
Soultions:
Load the MP4 videos in FCP by Sony XDCam Transfer plugin (Complexed and may have reliability and incompatiblity issues) Calibrated{Q} MP4-EX Import component($149.95) supports tranferring MP4 to QuickTime MOV but it don't fit for Final Cut Pro X. (Expensive and not supported FCP X)
Here Mac Sony XDCAM EX Converter( Pavtube HD Video Converter for Mac ) helps you to convert Sony XDCAM MP4 files to Prores 422 for FCP X with original quality. (Easy and Helpful way)
As you see, the last solution is the esaiest and effective way.
Below are step to step guide for transferring Sony PMW-EX3 XDCAM MP4 files to FCP X on Mac OS 10.8
Step 1. Load MXF or MP4 files from Sony XDCAM camcorder to the professional Mac XDCAM to FCP X Converter.
Download Sony XDCAM MP4 to Prores Converter for mac, and install it. Click the Add Video button to import Sony XDCAM seperate mp4 files or press on"add from folder" button to add MP4 folder.
Tip: If you want to merge Sony XDCAM MXF or MP4 files for Final Cut Pro X, just need to check the "Merge into one files" box.
Question : I'm having trouble importing Sony camera footage. FCP X does not accept Sony XDCAM MP4 footage. I'd like to just convert the MP4 to ProRes, instead of using this XDCAM program. Is there a way? And is there a reason why Sony footage files suck when used with FCP X?
Soultions:
Load the MP4 videos in FCP by Sony XDCam Transfer plugin (Complexed and may have reliability and incompatiblity issues) Calibrated{Q} MP4-EX Import component($149.95) supports tranferring MP4 to QuickTime MOV but it don't fit for Final Cut Pro X. (Expensive and not supported FCP X)
Here Mac Sony XDCAM EX Converter( Pavtube HD Video Converter for Mac ) helps you to convert Sony XDCAM MP4 files to Prores 422 for FCP X with original quality. (Easy and Helpful way)
As you see, the last solution is the esaiest and effective way.
Below are step to step guide for transferring Sony PMW-EX3 XDCAM MP4 files to FCP X on Mac OS 10.8
Step 1. Load MXF or MP4 files from Sony XDCAM camcorder to the professional Mac XDCAM to FCP X Converter.
Download Sony XDCAM MP4 to Prores Converter for mac, and install it. Click the Add Video button to import Sony XDCAM seperate mp4 files or press on"add from folder" button to add MP4 folder.
Tip: If you want to merge Sony XDCAM MXF or MP4 files for Final Cut Pro X, just need to check the "Merge into one files" box.
 Step 2: Select Apple ProRes 422 as native format for FCP X.
Click on the Format box and select "Apple ProRes 422 (*.mov)" or "Apple ProRes 422 HQ (*.mov)" format from dropdown-list. Due to the difference in the compresstion standard of AVCHD and ProRes 422, the converted files are significantly larger than the original ones. If you prefer smaller file size, please choose "Apple ProRes 422 (LT) (*.mov)" instead.
Step 2: Select Apple ProRes 422 as native format for FCP X.
Click on the Format box and select "Apple ProRes 422 (*.mov)" or "Apple ProRes 422 HQ (*.mov)" format from dropdown-list. Due to the difference in the compresstion standard of AVCHD and ProRes 422, the converted files are significantly larger than the original ones. If you prefer smaller file size, please choose "Apple ProRes 422 (LT) (*.mov)" instead.
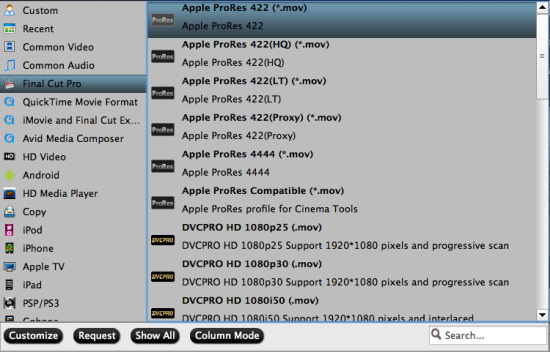 Tips: The main difference between the five ProRes codecs for you:
Apple ProRes 422 – Higher quality than Apple ProRes 422 (LT);
Apple ProRes 422 (HQ) – Keep original video quality for editing in FCP;
Apple ProRes 422 (LT) – Get a smaller file sizes than Apple ProRes 422;
Apple ProRes 422 (Proxy) – SD levels – 480i/p and 576i/p. Used in offline workflows;
Apple ProRes 4444 – Edit and finish 4:4:4 materialStep 3: Set to get better quality as you like.
Step 3. Edit Sony XDCAM MXF/MP4 footage with the best Sony XDCAM Converter for FCP X.
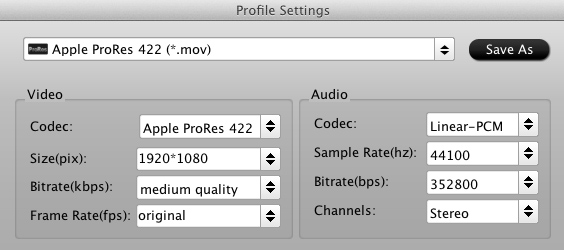
Trim MXF/MP4 file into small segments, cut black sides around video, apply special effects, audio replacement, etc. And click "Settings" button, then you will enter the following interface, on which you are allowed to customize size, bit rate, frame rate, sample rate, and audio channel to your required ones. (Tip: this converter can helps you to downmix 5.1 channell to stereo for Final Cut Pro X editing)
Tips: The main difference between the five ProRes codecs for you:
Apple ProRes 422 – Higher quality than Apple ProRes 422 (LT);
Apple ProRes 422 (HQ) – Keep original video quality for editing in FCP;
Apple ProRes 422 (LT) – Get a smaller file sizes than Apple ProRes 422;
Apple ProRes 422 (Proxy) – SD levels – 480i/p and 576i/p. Used in offline workflows;
Apple ProRes 4444 – Edit and finish 4:4:4 materialStep 3: Set to get better quality as you like.
Step 3. Edit Sony XDCAM MXF/MP4 footage with the best Sony XDCAM Converter for FCP X.
Trim MXF/MP4 file into small segments, cut black sides around video, apply special effects, audio replacement, etc. And click "Settings" button, then you will enter the following interface, on which you are allowed to customize size, bit rate, frame rate, sample rate, and audio channel to your required ones. (Tip: this converter can helps you to downmix 5.1 channell to stereo for Final Cut Pro X editing)
 Step 4. You can edit the Sony XDCAM MP4 video before conversion. By clicking "
 " button, you can trim, crop the video, or add watermark and adjust effect to the videos which you will convert.
Step 5. Click "
" button, you can trim, crop the video, or add watermark and adjust effect to the videos which you will convert.
Step 5. Click " " to start to transcode Sony XDCAM MP4 footage to ProRes 422 MOV on Mac OS X.
When the Sony XDCAM MXF/MP4 to ProRes MOV conversion is done, simply click "Open" button to transfer the generated files to FCP X for editing on Mac. Find this Sony XDCAM to FCP X Converter makes your editing work more easy and convenient? Now you can effortlessly and losslessly convert and import Sony XDCAM MXF/MP4 footage into FCP X without rending time.
After fast Sony XDCAM mp4 to FCP X Conversion, you can directly Importing video files and projects into Final Cut Pro X without problems on Mac OS X 10.8. And please remember for FCP X users, make sure that you have installed the Apple ProRes Codec manually since the FCP X asks users to install it by themselves.
P. S.
If you want to convert a XDCam EX MP4 file into a mac-compatible file for enjoying which retain the same size and quality, with running xdcam browser you can preview the MP4 files or export as a mxf file, but can't transfer to a .mov file and this rewapped .mxf file may not be viewing. Also, can try a program called "Calibrated{Q} XD Decode codec" ($89.95) to encode MP4 files for playback. But using Pavtube HD Video Converter for mac($35) can helps you to tranfer to a mac friendly format like .mov. easily and fastly.
If you have rewapped the MP4 files to MXF by xdcam browser, you can also use Pavtube Mac HD Video Converter above,and if you like, you can try another related software Mac Sony MXF Converterspecially designed for MXF files.
Hope the guide on making transferring Sony PMW-EX3 XDCAM EX HD Camcorder clip to FCP X easier can give you a big help.
See also:
HOOOOOOOOT NEWS: Pavtube 2014 Christmas Biggest Promotion is coming:
- Up to 40% off gift: iMixMXF
- Pay extra $9.9 to Get Another Converter from pavtube.com/products
- Like our Facebook, get 50% off discount: https://www.facebook.com/pavtubefans/app_198826126804423
Expiring on Jan 31, 2015. Time-limited! Never Miss!
" to start to transcode Sony XDCAM MP4 footage to ProRes 422 MOV on Mac OS X.
When the Sony XDCAM MXF/MP4 to ProRes MOV conversion is done, simply click "Open" button to transfer the generated files to FCP X for editing on Mac. Find this Sony XDCAM to FCP X Converter makes your editing work more easy and convenient? Now you can effortlessly and losslessly convert and import Sony XDCAM MXF/MP4 footage into FCP X without rending time.
After fast Sony XDCAM mp4 to FCP X Conversion, you can directly Importing video files and projects into Final Cut Pro X without problems on Mac OS X 10.8. And please remember for FCP X users, make sure that you have installed the Apple ProRes Codec manually since the FCP X asks users to install it by themselves.
P. S.
If you want to convert a XDCam EX MP4 file into a mac-compatible file for enjoying which retain the same size and quality, with running xdcam browser you can preview the MP4 files or export as a mxf file, but can't transfer to a .mov file and this rewapped .mxf file may not be viewing. Also, can try a program called "Calibrated{Q} XD Decode codec" ($89.95) to encode MP4 files for playback. But using Pavtube HD Video Converter for mac($35) can helps you to tranfer to a mac friendly format like .mov. easily and fastly.
If you have rewapped the MP4 files to MXF by xdcam browser, you can also use Pavtube Mac HD Video Converter above,and if you like, you can try another related software Mac Sony MXF Converterspecially designed for MXF files.
Hope the guide on making transferring Sony PMW-EX3 XDCAM EX HD Camcorder clip to FCP X easier can give you a big help.
See also:
HOOOOOOOOT NEWS: Pavtube 2014 Christmas Biggest Promotion is coming:
- Up to 40% off gift: iMixMXF
- Pay extra $9.9 to Get Another Converter from pavtube.com/products
- Like our Facebook, get 50% off discount: https://www.facebook.com/pavtubefans/app_198826126804423
Expiring on Jan 31, 2015. Time-limited! Never Miss!

Summary: Don't konw how to import single .mts/.m2ts files to Final Cut Pro? Follow the article below, you will get to know the easy way to transcode individual AVCHD footage to Prores mov for editing in FCP. Questions here: Could MTS/M2TS be directly accepted by other popular NLEs such like Premiere Pro, iMovie, etc. Or could we go through the way smoothly in uploading MTS/M2TS on YouTube/Vimeo? MTS and M2TS both are file extensions for the high definition digital video camera recorder format, AVCHD. AVCHD was jointly established by Sony Corporation and Panasonic Corporation in 2006 for use in their digital tapeless camcorders. MTS files can typically be opened and edited using the software included with Sony, Panasonic and some Canon HD camcorders. But practically speaking, importing AVCHD to FCP might be tricky, due to the version of FCP, your Mac processor (PowerPC- or older Intel-based Mac don't support AVCHD editing) , and the model of camcorder. Thus, many users report that they can't import AVCHD files into FCP using camera import, or can't edit them by selecting the single .mts clips.  As AVCHD format records video using the MPEG-4 AVC/H.264 video codec, to get FCP recognise single .mts/.m2ts files, you need to convert your AVCHD files to FCP friendly format like Prores .MOV with a 3rd party tool. Here recommend you the top Pavtube MTS/M2TS Converter for Mac which can help you to convert AVCHD to Apple ProRes 422 preserving the original quality that get individual .mts/.m2ts files to edit in FCP successfully. Plus, this Mac AVCHD converter also supports converting AVCHD MTS footage to iMovie, Adobe Premiere, Avid Media Composer, Final Cut Express and more to meet your needs. What's more, some easy-to-use editing features like trimming, cropping, adding watermark, deinterlacing, etc are combined with the convert program. Now, follow the step-by-step guide transcoding single .mts/.m2ts to Final Cut Pro. 1. Download the best AVCHD Converter for FCP, install and run it. As soon as its main interface appears, click "Add video" or "Add from folder" icon to load your individual .mts/.m2ts files that stored on your Mac.
 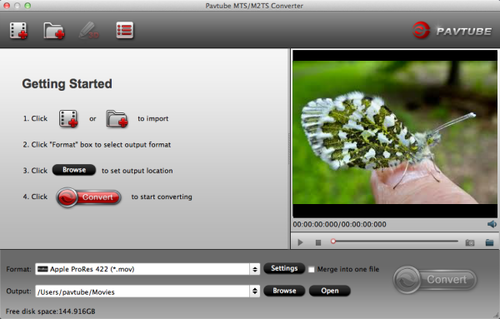 2. Choose "Apple ProRes 422 (*.mov)" as output format from "Final Cut Pro" option as the best codec with single .mts/.m2ts footage in Final Cut Pro.
 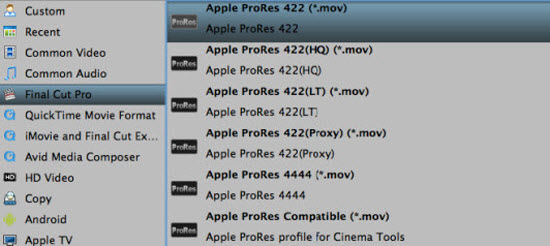 3. Click "Convert" to start AVCHD to FCP conversion. Once the conversion is done, you can click "Open" button to find out the generated files with ease. Tips: How to import the converted video files to FCP for further editing? Launch Final Cut Pro, choose File > Import > Files…. More related articles:
Good news! Pavtube Bundles Deals are coming! It's a time for taking a break from work and relaxing. And now you can enjoy your colorful time with good featured products at"Pavtube Bundles Deals". Go ahead and click the link to get your coupon. Save up to $44.1!Never miss!!!
3. Click "Convert" to start AVCHD to FCP conversion. Once the conversion is done, you can click "Open" button to find out the generated files with ease. Tips: How to import the converted video files to FCP for further editing? Launch Final Cut Pro, choose File > Import > Files…. More related articles:
Good news! Pavtube Bundles Deals are coming! It's a time for taking a break from work and relaxing. And now you can enjoy your colorful time with good featured products at"Pavtube Bundles Deals". Go ahead and click the link to get your coupon. Save up to $44.1!Never miss!!!
- MTS/M2TS Converter for Mac($29) + MXF Converter for Mac($29) = Only $29.9
- MTS/M2TS Converter for Mac($29) + MKV Converter for Mac($29) = Only $29.9
- MTS/M2TS Converter for Mac($29) + FLV/F4V Converter for Mac($29) = Only $29.9
- iMixMXF($45) + HD Video Converter for Mac($35) = Only $54.9 .....