2015年7月13日星期一

Solve no audio issue-Convert multi-track MXF files on Mac

Summary: As a professional video format, MXF allows us to shoot video with multiple audio tracks. There is an easy way to solve MXF audio problems. Pavtube iMixMXF can remove all your worries about sound problems when convert multi-track MXF on Mac

Hot Search: Multi-track P2 MXF to FCP X | MXF to FCP X | MXF to Avid | Multi-track MXF to SBS 3D video | MXF to Aperture 3 | MXF to Premiere Pro CC 


Multi-track MXF footage becomes more and more common with camcorders from Canon, Sony, Panasonic and so on. Usually these mxf contains two or more audio tracks for better presenting, you may like to record one audio track in mics which will get better audio effect especially shooting in a noisy environment. 

But it may troubles you when converting the multi-track MXF footage to other formats for editing/playback in NLE or other programs on Mac; for instance, you may like to convert multi-track MXF to MOV, ProRes, AIC, DNxHD, H.264/AVC, QuickTime MOV. However, due to the multi-track audios, you may not able to get the right track or get all the tracks converted. Here by this article will show you how to convert your multi-track MXF files on Mac without audio problems. 

To achieve this goal, Pavtube iMixMXF(Review) can exactly do it for you which are professional multi-track MXF Converter and Mixer tools for helping to convert MXF to any other video and audio formats for playback or further editing on Mac with preserving all the multiple audio tracks of original MXF videos. Other than multi-track preserving features, it is also capable of mixing several audio tracks into one track. Let's go to try efficient conversion workflow with an easy-to-use interface and these wonderful functions now. 

The following instruction will tell you how to transcode multi audio channels MXF on Mac Mavericks. Now download and install the best Multitracks MXF Converter and Mixer, and then follow the instruction. 

(Note: And its windows version is available here.) 

Before converting, connect your MXF Camcorder to Mavericks with USB 2.0 cable or use card reader to transfer the.mxf files to Apple hard drive disk. 


Other Download: 
- Pavtube old official address: http://www.pavtube.com/imixmxf-mac/ 
- Amazon Download: http://www.amazon.com/Pavtube-Studio-iMixMXF-Download/dp/B00QI7MY4Y 
- Cnet Download: http://download.cnet.com/Pavtube-iMixMXF/3000-2194_4-76171460.html 

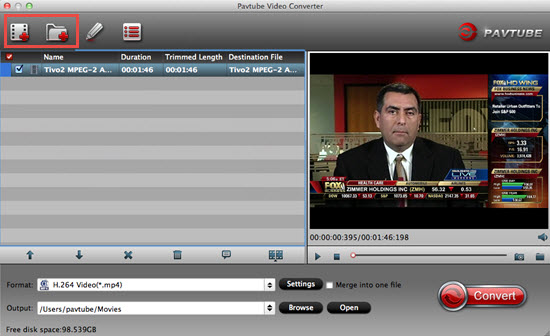
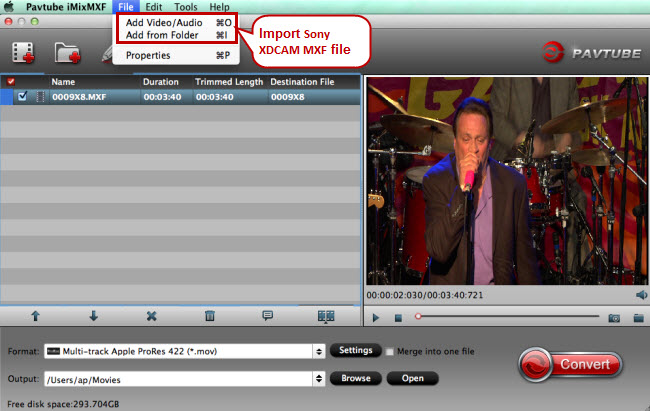
Step 1. Launch Pavtube iMixMXF and click the top left two icons to load individual mxf clips or the entire folder. 


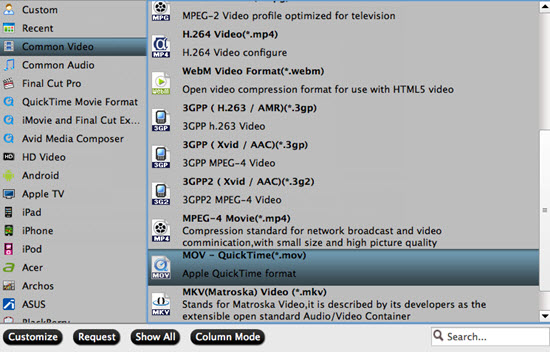
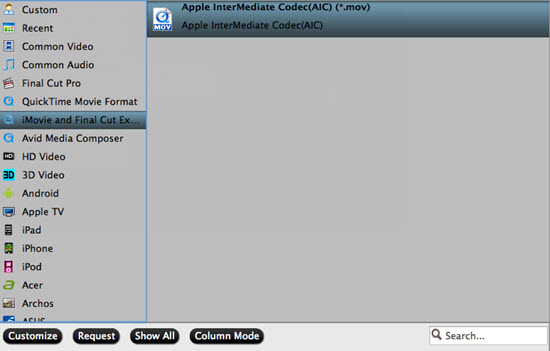
Step 2. Choose best video codec according to your needs. 

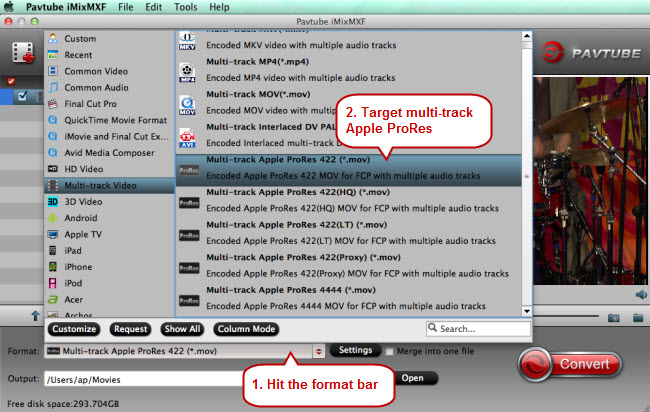
Different from other MXF converters, Pavtube iMixMXF is able to output multi-track Apple RreRes formats for FCP X, multi-track MOV for various editor tools, making it stand out from the rest. To preserve and produce multi-track video, click the "Format" bar to follow "Multi-track Video" > "Multi-track Apple ProRes 422 (*.mov)", "Multi-track MOV", Multi-track MP4" for broadcasting, further editing, delivering and playing. 


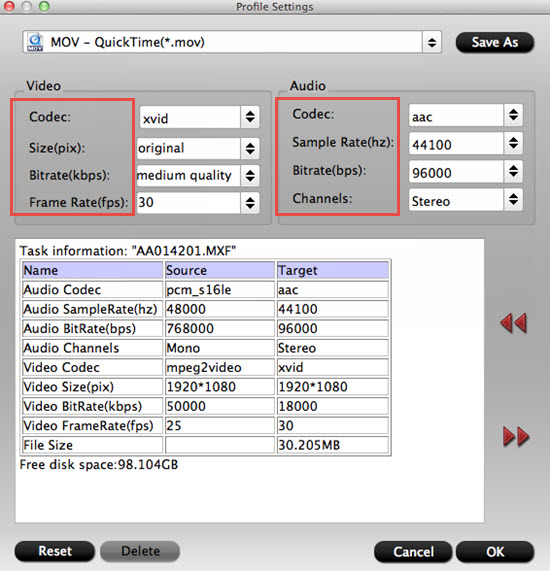
Step 3. Check "Mix into one track" 

In the main interface, press "Settings" button, and then "Multi-task Settings" panel pops up. Switch to "Audio" section, check the audio tracks that you want to mix down, and tick off the checkbox before "Mix into one track". After that, click "OK" 


If you don't change it, Mac MXF Converter will take the first audio track be default; but if this track has no audio, you will only get video no audio after conversion. 

Step 4. Click "Start" to start multi-track MXF conversion. 

Click the "Convert" button to start converting MXF to compatible video format on Mac. After conversion, you can click "open output folder" to locate the converted files and then you can edit, deliver and play them. Of course, there is no sound problem any more. That's great! 
 

More Guides: 
Canon XF plug-in for FCP or Use iMixMXF to Convert MXF for FCP 
Import Sony PXW-X70 Video Files into FCPX or iMovie 
Mix and Convert Avid Multi-track MXF Files to MP4 
Audio Issues When Editing Sony PMW 150 MXF in FCP? 
Convert Panasonic HPX250 P2 MXF files for playback on TV 
How to Edit 4K Footage in Adobe Premiere 
Import Canon multi-track MXF to Davinci Resolve 
Canon XF300 MXF Read Errors in Premiere Pro CC 
Edit Panasonic AJ-HPX2700 P2 MXF in Avid/Premiere/Sony Vegas Pro 
Encode Sony XDCAM MXF to Multi-track Apple ProRes for FCP 
Transcode MXF to MP4 with multiple audio tracks for playing and editing 
Import Canon C300 Mark II 4K MXF to Premiere Pro CS6/5/4/3 
Method of Importing JVC GY-HM650U MXF Files to iMovie 

Convert TiVo to QuickTime movie files for creating DVD

I use My TiVO Series 3 records the amazing new series on Fox / National Geographic: "COSMOS: A Space-time Odyssey" ans archive them so my niece can see it. She's in a remote area of the world, with no access to TV or even the Internet. But I can send her a DVD with the QuickTime movie files on it so she can see it that way. That's why I convert TiVo to mov files. 


I'm simply editing in the QuickTime Player 7 itself; don't need anything fancy. Just editing out the ads. The fact that I could do this! I tried products from iSkySoft, and they didn't work. The open-source cTivo (Google Project) KIND of works, but doesn't give me much control over the final .mov file. Roxio Toast 11 can do it ... but limits you to 640 x 480 with no support for HD. Pavtube Video Converter for Mac(Review) is the ONLY product I can find on the Mac that works correctly and easily with native TIVO files! Two parts are included in this article. 

PS: If you record a show on your TiVo box and want to transfer them to your Windows-based (Windows 10 included) PC, you can follow the instructions to transfer TiVo shows to your PC

Part I: Transfer TiVo recorded shows to Mac OS X 

TiVo Decode Manager is a free program which helps you fetch TiVo recovered shows and even transfers the files to your Mac for enjoyment. 

1. Connect your TiVo to network 

Make sure your TiVo on your home network. If it's not, consult your TiVo manual to get it connected. Set up an account at www.tivo.com. Log in and click DVR Preferences in the left navigation bar. Check Allow Transfers and click Save Preferences without logging out. 


Click Overview in the left navigation bar, then click the Media Access Key (MAK) link on the right side of the window. The page that appears will reveal your MAK. Write it down, or select it and press Command-C on your keyboard. Now you can log out. 

2. Make sure your Mac is on your network and launch TiVoDecode Manager. 

TiVoDecode Manager (TDM) is a free Applescript Studio interface (i.e. "wrapper") for the tivodecode program that automates the process of downloading of standalone TiVo Series 2 files to your computer and decoding into MPEG-2 or MPEG-4 files. It is not for Series 1 (ever), Series 3, or DirecTiVos (unhacked or hacked). 


3. Find your TiVo on your network. 

Enter your TiVo's IP address in the TiVo IP Address box. Or let the software find it for you by selecting your TiVo from the pull-down menu and clicking the Update From TiVo button. 
Next click the Prefs button in the lower-right corner. Fill in the Media Access Key box with the number you recorded in step 1. Click Update From TiVo again. 

4. Transfer TiVo shows to Mac 

A list of shows on your TiVo will appear in the Now Playing list. 
Select the show and click Add Show To Queue. And now click Download Location to customize the place where you want to save your files. 

Then Pick a format. At the bottom of the window, click the Download Format pull-down menu to select a format from MPEG-2 (native), QuickTime MPEG-4 (iPod), and custom MPEG-4 format for your downloaded show. 


Part II: Convert TiVo to MOV on Mac (Yosemite included) 

After fetching TiVo recovered shows and transfers them to your Mac, you need Pavtube HD Video Converter remove DRM automatically while converting TiVo files to QuickTime MOV with fast encoding speed and loss-less quality on Mac (OS X El Capitan, Yosemite and Mavericks included). Now you need download and install the trial: 


Other Download: 
- Pavtube old official address: http://www.pavtube.com/video-converter-mac/ 
- Amazon Store Download: http://www.amazon.com/Pavtube-Video-Converter-Mac-Download/dp/B00QIBK0TQ 
- Cnet Download: http://download.cnet.com/Pavtube-Video-Converter/3000-2194_4-76179460.html 


Below is a step-to-step guide to convert TiVo to QuickTime movie files for creating DVD.

Step 1. Import TiVo to the program.

Click "File">"Add Video/Audio" to load your TiVo files. The first time you load your files, Pavtube will pop up this windows to remind you import your "Media Access Key" by click "Option" button.


Click "OK" to go to the next step , which your key is required to remove the copy protection.


Then your TiVo files will be loaded into this app , you can double click it to preview it in the preview window.


Tips: If you want, you can merge several Tivo clips by ticking "Merge into one file" box.


Step 2. Choose "Common Video> MOV-QuickTime(*.mov)" as the best video format for playing Tivo footage on QuickTime. To get higher quality, please click on "HD Video" tab and choose "HD MOV" format.


Optional - You can also click "Settings" to change the output video bitrate, frame rate, size, etc. all according to your needs.


Step 3. Start TiVo shows to QuickTime MOV conversion on Mac Mavericks.

When everything is done, click the "Convert" button at the bottom-right corner to finish the Tivo to QuickTime mov conversion on Mac.

With it smart Video Coverter for Windows/Mac software, you can also easily convert TiVo shows to MPEGM4VMP4AVI, FLV, WMV, MKV, Apple ProRes, etc. formats for playig on portable media devices, media players, video editing software like iPad, iPhone, Apple TVAndroidGalaxy Tab 4, Galaxy S6, Surface, Windws Media PlayerXboxFCP X, etc. for freely enjoyment. 

Sony FS700 MTS won't work in DaVinci Resolve - Fixed

Overview: Here we offer some good methods of freely importing Sony FS700 MTS files to DaVinci Resolve for further editing on Mac or Windows. 

See also: MTS File Extension Details and Tips 


It is said that the popular editing software DaVinci Resolve works with everything in real time, ranging from Quick Time, ProRes, DNxHD, MXF files to AVI, JPEG2000, HQ and HQX in MOV,JPEG,TGA and BMP. However, MTS with DaVinci Resolve is such a pain. 

My friend got an 30sec ama sequence of an commerical shoot on sony fs700. Resolve cannot handle MTS files and now he needs to deliver the sequence for grading so what should be the best way to do this. He said he is not familiar with this MTS workflow because most of the time he is working with red footage cut it offline and relink it back to raw. 

Do you know what suggestions did I suggest to him? Pavtube MTS/M2TS Converter for Mac / Windows, a strong program which can get rid of this trouble well. How does it work? 

See also: Top 5 MTS/M2TS Converter for Mac Reviewed 

First, download it for a preparation and we'll come to the step-by-step process. 


Other Download: 
- Pavtube old official address: http://www.pavtube.com/mts-converter-mac/ 
- Amazon Download: http://www.amazon.com/Pavtube-MTS-M2TS-Converter-Download/dp/B00QIE3U0Y 
- Cnet Download: http://download.cnet.com/Pavtube-MTS-M2TS-Converter/3000-2194_4-76177029.html 


Run DaVinci Resolve video converter on your Windows PC or Mac, and click the 'Add vdieo' to load them in a correct way. As is mentioned above, Avid DNxHD is well supported by DaVinci Resolve 11. So just click the format bar to follow "Avid Media Compose" > "Avid DNxHD 720p (*.mov)" or "Avid DNxHD 1080p (*.mov)."


Before importing MKV, MTS, MXF, AVI, MP4, and FLV videos to DaVinci Resolve 10/9 for professional and further editing, you can use the video editor designed in this video converter to edit your MKV, MTS, MXF, AVI, MP4, and FLV videos. Click "Edit" to get to the "Video Editor" interface, and edit your videos by trimming (get/cut off video clips), cropping (remove unwanted areas), adding text/image/video watermarks, inserting subtitles, adding special effects, etc.


With all the preparation work done, click the "Convert" to start your work. For more related guides, you can take the following as the reference. Also, welcome to show your own opinions below.

Further Reading:
Freely Play Sony Handycam MTS Videos on Windows 10/Mac Yosemite
Watch 3D AVCHD MTS video on 3D Tablet
A Cool Movie Editor for Mac OS X Yosemite
Play AVCHD Videos with VLC and QuickTime on Yosemite
Import Panasonic V130 MTS to iMovie/FCE for Editing 
Play/Convert MTS Files in Aperture Library
Convert 3D MTS Movies for Playback with SBS 3D MOV/MP4/MKV/AVI
Import MP4, AVI, WMV, MXF, MTS to Premiere Pro CS3/4/5/6/CC
Import Sony HDR-PJ275 1080/60p AVCHD to FCP X
Play MKV movies on NVIDIA 3D Vision Player
Enjoy 3D Movie on Oculus Rift DK2
Play MTS on Smart TV (Windows and Mac Solutions)
Convert Sony Handycam MTS to Quicktime MOV for Playback
Load Sony HDR-XR150 mts to Pinnacle Studio 17 

Edit Panasonic P2 MXF files natively in FCP

Many camcorder producers have released their high-end products to attract video editors with high tech in their camcorders. You'd know that professional camcorders series usually use MXF container format to record videos instead of AVCHD format, which is often used in family expenses camcorders. 

MXF is a special HD video format which has been put to use in many high-end camcorders such as Canon XF series and Panasonic P2 HD series (including AG-HPX170, AG-HVX200, AG-HPX300, AG-HPX370, AG-HPX500, AJ-HPX2100, AJ-HPX2700, AJ-HPX3000, and AJ-HPX3700, etc.). Files are saved onto the P2 memory card in MXF format allowing direct data transfer to broadcasting and production system. 


However, those files in MXF format have proved to be not so well-suited when they are about to be edited in Final Cut Pro, see the below question: 

"The footage came from a Panasonic DVCPRO HD P2 camera. I have converted many files from this same camera with no problem but for some reason now it has no audio. I cannot find that screen you have referenced below. Is there a way someone can help walk me through this?" 

To edit Panasonic P2 footage with FCP, you have to convert P2 MXF to FCP natively supported video format like MOV with Apple ProRes Codec. Here we recommend you the best P2 MXF to FCP Converter for Mac which can help you to transcode Panasonic P2 MXF to Apple ProRes .mov format for FCP on Mac OS X quickly and easily. Here comes the detailed guide

Notes: 

1. Please ensure that the computer you are using to do P2 MXF conversion has Final Cut Pro installed, otherwise, the converted files will have audio only without image. 

2. If you are using FCP X, please make sure you have installed ProApps QuickTime Codecs, or you may get files with sound only without video. The FCP X does not install the ProApps QuickTime Codecs automatically, so you need download and install the codec manually from http://support.apple.com/kb/DL1396

3. While importing MXF clips to Pavtube Mac MXF Converter for conversion, please make sure you have the entire MXF file structure as it saved on your camcorder's P2 card. If you only have some loose .MXF clips, your files will have image only without audio. See MXF file structure on Panasonic's P2 card as below. 


The above screenshot clearly shows .MXF clips are all saved in "VIDEO" folder, while audio files are all stored in "AUDIO" folder. When you importing .MXF clips from the correct file structure, Pavtube MXF to FCP Converter is able to recognize audio tracks from 'AUDIO' folder automatically, which ensures the generated ProRes 422 MOV files have both image and sound correctly. 

Step 1. Click "Add Video" button to import P2 .mxf files 


Step 2. Choose "Apple ProRes 422 (*.mov)" as output (Pavtube MXF Converter for Mac has a preset option to choose a format specific to the Final Cut Pro) 

See also: Types of Apple ProRes Codecs | Apple ProRes Info & Tips | Working with Apple ProRes Codecs 


Step 3. Click "Convert" button to convert P2 MXF to FCP Apple ProRes on Mac, including the latest Mac OS X E1 Capitan, Yosemite 10.10, 10.9 Mavericks, etc.

As soon as the P2 MXF to FCP conversion is finished, click "Open" button to get the generated Apple ProRes 422 MOV files to FCP (X)for extending editing. 


Further Reading: 
Import Canon C300 Mark II 4K MXF to iMovie on Mac 
Work with .MXF files from Canon camcorder in iMovie 
Encode Canon MXF media to Avid with DnxHD codec 
Rewrap MXF to H.264 MOV for Adobe Premiere Pro 
Canon C300 .MXF won't render correctly in After Effects 
Free and Best 6 MXF Converter for Mac programs reviewed 
Problems with VLC When Playing GoPro Hero 4K Videos 
Play MXF Videos with Playback Pro on PC/Mac 
Making Sony Vegas Handle Raw MXF Files with Multi-track 
Alternative to GoPro Studio to Work with GoPro Hero Footage 
Merge MXF Files for Using in Magix Video Pro X 
XAVC .mxf to Avid Media Composer Solutions on Windows/Mac 

2015年7月8日星期三

Ingest HC-X1000 4K AVCHD MTS to iMovie 11/10/9

Summary: Failed to import Panasonic HC-X1000 4K AVCHD MTS to iMovie 11/10/9? Always edit Panasonic HC-X1000 4K AVCHD MTS in iMovie 11/10/9 unsuccessfully? Read through to know iMovie 11/10/9 better on the recommended video formats. Tips for how to ingest HC-X1000 4K AVCHD MTS to iMovie 11/10/9 are also provided. 

Hot search: MTS ColumnPaansonic Column | AVCHD to FXhome HitFilm | AVCHD to FCPAVCHD to Premiere Pro CS5AVCHD to Premiere Pro CCMTS to Avid Media Composer | AVCHD to Sony Vegas ProMTS to Panasonic Media Player | MTS to Sony Movie Studio 


Panasonic HC-X1000 is a powerful camcorder, it works as 4K DCI/Ultra HD/Full HD Camcorder, and with it you can jump right into 4K. In case that you encountered import issues while handling Panasonic HC-X1000 4K AVCHD MTS clips with iMovie 11/10/9, you can consider converting these HD video contents to a format that is best suited for iMovie 11/10/9, such as AIC MOV. 

Panasonic HC-X1000 can record videos in MP4, MOV or AVCHD codec, have you recorded some wonderful videos with this camcorder? After you recorded videos with it, you may have the need to import Panasonic HC-X1000 4K AVCHD MTS to iMovie 11/10/9 for editing. 4K Video and AVCHD MTS format is not easy to use as it's not well supported by many editing software, especially on Mac. Currently neither iMovie nor FCE supports the original 4K Video, AVCHD MTS footages from HC-X1000, that's why you cannot import Panasonic's HC-X1000 files to iMovie 11/10/9. 

If you have ever used iMovie, you may know there are limited video codecs and formats are supported by iMovie 11/10/9. In this case, how can we avoid the Panasonic HC-X1000 4K AVCHD MTS to iMovie 11/10/9 importing issue? It's easy. The common practice for HC-X1000 footage workflow with iMovie 11/10/9 is, get a Top MTS/M2TS Converter for Mac and transcode HC-X1000 4K AVCHD MTS to AIC (Apple Intermediate Codec), the well-acknowledged optimal editing format for iMovie 11/10/9. Here Pavtube MTS/M2TS Converter for Mac is highly recommended, which can save you both time and troubles. All you need is drag and drop the result videos for prompt editing. (Read also: Best MTS/M2TS Converter for Mac Reviews


Other Download: 
- Pavtube old official address: http://www.pavtube.com/mts-converter-mac/ 
- Amazon Download: http://www.amazon.com/Pavtube-MTS-M2TS-Converter-Download/dp/B00QIE3U0Y 
- Cnet Download: http://download.cnet.com/Pavtube-MTS-M2TS-Converter/3000-2194_4-76177029.html 


How to ingest HC-X1000 4K AVCHD MTS to iMovie 11/10/9?

Step 1. Free download this best 4K AVCHD MTS to iMovie 11/10/9 Converter. Install and run it as the best Panasonic 4K AVCHD MTS to iMovie 11/10/9 Converter. It supports single or batch conversion. Therefore, you are able to add individual or multiple 4K AVCHD MTS footages into the program at one time. Click the "Add video" button on the tool bar to finish the input.


Step 2. Click the drop-down list in the "Format" line to get the format box. Then choose "iMovie and Final Cut Express -> Apple InterMediate Codec (AIC) (*.mov)" as output format compatible with iMovie 11/10/9.


Step 3. The built-in editing function provided by 4K AVCHD MTS to iMovie 11/10/9 converter is something worth trying. To trim the video, add artistic effects, adjust audio, add watermark, customize video parameters and so on. You can get the work done splendidly. Of course, if you don't think it's a necessary to do, you can skip it and move onto the next step directly.

Step 4. You can preview to check the final result. Once you are happy with it, click the "Convert" button to start converting Panasonic HC-X1000 4K AVCHD MTS to iMovie 11/10/9 supported AIC MOV. It will take you a little while.

Conclusion: After the conversion is done, launch iMovie 11/10/9 and do the edit work. For more operation information about iMovie, you can refer to the article: How to import video files to iMovie 8/9/11 on Mac? Don't wait. Just follow the steps above and enjoy your editing!

Good news! Pavtube Bundles Deals are coming! It's a time for taking a break from work and relaxing. And now you can enjoy your colorful time with good featured products at "Pavtube Bundles Deals". Go ahead and click the link to get your coupon. Save up to $44.1!Never miss!!!
- MTS/M2TS Converter for Mac($29) + MXF Converter for Mac($29) = Only $29.9
- MTS/M2TS Converter for Mac($29) + MKV Converter for Mac($29) = Only $29.9
MTS/M2TS Converter for Mac($29) + FLV/F4V Converter for Mac($29) = Only $29.9
- iMixMXF($45) + HD Video Converter for Mac($35) = Only $54.9 .....


Further Reading:
Compress MTS to MP4 with Handbrake
Edit Nabi Square HD 4K Video in FCP
Convert Sony Camera Video to QuickTime for Playback
Encode Blackmagic 4K to ProRes and DNxHD on Mac
Play Sony HDV Video on Smart TV or Media Player
Audio does not work for MPEG-2 file to FCP X?
Sony AX-100 4K XAVC S and Premiere Pro Workflow
Encode MXF to MOV, MPG, MP4, AVI, WMV, FLV on Mac/PC
Import Sony XAVC MXF to Adobe Premiere Pro
Play AVI Videos on QuickTime Player
How to Upload iMovie Videos to Facebook?
Import Canon XC10 MXF to Avid Media Composer
Import GoPro 4K Video to Final Cut Pro X

Source: http://camcordervideoshare.altervista.org/blog/import-4k-avchd-mts-to-imovie/