MTS to Sony Vegas Pro: Import AVCHD MTS/M2TS to Sony Vegas Pro 12 Summary: Can't import AVCHD MTS files to Sony Vegas Pro 12? The easy workaround is to transcode AVCHD to Sony Vegas best editing MPEG-2 format. Here is how. Hi, I'm new on the boards. I'd like to know the best way to transcode MTS files to ProRes to edit in Sony Vegas Pro 12? I've always used ClipWrap to convert them for Premiere, but for some reason, Vegas doesn't seem to play nice with this software unless I convert in ClipWrap first, then re-convert using MPEG Streamclip. Any way I can cut down the steps and only do it once (something other than natively editing the MTS file)?  If you are using Sony Vegas Pro 12 to perform further editing, you will find the program does not work well with the 1920x1080x60p AVCHD MTS files from your Canon, Panasonic, Sony camera or camcorders. Although Sony Vegas announced that it was compatible with MTS files since Vegas Pro 8 version on its official site, the incompatibility issues occurred from time to time. To get you easily and natively editing AVCHD videos in Sony Vegas Pro 12, I will offer the way to fix the problem in this article. Due to video codec, frame rate, bitrate of the raw AVCHD recordings and even the computer configuration, Sony Vegas Pro can't fully support the 1080 60p AVCHD 2.0 all the time. So an easy solution is to convert these files to Vegas compatible formats like WMV, MPG, MOV first. To get the work done, Pavtube Video Converter is highly recommended, which provides optimized presets MPEG-2, WMV for Sony Vegas Pro. The program is specially designed for Sony, Canon, JVC and Panasonic AVCHD Camcorder/camera owners to convert MTS/3D MTSto any file format with excellent audio and image quality for using in video editing software and multimedia devices including Sony Vegas Pro, Adobe Premiere Pro, iMovie, etc. Download the tool and follow the step-by-step guide to import and load AVCHD MTS/M2TS files into Sony Vegas Pro for editing. Step 1: Download and install this converter. Copy the .mts files to your computer. Launch the MTS to Sony Vegas Converter, and you may either click "Add Video" or "Add from folder" button to import .mts files, or directly drag and drop the files into this program.
  Step 2: Select Sony Vegas 12 compatible format Get the dropdown menu of "Format" and then move your pointer to "Adobe Premiere Pro/Sony Vegas to choose "MPEG-2 (*.mpg) as the output format from the profile list which is the Sony Vegas Pro compatible video format.
  Tip:You can adjust the video and audio parameters, including the Bitrate of Video & Audio, Video Size, Frame Rate, Audio Channels, etc., by clicking the Settings button on the main interface. Step 3: Start conversion Click the convert button, the AVCHD converter will start encoding AVCHD .mts/m2ts files to Sony Vegas Pro immediately. Then just transfer the files to Sony Vegas as usual, we can nicely enjoy them freely. After the files are converted, tap the Open button to locate the converted files and bring them into your Vegas Pro with best audio and video quality, edit, export or share. This converter can convert very fast and support for editing applications like Avid MC, Premiere, Pinnacle, Windows Movie Maker etc. Related articles:
Good News! Pavtube Bundles Dealsare coming! If you want to import/preserve/mix multi-track MXF in MKV/MP4/MOV formats, get multi-track Apple Prores MOV for further editing in Final Cut Pro (X), the following bundled software is your best choice:? --------Video Converter($35) + MXF MultiMixer($45) = $54.9, Save $25.1 (buy link) --------Video Converter for Mac($35) + iMixMXF($45) = $54.9, Save $25.1 (buy link) Go ahead and click the link to get your coupon. Save up to $44.1!Never miss!!!
Tip:You can adjust the video and audio parameters, including the Bitrate of Video & Audio, Video Size, Frame Rate, Audio Channels, etc., by clicking the Settings button on the main interface. Step 3: Start conversion Click the convert button, the AVCHD converter will start encoding AVCHD .mts/m2ts files to Sony Vegas Pro immediately. Then just transfer the files to Sony Vegas as usual, we can nicely enjoy them freely. After the files are converted, tap the Open button to locate the converted files and bring them into your Vegas Pro with best audio and video quality, edit, export or share. This converter can convert very fast and support for editing applications like Avid MC, Premiere, Pinnacle, Windows Movie Maker etc. Related articles:
Good News! Pavtube Bundles Dealsare coming! If you want to import/preserve/mix multi-track MXF in MKV/MP4/MOV formats, get multi-track Apple Prores MOV for further editing in Final Cut Pro (X), the following bundled software is your best choice:? --------Video Converter($35) + MXF MultiMixer($45) = $54.9, Save $25.1 (buy link) --------Video Converter for Mac($35) + iMixMXF($45) = $54.9, Save $25.1 (buy link) Go ahead and click the link to get your coupon. Save up to $44.1!Never miss!!!  Source: http://handycameratips.jimdo.com/2013/12/28/sony-vegas-workflow-with-mts-files/
P2 MXF to FCP X--Panasonic AG-HPX170MXF Files to FCP X Summary: As FCP X won't import Panasonic AG-HPX170 P2 MXF footage, so this easy workaround aims to help you to import/edit AJ-HPX170 P2 MXF files into Final Cut Pro X flawlessly. Panasonic AG-HPX170 is an ultra-mobile P2 HD handheld camcorder featuring full, 4:2:2 independent frame production quality HD and solid-state recording. Its newly enhanced 1/3'' progressive 16:9 3-CCD imager delivers an excellent signal-to-noise ratio, lower noise/smear, and exceptional low-light performance. And HPX170 has two P2 card slots and records in 20 HD and SD formats. Files are saved onto the P2 memory card in MXF format allowing direct data transfer to broadcasting and production system.  After recording some files on the Panasonic AG-HPX170, you may find your Mac FCP X can not recognize the HPX170 P2 .mxf videos as below: "I have a project has 26 files and a total size of 5.7GB. The camera was the Panasonic AG-HPX170, I found that all the video record by Panasonic P2 camcorder is of .mxf format which Final Cut Pro X don't support. How can I import the P2 MXF project into Final Cut Pro X? What's the best supported video formats for FCP X?" Panasonic AG-HPX170 records MXF file using AVC-Intra codecs. Due to the unfriendly codec, it is not easy to import such a P2 MXF file directly into FCP X. To edit Panasonic AG-HPX170 P2 MXF footage with Final Cut Pro X smoothly, you have to import AG-HPX170 P2 MXF to FCP X natively with FCP supported video format like MOV in Apple ProRes Codec. Here we recommend you the best Mac P2 MXF to MOV Converter ( Pavtube MXF Converter for Mac ), which can help you to easily and losslessly convert Panasonic AG-HPX170 P2 MXF to ProRes 422 for FCP X on Mac. And the latest Mac OS X Mountain Lion 10.8.3 is supported; just feel free to try it!
 How to convert Panasonic AG-HPX170 P2 MXF to ProRes 422 for FCP X on Mac? Step 1. Connect your Panasonic AG-HPX170 P2 Camcorder to Mac with USB cable or use card reader to transfer the P2 MXF files to Apple hard drive disk.
  Step 2. Add Panasonic Panasonic AG-HPX170 P2 MXF videos to MXF Converter for Mac. Run this MXF to ProRes Converter for Mac, and click the "Add Files" button to load individuals mxf videos; or click "Add from folder" to load the entire folder.
 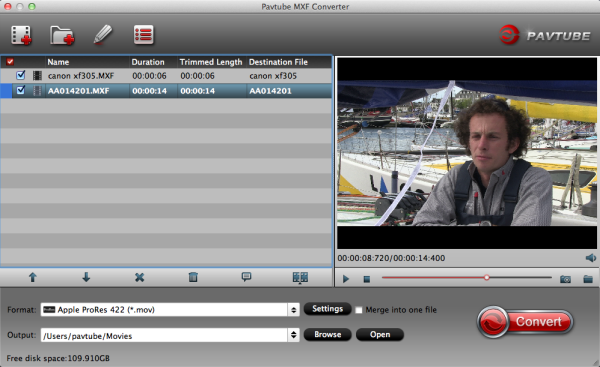 Step 3. Choose FCP X compatible format. Click the "Format" option and click to choose Final Cut Pro>Apple ProRes 422 for editing HPX-170 P2 MXF in Final Cut Pro X.
 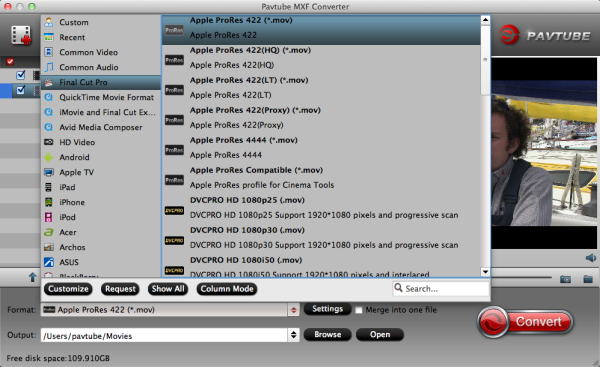 Pls note the "merge into one file" box above "Open", you can lossless merge Panasonic MXF footages a few clicks. Step 4. Now click the big red "Convert" and wait for a while to get the fresh hot converted video. Click Browse the locate them directly. Launch FCP X, and go to "File > Import > Files…" to import converted P2 footage to FCP X project.
  Now you can smoothly import Panasonic AG-HPX170 P2 MXF to FCP X on Mac Mountain Lion. Panasonic Related Articles: Canon XF300 MXF Read Errors in Premiere Pro CC Play MXF Videos in QT, WMP and Playback Pro Transcode AG-HVX200 MXF to FCP 6/7 Transfer Panasonic AJ-HPX3100 P2 MXF to FCP Edit MXF/P2 MXF recordings in iMovie '11 Good News: Never miss to get Saving up to $44.1, MXF/MTS/M2TS/MKV/FLV/MOV Converter.etc at Pavtube Bundles Deals, such as: HD Video Converter for Mac($35) + DVD Creator for Mac($35) = $39.9, Save $30.1 Source: http://pc-mac-compatibility-issues.blogspot.com/2013/06/import-panasonic-ag-hpx170-p2-MXF-to-FCP-X-for-editing.html
Import Sony PMW-200 XDCAM MXF to FCP 6/7 or Aperture 3 Summary: This guide shows you how to convert/transcode Sony PMW-200 XDCAM MXF file to Final Cut Pro/Aperture 3 supported files with Pavtube MXF Converter for Mac. Sony PMW-200 camcorder features a broadcast-friendly 50Mbps data rate drawing from three half-inch CMOS sensors -- bigger than any other broadcast handheld cam, according to Sony -- though that size is still a far cry from its own super-35 filmmaking cams and others on the market.  50Mbps HD422 Recording: In the UDF/MXF recording mode, you can record Full HD video (1920x1080) at up to 50Mbps using MPEG HD422 compression technology and enjoy the benefits of proven, high-speed and intuitive XDCAM HD422 workflow. With the PMW-200, you can also record video in MPEG HD (420) or DVCAM? format. (Note: Proxy video is not available with the PMW-200). Import XDCAM MXF recordings to FCP 6/7 or Aperture 3 Q: Hi! I was wondering if the FCP 6/7 works with mxf footages natively. Aperture 3 seems not work with these mxf recordings. I have some mxf video from Sony PMW-200 to edit for group work, and it would be great if anyone could help me with the importing workflow. Thanks! A: If you want to edit Sony PMW-200 XDCAM MXF in Final Cut Pro 6/7 or Apple Aperture 3, you first need to convert the XDCAM MXF video to compatible format like ProRes 422 codec. This is a common format developed by Apple. Below are some useful tips. Related Aperture Articles: Encode Canon EOS 7D Mark II to Apple Aperture 3 Play/Convert MTS Files in Aperture Library Solution: Transcode Sony PMW-200 XDCAM MXF to FCP 6/7 or Aperture 3 with Apple ProRes 422 codec 1.Download Pavtube MXF Converter for Mac. This is excellent software which can help you convert Sony PMW-200 XDCAM MXF video to ProRes for FCP 6/7 or Aperture 3. Besides, it supports many other formats for output. 2. Install and launch the Sony XDCAM MXF Converter Mac, import the MXF video from Sony PMW-200. 3.Choose the best output format for Final Cut Pro 6/7 or Aperture 3. Click on "Format" and choose "Final Cut Pro >>Apple ProRes 422 (*.mov)" format. 4.You can click settings to adjust the output parameters, such as resolution, bitrate and frame rate. 5.You can click edit button to edit MXF video, such as deinterlace, denoise, mute, volume up and crop. 6.Click convert button to start. Sony MXF to ProRes Converter will transcode Sony PMW-200 MXF to Apple ProRes codec MOV format. After converting, you can import converted video files to FCP 6/7 or Aperture 3 instantly without rendering. More output formats are supported. Read more:
Good News: Never miss to get Saving up to $44.1, MXF/MTS/M2TS/MKV/FLV/MOV Converter.etc at Pavtube Bundles Deals, such as: HD Video Converter for Mac($35) + DVD Creator for Mac($35) = $39.9, Save $30.1 Source: http://pc-mac-compatibility-issues.blogspot.com/2013/08/sony-pmw-200-importing-workflow-in-fcp-6-7-aperture-3.html
50Mbps HD422 Recording: In the UDF/MXF recording mode, you can record Full HD video (1920x1080) at up to 50Mbps using MPEG HD422 compression technology and enjoy the benefits of proven, high-speed and intuitive XDCAM HD422 workflow. With the PMW-200, you can also record video in MPEG HD (420) or DVCAM? format. (Note: Proxy video is not available with the PMW-200). Import XDCAM MXF recordings to FCP 6/7 or Aperture 3 Q: Hi! I was wondering if the FCP 6/7 works with mxf footages natively. Aperture 3 seems not work with these mxf recordings. I have some mxf video from Sony PMW-200 to edit for group work, and it would be great if anyone could help me with the importing workflow. Thanks! A: If you want to edit Sony PMW-200 XDCAM MXF in Final Cut Pro 6/7 or Apple Aperture 3, you first need to convert the XDCAM MXF video to compatible format like ProRes 422 codec. This is a common format developed by Apple. Below are some useful tips. Related Aperture Articles: Encode Canon EOS 7D Mark II to Apple Aperture 3 Play/Convert MTS Files in Aperture Library Solution: Transcode Sony PMW-200 XDCAM MXF to FCP 6/7 or Aperture 3 with Apple ProRes 422 codec 1.Download Pavtube MXF Converter for Mac. This is excellent software which can help you convert Sony PMW-200 XDCAM MXF video to ProRes for FCP 6/7 or Aperture 3. Besides, it supports many other formats for output. 2. Install and launch the Sony XDCAM MXF Converter Mac, import the MXF video from Sony PMW-200. 3.Choose the best output format for Final Cut Pro 6/7 or Aperture 3. Click on "Format" and choose "Final Cut Pro >>Apple ProRes 422 (*.mov)" format. 4.You can click settings to adjust the output parameters, such as resolution, bitrate and frame rate. 5.You can click edit button to edit MXF video, such as deinterlace, denoise, mute, volume up and crop. 6.Click convert button to start. Sony MXF to ProRes Converter will transcode Sony PMW-200 MXF to Apple ProRes codec MOV format. After converting, you can import converted video files to FCP 6/7 or Aperture 3 instantly without rendering. More output formats are supported. Read more:
Good News: Never miss to get Saving up to $44.1, MXF/MTS/M2TS/MKV/FLV/MOV Converter.etc at Pavtube Bundles Deals, such as: HD Video Converter for Mac($35) + DVD Creator for Mac($35) = $39.9, Save $30.1 Source: http://pc-mac-compatibility-issues.blogspot.com/2013/08/sony-pmw-200-importing-workflow-in-fcp-6-7-aperture-3.html
Transcode .TS files to Avid DNxHD mov for Avid Media Composer Summary: The article explains how to get Avid Media Composer to work perfectly with AVCHD footage in .TS format by transcoding to DNxHD MOV files. TS, short for Transport Stream, is a communications protocol for audio, video, and data. But TS is not a Avid-compatible format. So you must convert TS to Avid supported formats like DNxHD .mov. TS to a Avid Converter brings you the easiest, affordable way to import .ts movies into Avid accepted video. Hot Search: Video_TS to VLC | TS to FCP X | TS to QuickTime | TS to DVD | TS to iTunes | TS to HD MKV  With a professional TS files to Avid converter is necessary, Pavtube HD Video Converter for Mac is highly recommended to you, It would be quite simple and easy for you to convert TS files to Avid Media Composer compatible-format on Mac. (If you're running a PC, pls get its Windows version.) The article is a step by step guide, showing you how to convert TS to Avid DNxHD MOV with excellent quality for Avid Media Composer on Mac. Official Download: http://download.pavtube.com/hd-video-converter-mac/hdvideoconvertermac_setup.dmg App Store Download: https://itunes.apple.com/de/app/pavtube-hd-video-converter/id502792488?mt=12 Amazon Store Download: http://www.amazon.com/Pavtube-Video-Converter-Mac-Download/dp/B00QI9GNZS Cnet Download: http://download.cnet.com/Pavtube-HD-Video-Converter/3000-2194_4-76177786.html Official Buy: http://www.pavtube.com/hd-video-converter-mac/purchase/ Simple steps to convert TS to Avid DNxHD .mov for editing .TS in Avid Media Composer on Mac 1. Add TS files to the program With the Mac TS converter, you can directly drag & drop the TS files to the converter, or click "Add video" or "Add from folder" icon to locate the TS files you want to load.
  2. Choose DHxHD MOV as output format Select "Avid DHxHD (*.mov)" as target format under "Avid Media Composer" option. This optimal format would guarantee a great performance when editing in Avid MC.
  3. TS to Avid Media Composer conversion on Mac OS X Hit "Convert" button and let this professional TS to Avid Converter do the rest for you! After the TS files to Avid Media Composer, you can freely use your TS files on Avid Media Composer, The converter also works on MacBook, MacBook Pro, MacBook Air, iMac. ********************************************************************* More features of TS Video Converter for Mac 1. By ticking off the checkbox before "Merge into one file" option, you can combine all the checked Panasonic MTS/M2TS clips into one file. 2. If you wanna customize the video and audio parameters, you can click "Settings" button to enter "Profile Settings" panel to modify video and audio settings like video resolution, bit rate, frame rate, sample rate, and audio channel. 3. The TS to Avid Converter provides customers with several simple editing functions, including cropping, trimming, deinterlacing, watermarking, adding special effects, and audio replacing, which help you do a fast and necessary editing on your .ts footage before importing them to Avid Media Composer. 4. Pavtube HD Video Converter for Mac Useful Guides:
********************************************************************* Good News: Never miss to get Saving up to $44.1, MXF/MTS/M2TS/MKV/FLV/MOV Converter.etc at Pavtube Bundles Deals, such as: HD Video Converter for Mac($35) + DVD Creator for Mac($35) = $39.9, Save $30.1 Source: http://1080p-video-tool.blogspot.com/2013/04/Import-.TS-Transport-Stream-files-with-Avid-MC.html
3. TS to Avid Media Composer conversion on Mac OS X Hit "Convert" button and let this professional TS to Avid Converter do the rest for you! After the TS files to Avid Media Composer, you can freely use your TS files on Avid Media Composer, The converter also works on MacBook, MacBook Pro, MacBook Air, iMac. ********************************************************************* More features of TS Video Converter for Mac 1. By ticking off the checkbox before "Merge into one file" option, you can combine all the checked Panasonic MTS/M2TS clips into one file. 2. If you wanna customize the video and audio parameters, you can click "Settings" button to enter "Profile Settings" panel to modify video and audio settings like video resolution, bit rate, frame rate, sample rate, and audio channel. 3. The TS to Avid Converter provides customers with several simple editing functions, including cropping, trimming, deinterlacing, watermarking, adding special effects, and audio replacing, which help you do a fast and necessary editing on your .ts footage before importing them to Avid Media Composer. 4. Pavtube HD Video Converter for Mac Useful Guides:
********************************************************************* Good News: Never miss to get Saving up to $44.1, MXF/MTS/M2TS/MKV/FLV/MOV Converter.etc at Pavtube Bundles Deals, such as: HD Video Converter for Mac($35) + DVD Creator for Mac($35) = $39.9, Save $30.1 Source: http://1080p-video-tool.blogspot.com/2013/04/Import-.TS-Transport-Stream-files-with-Avid-MC.html
Tips/ideas on 760D / Rebel MP4 to MOV Workflow? If you are facing the issues transcoding Canon EOS Rebel T6s/760D MP4 video to MOV for editing or playing, such as "Can anyone tell me if Canon EOS Rebel T6s/760D movies will work well with FCP X with MOV formats? Thanks in advance." Get the easy solution here. Canon EOS Rebel T6s(760D) is a new model in Canon's dSLR. Users can record Full HD MP4 files with it. But there are some problems such as not showing the video, unsupported file type when playing & editing Canon T6s(760D) MP4 videos. So in this case, someone there may wanna turn the Canon EOS 760D / Rebel T6s MP4 files into MOV, which could be the most suitable one for editing in FCP with ProRes codec or in iMovie/FCE with AIC codec.  Actually, iMovie can recognize Rebel T6s/T6i (760D/750D) as input, but the editing process maybe unstable and unreliable. That's mainly because MP4 is not an editing format best suited for working with iMovie. Here if we got the Pavtube Canon Video Converter for Mac, which works as the best Canon T6s/760D MP4 to MOV Video Converter on Mac OS X Yosemite, Mavericks, etc. What's more, it's the optimal tool for transcoding GoPro, Sony, Canon, Nikon, Panasonic, JVC, etc. camera or camcorder videos to kinds of NLE programs Avid MC, Final Cut Pro, iMovie, FCE, Premiere Pro CC/CS, After Effects CC/CS, DaVinci Resolve, Aperture 3 and more. Official Download: http://download.pavtube.com/video-converter-mac/videoconvertermac_setup.dmg Amazon Store Download: http://www.amazon.com/Pavtube-Video-Converter-Mac-Download/dp/B00QIBK0TQ Cnet Download: http://download.cnet.com/Pavtube-Video-Converter/3000-2194_4-76179460.html Official Buy: http://www.pavtube.com/video-converter-mac/purchase/ Easter Discount Buy: http://www.pavtube.com/2015-easter-special-50-offer.html How to encode Rebel T6s/T6i (760D/750D) MP4 to MOV for editing and playing? Step 1: Open up Video Converter for Mac as a Rebel T6s/T6i Converter for Mac. When its main interface comes up, click "Add File" to load your source media.
  Step 2: Select output format for your editing program To convert Rebel T6s/T6i (760D/750D) MP4 for iMovie, from "Profile" list, choose "Apple InterMediate Codec (AIC)(*.mov)" as output format under "iMovie and Final Cut Express" column.
  Step 3: Step 3: Custom video and audio settings (optional) If necessary, you can click "Settings" button and go to "Profiles Settings" panel to modify video and audio settings like video encoder, resolution, video bit rate, frame rate, aspect ratio, audio encoder, sample rate, audio bit rate, and audio channels. Do you wanna a try?
  Step 4: Begin Rebel T6s/T6i (760D/750D) MP4 to MOV Conversion on Mac When ready, click "Convert" to start format conversion. Once the conversion process is complete, you can click "Open Folder" button to get the generated AIC MOV files for editing in iMovie with optimum performance. Fuether Reading:
Good News~ Get up to 50% OFF Video Converters for Mac at Pavtube 2015 Easter Day deals is coming. Come On Baby ~
Step 4: Begin Rebel T6s/T6i (760D/750D) MP4 to MOV Conversion on Mac When ready, click "Convert" to start format conversion. Once the conversion process is complete, you can click "Open Folder" button to get the generated AIC MOV files for editing in iMovie with optimum performance. Fuether Reading:
Good News~ Get up to 50% OFF Video Converters for Mac at Pavtube 2015 Easter Day deals is coming. Come On Baby ~  Source: http://1080p-video-tool.blogspot.com/2015/03/convert-canon-eos-460d-mp4-to-mov.html