Solve MTS Files to Corel VideoStudio Pro X7 Issues
Summary: Is there any efficient tips on importing MTS files to Corel VideoStudio Pro X7? Maybe in the following article you can find some solutions.
Not know much about Corel VideoStudio Pro X7?
For Mac users, you may know clearly about some common editing apps such as FCP, iMovie, etc. While for Windows users, besides the Adobe and Movie Maker, we also have Corel Video Pro X7, which allows both storyboard and timeline-oriented editing. Using new Motion Tracking to follow moving objects on screen and attach graphics and text. However, as you know different video formats supported by source clips in Corel VideoStudio.
 Want an enjoyable playback on PC after a dispose in Corel VideoStudio?
As MTS files are usually shot by some HD cameras, no matter as Sony, Canon or Panasonic, etc. It is awesome to enjoy out recordings to know how much we learned there. Unfortunately, do you know Corel VideoStudio Pro X7 has its own personal format WMV. So how could it be possible to make our MTS files accepted by Corel VideoStudio? We need the Pavtube Video Converter ( Mac Version )to do a big favor.
How can this MTS to VideoStudio Converter do this job well?
As a professional video converter, it surely has the various import and output choices with an easy operation. Would like to listen to me about the details on how to convert MTS to the most suitable WMV for Corel VideoStudio Pro X7?
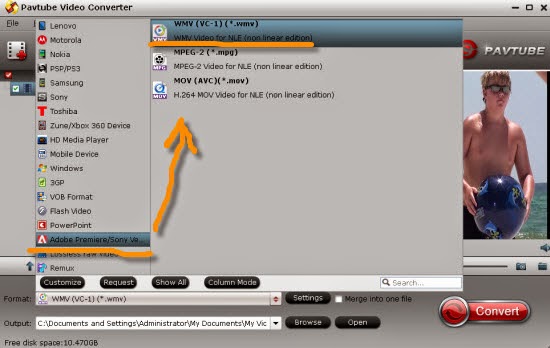
Launch and open this program, what you find there are some main items on the main interface. To load our files in? 'Add video' on the left corner may handle this job well. Or in other ways, you can directly drag your footage in if you have connected your camera or source device to your computer. Then here on the output list, we suggest you to choose the 'Adobe Premiere Pro/Sony Vegas'>>WMV(VC-1)(*.wmv)' as the best one.
Want an enjoyable playback on PC after a dispose in Corel VideoStudio?
As MTS files are usually shot by some HD cameras, no matter as Sony, Canon or Panasonic, etc. It is awesome to enjoy out recordings to know how much we learned there. Unfortunately, do you know Corel VideoStudio Pro X7 has its own personal format WMV. So how could it be possible to make our MTS files accepted by Corel VideoStudio? We need the Pavtube Video Converter ( Mac Version )to do a big favor.
How can this MTS to VideoStudio Converter do this job well?
As a professional video converter, it surely has the various import and output choices with an easy operation. Would like to listen to me about the details on how to convert MTS to the most suitable WMV for Corel VideoStudio Pro X7?
Launch and open this program, what you find there are some main items on the main interface. To load our files in? 'Add video' on the left corner may handle this job well. Or in other ways, you can directly drag your footage in if you have connected your camera or source device to your computer. Then here on the output list, we suggest you to choose the 'Adobe Premiere Pro/Sony Vegas'>>WMV(VC-1)(*.wmv)' as the best one.
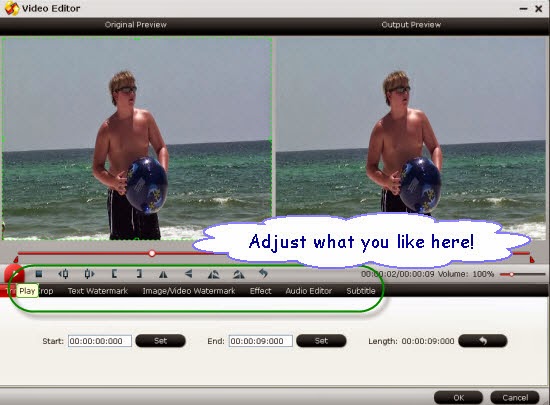
 What I have to mention here this program also has the simple 'Edit' item for our advanced users. All of us can go to the 'Edit' to adjust our videos as we like. Such as the 'Trim', 'Crop' or 'Subtitles', etc. You may enjoy the effects in the preview window below. Go to have a try! You won't be disappointed!
 Tips: If you got the MXF files instead of MTS, why not take this article of MXF to VideoStudio for a close reference?
With all your preparation work done? Back to the main interface and click the 'Convert' button to finish your work! With the 6X faster conversion speed that other similar programs, it won't take you so much time for waiting.
More:
Import MTS Clips from Canon C100 to Final Cut Pro on Mac
Panasonic Lumix DMC-LX100 AVCHD Not Suitable for FCP X?
Tips of Converting Canon VIXIA HF R400 MTS to MOV on Mac
Make Sony HXR-NX30 MTS Work in FCP X
Good News! Pavtube Bundles Dealsare coming! If you want to import/preserve/mix multi-track MXF in MKV/MP4/MOV formats, get multi-track Apple Prores MOV for further editing in Final Cut Pro (X), the following bundled software is your best choice:?
Video Converter($35) + MXF MultiMixer($45) = $54.9, Save $25.1 (buy link)
Video Converter for Mac($35) + iMixMXF($45) = $54.9, Save $25.1 (buy link)
Source from: http://camcordervideoshare.altervista.org/blog/edit-mxf-in-corel-videostudio-x7/
Tips: If you got the MXF files instead of MTS, why not take this article of MXF to VideoStudio for a close reference?
With all your preparation work done? Back to the main interface and click the 'Convert' button to finish your work! With the 6X faster conversion speed that other similar programs, it won't take you so much time for waiting.
More:
Import MTS Clips from Canon C100 to Final Cut Pro on Mac
Panasonic Lumix DMC-LX100 AVCHD Not Suitable for FCP X?
Tips of Converting Canon VIXIA HF R400 MTS to MOV on Mac
Make Sony HXR-NX30 MTS Work in FCP X
Good News! Pavtube Bundles Dealsare coming! If you want to import/preserve/mix multi-track MXF in MKV/MP4/MOV formats, get multi-track Apple Prores MOV for further editing in Final Cut Pro (X), the following bundled software is your best choice:?
Video Converter($35) + MXF MultiMixer($45) = $54.9, Save $25.1 (buy link)
Video Converter for Mac($35) + iMixMXF($45) = $54.9, Save $25.1 (buy link)
Source from: http://camcordervideoshare.altervista.org/blog/edit-mxf-in-corel-videostudio-x7/
Import Sony PXW-X180 Footage to Avid Media Composer  To get Avid Media Composer work flawlessly with Sony XDCAM camera files-MXF, a best way is to convert XDCAM files to Avid DNxHD. Below is a tutorial to convert Sony PWX-X180 MXF to Avid with 3 clicks. Any more MXF tips you wanna take a reference? Can Avid Media Composer directly import XDCAM MXF? Although Avid claims that Media Composer after 1.5 support MXF importing. However, when importing and editing MXF files from Canon/Panasonic P2/Sony XDCAM in Avid, users always encounter video and audio issues, such as audio out of sync. Besides, MXF isn’t the ideal format to maintain quality during complex post production effects processing. Uncompressed HD format delivers superior image quality, but data rates and file sizes will stop a workflow dead in its tracks. Well, Avid DNxHD delivers both efficiency and quality without compromises. So it is a good choice to convert MXF to DNxHD MOV withPavtube MXF Converter for Mac. Sony PXW-X180 Review The PXW-X180 is the first Sony professional camcorder to feature a new variable neutral density (ND) filter. This new device has been developed to electronically control density and enable continuous setting adjustment from 1/4ND to 1/128ND with simple dial operation. Using the filter in conjunction with different iris and shutter speed settings, depth of field and brightness can be adjusted. This allows the use of shooting techniques such as slow shutter shooting as desired in daylight and other bright light conditions. The PXW-X180 records in MPEG HD422 at 50 Mbps, a format widely preferred by broadcasters and production houses today. Thus, MXF recordngs is not suitable wih Avid MC, but also with some other NLEs like FCP or sharing on YouTube/Vimeo, etc. How to Convert XDCAM MXF to Avid DNxHD MOV? Pavtube Trans MXF for Mac-Fast, Clean and Stable This is an hands-down XDCAM to Avid DNxHD Converter on Mac OS X (Mac OS X 10.9 Mavericks, Leopard/Snow Leopard/Lion/Mountain Lion). With it, you can effortlessly transcode Canon/P2/Sony XDCAM MXF to edit in Avid Media Composer, Final Cut Pro, Sony Vegas, iMovie, QuickTime. If you running a PC, please turn to the alternative Windows version - Pavtube MXF Converter. Step 1: load XDCAM MXF files Once you run the Sony XDCAM MXF Converter, click "Add Video" button or "Add from folder" button to load your source MXF files. Drag & Drop is available. You can view the videos from the Preview window.
  Step 2: Choose output format Click on "Format", and select output format from the drop-down list. Follow "Avid Media Composer" > Avid DHxHD (*.mov)".
  Tips: If the default settings do not fit your needs, you can click "Settings" button to adjust audio and video parameters as you like. Step 3: Convert XDCAM to Avid DNxHD Click "Convert" button and the Canon/Panasonic P2/Sony XDCAM MXF files will be converted to Avid DNxHD MOV immediately. Conclusion: Soon after the conversion, just click "Open" button to get the generated files for editing in Avid Media Composer perfectly. If you are a good reader, you will be cleared about converting Sony PWX-X180 XDCAM MXF to Avid Media Composer DNxHD MOV. Further Reading:
Never miss to get Saving up to $44.1, MXF/MTS/M2TS/MKV/FLV/MOV Converter.etc at Pavtube Bundles Deals!  Source from: http://camcordervideoshare.altervista.org/blog/xdcam-to-avid-convert-sony-pwx-x180-xdcam-mxf-to-dnxhd-mov/
Make Sony PXW-Z100 4K XAVC Accepted by FCP 7 Summary: In order to import Sony PXW-Z100 4K XAVC files to FCP 7 for nice editing, we should convert XAVC to ProRes HQ as the best method. Though working with FCP for a long time, how to edit our Sony PXW-Z100 4K XAVC files in FCP 7 without rendering has still brought us some issues there, right? Well, if you are a regular consumer of Sony PXW-Z100, you will quite happy with it. The Sony PXW-Z100 4K Handheld XDCAM Camcorder provides professional-quality 4K recording in a familiar handheld form factor. In this way, edit XAVC footage in FCP is not so simple in our minds. Usually, we need to transcode XAVC to common ones for further playback or editing.  'I'm working on a documentary with a lot of different cameras. One of those include the Sony z100, shooting in 4k XAVC. We are editing FCP 7, 23.98 Apple ProRes HQ, looking to finish in 2K, so we would like to go back to the original 4K XAVC file for online. What is the best way to bring the footage into FCP 7?' Follow the page below, let's smoothly work XAVC files well on Windows and Mac. Since the XAVC footage is a peripheral non-standard format which is not supported by FCP 6/7/X. In order to import Sony PXW-Z100 XAVC footage into FCP for smoothly editing, we can render to the third-party software called Pavtube Video Converter for Mac to help convert XAVC to Apple ProRes 422 MOV– native format for Final Cut Pro 6/7/X. Also, you may find it can make XAVC friendly with iMovie/FCE, etc. Easiest way of converting Sony PXW-Z100 4K XAVC to ProRes HQ for editing in FCP 7: Step 1. Free Download the Mac Sony XAVC Transcoder for FCP to your Mac. Install and run it. It's excellent Sony XAVC converter which can convert Sony PXW-Z100 videos to any formats you need, such as Apple Prores 422 MOV, Apple InterMediate Codec MOV, QuickTime MOV, etc.
  Step 2. Click format bar to choose output format for use in FCP 6/7 or FCP X. Choose Final Cut Pro -> Apple ProRes 422 (HQ) (*.mov).' as we mentioned above.
  Step 3. Optional 'Edit' button can be allowed here for you if you have some interests in editing your output videos with your own style. That's why we also call this program as a 'Tiny Editor'.
  Additional tips: For Adobe Premiere Pro users, do you all have any interests in editing XAVC files in Premiere Pro? Just take following video as a good reference. https://www.youtube.com/watch?v=jVb9eA8dc6E For the final step, if you have finished your work, it's time to hit the 'Convert' icon to start your conversion of 4K XAVC to FCP 7. Enjoy your movies after transferring files to FCP 7. Any other question? Welcome to leave to us as comments below. See Also: Encode 4K XAVC S to MKV/MOV/MP4/MPEG/ FLV on PC/Mac Top 3 Best XAVC/XAVC S Video Converter for Mac Review Discussion: Final Cut Pro Supported Video Formats for Editing Good News! Pavtube Bundles Dealsare coming! If you want to import/preserve/mix multi-track MXF in MKV/MP4/MOV formats, get multi-track Apple Prores MOV for further editing in Final Cut Pro (X), the following bundled software is your best choice:? Video Converter($35) + MXF MultiMixer($45) = $54.9, Save $25.1 (buy link) Video Converter for Mac($35) + iMixMXF($45) = $54.9, Save $25.1 (buy link) Source from: http://digitalmediasolution.altervista.org/blog/convert-pmw-z100-xavc-to-prores-for-fcp-7/
Export Videos with FCP to WMV/MKV/MP4/WMV/AVI/MOV Description: If you want to convert projects from FCP to MKV, MP4, WMV, AVI, MOV, MPG, VOB, FLV, etc. for playing, burning, editing, sharing and so on, this article will give you instruction. Follow this article to find the solution. Final Cut Pro is a professional editing program developed by Macromedia Inc. and later Apple Inc. Many Mac users prefer to use FCP to create individual videos for sharing with family and friends and export videos as Apple ProRes 4444, Apple ProRes 422 (HQ), Apple ProRes 422, Apple ProRes 422 (LT), and Apple ProRes 422 (Proxy). Types of Apple ProRes Codecs  Do you want to convert FCP projects to MP4 or MKV for playing them in some mobile devices, tend to convert to WMV or AVI for sharing with your friends who use Windows Media Player on PC, ortranscode to H264 MOV for more portable devices? When you search a solution in Google, you will find much third-party software can do conversion. Free software like Handbreak may be your first choice. After trying it, you will be disappointed that the output video looks fine but the audio is out of sync. At this time, Turning to Pavtube HD Video Converter for Mac will bring you good-quality output videos without any video and audio out of sync issue. And easy-to-use workflow and fast conversion speed will provide you great customer experience. Now let me show you how to convert FCP projects. Note: Trial version before purchase can help you to test all the functions, but there will be Pavtube watermark in the middle of output videos, which is the difference form retail version. Download it according to different Mac OS. Make preparation: Export videos with Final Cut Pro When you have finished editing the video with Final Cut Pro, export it to MOV files. Hit "File" option and then go to "Export", choose QuickTime Movies. 1. Import FCP projects After you get the FCP output files successfully, launch HD Video Converter for Mac and then choose to locate the projects into the program by clicking "Add video" or "Add from folder". And there is an easier way that is to directly drag the projects into the program, which allows you to load multiple projects at one time. It loads files quickly and the dialogue box of progress will give you timely state of loading.
  Tips: If your videos are different segments and you want to joint them into one output file, at this time, you can go to select the desired segment titles and then check Merge into one file button on the interface. In this way, you will get a big combined file. 2. Choose video format for output This program offers you a variety of video formats in the "Format" dropdown list. Many common portable devices and editing software are listed. If you do not want to choose the devices, "HD Video", "Common Video" and more options can give you more choices. Just choose the one you need from the list.
  Tips: Sometimes you may think too many video formats listed is inconvenient because some options you won't use at all. Don't worry; you can remove some formats and customize the list according to your own need.
3. Adjust the output parameters (Optional) This step is optional. If you are not good at settings, keep the system built-in settings will as give you great target videos. However, if you want to change codec, bitrate, frame rate, and so on, here is right for you. Click "Settings" to set them.  4. Convert FCP projects. Before starting conversion, you may need to set the location of output videos in Browse. Now, hit the "Convert" button to get started. Then Open output folder to get the generated videos. Tips: If you need to convert so many videos with big file size, you can not bear waiting for a long time when you are in a hurry to go out or go to bed. Just one click will solve the problem for you: Go to check "Shut down the computer after conversion" and then you can go to do everything else. The computer will shut down automatically after completed conversion.
  It is an all-in-one program that many other videos besides FCP projects can be converted with this program. Read more: Transcoding Canon PowerShot SX600 HS footages for editing Importing EOS Rebel T5 MOV files to Premiere Pro Getting Canon EOS Rebel T5 mov files to work in After Effects Good News: Never miss to get Saving up to $44.1, MXF/MTS/M2TS/MKV/FLV/MOV Converter.etc at Pavtube Bundles Deals, such as: HD Video Converter for Mac($35) + DVD Creator for Mac($35) = $39.9, Save $30.1 Source: http://video-tips.jimdo.com/2013/09/16/convert-fcp-projects-to-mkv-mp4-wmv-avi-mov/
Top on Transcode/Edit AVCHD files into Final Cut Pro Today here we are going to start a topic on how to import AVCHD MTS files to FCP in effective ways. You can see *** Youtube Guide Here : https://www.youtube.com/watch?feature=player_embedded&v=psCu-IKO1n4
You'd better know more about AVCHD below: As a popular format for both consumers and professionals, AVCHD has played an important role in video format area. Since the media is compressed when it is recorded it has to be uncompressed to be used in Final Cut Pro. The method for uncompressing AVCHD in Final Cut Pro is the Log and Transfer. So now we provide you a great video tutorial to show you the way of importing AVCHD videos into Final Cut Pro. Some explanations you can take as the reference here: When a camera is connected, it appears in the Finder just like a hard drive, and it acts like one too. It is a great idea to transfer the contents of the camera to a folder on a hard drive, and then access the media from there. This has a number of benefits:  First of all, it frees up space on your camera; second of all it creates a compressed archive of your media; this is nice because after you complete your project you can delete the uncompressed files and save considerable space on your hard drive. Log & Transfer acts like Log & Capture in that it imports the clips into the file browser and stores the actual files in the Capture Scratch. I hope this has helped you understand using AVCHD media in Final Cut Pro with Log & Transfer. For more efficient methods of importing AVCHD media into FCP? Why not have a try with some professional AVCHD MTS converters like Pavtube MTS/M2TS to FCP Converter for Mac, which has a good reputation on the Internet. You can search to check it out. With the fast conversion speed, various output choices, stable conversion capacity, etc. What you need you can all find in related articles.
 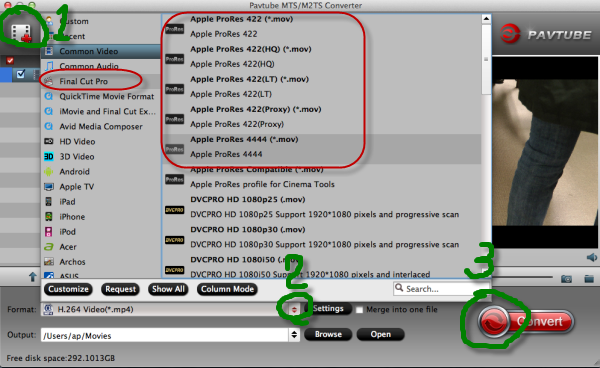 Finally, go back to the main interface to tap the 'Convert' button, you can easily get your work started. If you are the first time to work with FCP, we here offer a transfer guide for FCP you can take a reference. Good luck! Related:
Good news! Pavtube Bundles Deals are coming! It's a time for taking a break from work and relaxing. And now you can enjoy your colorful time with good featured products at"Pavtube Bundles Deals". Go ahead and click the link to get your coupon. Save up to $44.1!Never miss!!!
Finally, go back to the main interface to tap the 'Convert' button, you can easily get your work started. If you are the first time to work with FCP, we here offer a transfer guide for FCP you can take a reference. Good luck! Related:
Good news! Pavtube Bundles Deals are coming! It's a time for taking a break from work and relaxing. And now you can enjoy your colorful time with good featured products at"Pavtube Bundles Deals". Go ahead and click the link to get your coupon. Save up to $44.1!Never miss!!!
- MTS/M2TS Converter for Mac($29) + MXF Converter for Mac($29) = Only $29.9
- MTS/M2TS Converter for Mac($29) + MKV Converter for Mac($29) = Only $29.9
- MTS/M2TS Converter for Mac($29) + FLV/F4V Converter for Mac($29) = Only $29.9
Source: http://mediaconverting.blogspot.com/2014/11/import-avchd-mts-to-fcp.html