Make Sony PXW-Z100 4K XAVC Accepted by FCP 7 Summary: In order to import Sony PXW-Z100 4K XAVC files to FCP 7 for nice editing, we should convert XAVC to ProRes HQ as the best method. Though working with FCP for a long time, how to edit our Sony PXW-Z100 4K XAVC files in FCP 7 without rendering has still brought us some issues there, right? Well, if you are a regular consumer of Sony PXW-Z100, you will quite happy with it. The Sony PXW-Z100 4K Handheld XDCAM Camcorder provides professional-quality 4K recording in a familiar handheld form factor. In this way, edit XAVC footage in FCP is not so simple in our minds. Usually, we need to transcode XAVC to common ones for further playback or editing.  'I'm working on a documentary with a lot of different cameras. One of those include the Sony z100, shooting in 4k XAVC. We are editing FCP 7, 23.98 Apple ProRes HQ, looking to finish in 2K, so we would like to go back to the original 4K XAVC file for online. What is the best way to bring the footage into FCP 7?' Follow the page below, let's smoothly work XAVC files well on Windows and Mac. Since the XAVC footage is a peripheral non-standard format which is not supported by FCP 6/7/X. In order to import Sony PXW-Z100 XAVC footage into FCP for smoothly editing, we can render to the third-party software called Pavtube Video Converter for Mac to help convert XAVC to Apple ProRes 422 MOV– native format for Final Cut Pro 6/7/X. Also, you may find it can make XAVC friendly with iMovie/FCE, etc. Easiest way of converting Sony PXW-Z100 4K XAVC to ProRes HQ for editing in FCP 7: Step 1. Free Download the Mac Sony XAVC Transcoder for FCP to your Mac. Install and run it. It's excellent Sony XAVC converter which can convert Sony PXW-Z100 videos to any formats you need, such as Apple Prores 422 MOV, Apple InterMediate Codec MOV, QuickTime MOV, etc.
  Step 2. Click format bar to choose output format for use in FCP 6/7 or FCP X. Choose Final Cut Pro -> Apple ProRes 422 (HQ) (*.mov).' as we mentioned above.
  Step 3. Optional 'Edit' button can be allowed here for you if you have some interests in editing your output videos with your own style. That's why we also call this program as a 'Tiny Editor'.
  Additional tips: For Adobe Premiere Pro users, do you all have any interests in editing XAVC files in Premiere Pro? Just take following video as a good reference. https://www.youtube.com/watch?v=jVb9eA8dc6E For the final step, if you have finished your work, it's time to hit the 'Convert' icon to start your conversion of 4K XAVC to FCP 7. Enjoy your movies after transferring files to FCP 7. Any other question? Welcome to leave to us as comments below. See Also: Encode 4K XAVC S to MKV/MOV/MP4/MPEG/ FLV on PC/Mac Top 3 Best XAVC/XAVC S Video Converter for Mac Review Discussion: Final Cut Pro Supported Video Formats for Editing Good News! Pavtube Bundles Dealsare coming! If you want to import/preserve/mix multi-track MXF in MKV/MP4/MOV formats, get multi-track Apple Prores MOV for further editing in Final Cut Pro (X), the following bundled software is your best choice:? Video Converter($35) + MXF MultiMixer($45) = $54.9, Save $25.1 (buy link) Video Converter for Mac($35) + iMixMXF($45) = $54.9, Save $25.1 (buy link) Source from: http://digitalmediasolution.altervista.org/blog/convert-pmw-z100-xavc-to-prores-for-fcp-7/
Export Videos with FCP to WMV/MKV/MP4/WMV/AVI/MOV Description: If you want to convert projects from FCP to MKV, MP4, WMV, AVI, MOV, MPG, VOB, FLV, etc. for playing, burning, editing, sharing and so on, this article will give you instruction. Follow this article to find the solution. Final Cut Pro is a professional editing program developed by Macromedia Inc. and later Apple Inc. Many Mac users prefer to use FCP to create individual videos for sharing with family and friends and export videos as Apple ProRes 4444, Apple ProRes 422 (HQ), Apple ProRes 422, Apple ProRes 422 (LT), and Apple ProRes 422 (Proxy). Types of Apple ProRes Codecs  Do you want to convert FCP projects to MP4 or MKV for playing them in some mobile devices, tend to convert to WMV or AVI for sharing with your friends who use Windows Media Player on PC, ortranscode to H264 MOV for more portable devices? When you search a solution in Google, you will find much third-party software can do conversion. Free software like Handbreak may be your first choice. After trying it, you will be disappointed that the output video looks fine but the audio is out of sync. At this time, Turning to Pavtube HD Video Converter for Mac will bring you good-quality output videos without any video and audio out of sync issue. And easy-to-use workflow and fast conversion speed will provide you great customer experience. Now let me show you how to convert FCP projects. Note: Trial version before purchase can help you to test all the functions, but there will be Pavtube watermark in the middle of output videos, which is the difference form retail version. Download it according to different Mac OS. Make preparation: Export videos with Final Cut Pro When you have finished editing the video with Final Cut Pro, export it to MOV files. Hit "File" option and then go to "Export", choose QuickTime Movies. 1. Import FCP projects After you get the FCP output files successfully, launch HD Video Converter for Mac and then choose to locate the projects into the program by clicking "Add video" or "Add from folder". And there is an easier way that is to directly drag the projects into the program, which allows you to load multiple projects at one time. It loads files quickly and the dialogue box of progress will give you timely state of loading.
  Tips: If your videos are different segments and you want to joint them into one output file, at this time, you can go to select the desired segment titles and then check Merge into one file button on the interface. In this way, you will get a big combined file. 2. Choose video format for output This program offers you a variety of video formats in the "Format" dropdown list. Many common portable devices and editing software are listed. If you do not want to choose the devices, "HD Video", "Common Video" and more options can give you more choices. Just choose the one you need from the list.
  Tips: Sometimes you may think too many video formats listed is inconvenient because some options you won't use at all. Don't worry; you can remove some formats and customize the list according to your own need.
3. Adjust the output parameters (Optional) This step is optional. If you are not good at settings, keep the system built-in settings will as give you great target videos. However, if you want to change codec, bitrate, frame rate, and so on, here is right for you. Click "Settings" to set them.  4. Convert FCP projects. Before starting conversion, you may need to set the location of output videos in Browse. Now, hit the "Convert" button to get started. Then Open output folder to get the generated videos. Tips: If you need to convert so many videos with big file size, you can not bear waiting for a long time when you are in a hurry to go out or go to bed. Just one click will solve the problem for you: Go to check "Shut down the computer after conversion" and then you can go to do everything else. The computer will shut down automatically after completed conversion.
  It is an all-in-one program that many other videos besides FCP projects can be converted with this program. Read more: Transcoding Canon PowerShot SX600 HS footages for editing Importing EOS Rebel T5 MOV files to Premiere Pro Getting Canon EOS Rebel T5 mov files to work in After Effects Good News: Never miss to get Saving up to $44.1, MXF/MTS/M2TS/MKV/FLV/MOV Converter.etc at Pavtube Bundles Deals, such as: HD Video Converter for Mac($35) + DVD Creator for Mac($35) = $39.9, Save $30.1 Source: http://video-tips.jimdo.com/2013/09/16/convert-fcp-projects-to-mkv-mp4-wmv-avi-mov/
Top on Transcode/Edit AVCHD files into Final Cut Pro Today here we are going to start a topic on how to import AVCHD MTS files to FCP in effective ways. You can see *** Youtube Guide Here : https://www.youtube.com/watch?feature=player_embedded&v=psCu-IKO1n4
You'd better know more about AVCHD below: As a popular format for both consumers and professionals, AVCHD has played an important role in video format area. Since the media is compressed when it is recorded it has to be uncompressed to be used in Final Cut Pro. The method for uncompressing AVCHD in Final Cut Pro is the Log and Transfer. So now we provide you a great video tutorial to show you the way of importing AVCHD videos into Final Cut Pro. Some explanations you can take as the reference here: When a camera is connected, it appears in the Finder just like a hard drive, and it acts like one too. It is a great idea to transfer the contents of the camera to a folder on a hard drive, and then access the media from there. This has a number of benefits:  First of all, it frees up space on your camera; second of all it creates a compressed archive of your media; this is nice because after you complete your project you can delete the uncompressed files and save considerable space on your hard drive. Log & Transfer acts like Log & Capture in that it imports the clips into the file browser and stores the actual files in the Capture Scratch. I hope this has helped you understand using AVCHD media in Final Cut Pro with Log & Transfer. For more efficient methods of importing AVCHD media into FCP? Why not have a try with some professional AVCHD MTS converters like Pavtube MTS/M2TS to FCP Converter for Mac, which has a good reputation on the Internet. You can search to check it out. With the fast conversion speed, various output choices, stable conversion capacity, etc. What you need you can all find in related articles.
 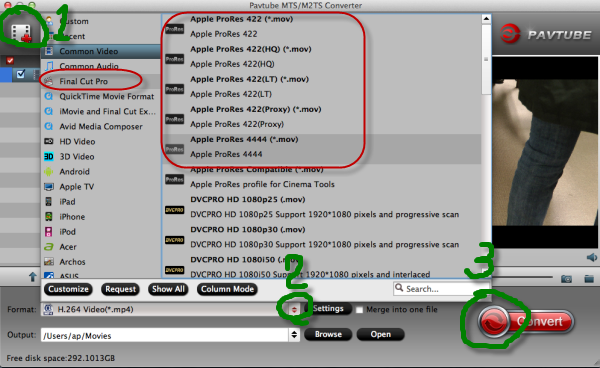 Finally, go back to the main interface to tap the 'Convert' button, you can easily get your work started. If you are the first time to work with FCP, we here offer a transfer guide for FCP you can take a reference. Good luck! Related:
Good news! Pavtube Bundles Deals are coming! It's a time for taking a break from work and relaxing. And now you can enjoy your colorful time with good featured products at"Pavtube Bundles Deals". Go ahead and click the link to get your coupon. Save up to $44.1!Never miss!!!
Finally, go back to the main interface to tap the 'Convert' button, you can easily get your work started. If you are the first time to work with FCP, we here offer a transfer guide for FCP you can take a reference. Good luck! Related:
Good news! Pavtube Bundles Deals are coming! It's a time for taking a break from work and relaxing. And now you can enjoy your colorful time with good featured products at"Pavtube Bundles Deals". Go ahead and click the link to get your coupon. Save up to $44.1!Never miss!!!
- MTS/M2TS Converter for Mac($29) + MXF Converter for Mac($29) = Only $29.9
- MTS/M2TS Converter for Mac($29) + MKV Converter for Mac($29) = Only $29.9
- MTS/M2TS Converter for Mac($29) + FLV/F4V Converter for Mac($29) = Only $29.9
 Source: http://mediaconverting.blogspot.com/2014/11/import-avchd-mts-to-fcp.html
Convert H.265 Movie from Samsung NX1 to H.265/HEVC Higher quality smaller size---that's the biggest highlight that brought by the new video codec H.265/HEVC. On the other hand, someone now are confused with the issues of playing H.265/HEVC movies on VLC player. It seems that we should have an intensive talking on H.265/HEVC to know how to make H.265 movies smoothly played on VLC player.  MediaCoder H.265 encoding is open for beta testing, this is also one of the best codec features that loved by almost all users. While as someone there said' I shot some H.265 gathering videos by Samsung NX1 4K camcorder and now I want to further editing them in Sony Vegas and then for a better enjoyment on VLC player on Windows with my family members. 'Unsupported Error' happened there. I think I have to ask for some help.' Though H.265/HEVC can support 8K UHD with a resolution of 7680×4320 and it would become the best codec in the future. So how could we edit and play our videos with no difficulties? Again the Pavtube studio has brought us the good news! With the latest upgraded version, all windows programs can support the H.265/HEVC movies encode and decode. Thus in this page, efficient solutions are offered here to play your H.265 recordings on VLC player with Pavtube Video Converter for Windows.
Tips on converting Samsung NX1 H.265/HEVC videos to MP4 for playback on VLC: Step 1. Download and install the program from the website, load your original 4K source in with 'Add video' directly drag files in is available.  Step 2.Choose the right output for VLC. As we mentioned above, we would like to introduce you to select the 'HD Video'>>'H.264 HD Video(*.mp4)' as your best choice. Surely you can choose other suitable ones as you like.
  Step 3. Any interests in adjusting your output videos? Additionally in the 'Edit' button on the main interface, we can 'Trim', 'Crop' to decide the video length or something else there. Do you have any interests there to have a try?
  Conclusion: Tap the 'Convert' on the main interface if you have done all the preparation work. This is the workflow that we need to transcode H.265 to H.264, which could make the original Samsung NX1 files accepted by popular media or editing devices. What's more, let's looking forward that the news of Mac products' upgraded version coming soon! More:
Good News! Pavtube Bundles Dealsare coming! If you want to import/preserve/mix multi-track MXF in MKV/MP4/MOV formats, get multi-track Apple Prores MOV for further editing in Final Cut Pro (X), the following bundled software is your best choice:? Video Converter($35) + MXF MultiMixer($45) = $54.9, Save $25.1 (buy link) Video Converter for Mac($35) + iMixMXF($45) = $54.9, Save $25.1 (buy link) Source: http://mediaconverting.blogspot.de/2015/02/watch-nx1-h.265-on-vlc-player.html
Conclusion: Tap the 'Convert' on the main interface if you have done all the preparation work. This is the workflow that we need to transcode H.265 to H.264, which could make the original Samsung NX1 files accepted by popular media or editing devices. What's more, let's looking forward that the news of Mac products' upgraded version coming soon! More:
Good News! Pavtube Bundles Dealsare coming! If you want to import/preserve/mix multi-track MXF in MKV/MP4/MOV formats, get multi-track Apple Prores MOV for further editing in Final Cut Pro (X), the following bundled software is your best choice:? Video Converter($35) + MXF MultiMixer($45) = $54.9, Save $25.1 (buy link) Video Converter for Mac($35) + iMixMXF($45) = $54.9, Save $25.1 (buy link) Source: http://mediaconverting.blogspot.de/2015/02/watch-nx1-h.265-on-vlc-player.html
How to Convert Sony PMW-500 MXF to FCP Converter 'What plug-in do I need to install so I can import and edit .MXF video files in Final Cut. The suggestion of doing Log and Transfer doesn't work (the .MXF files are gray out not allowing me to select it.). So what does this situation exactly mean?' In the following article, we are glad to introduce you some efficient ways to solve the problems when editing Sony PMW-500 MXF recordings in FCP 6/7 with ProRes 422/4444/LT Notes: Final Cut Pro supported video formats we should know for a first step.  The PMW-500 is Sony Professional's first XDCAM HD422 Camcorder with solid state recording. It supports full-HD 422 50-Mbps MXF record and playback based on highly developed MPEG-2 Long GOP compression technology. So it would be not strange that it will be hard to directly to import Sony PMW-500 MXF to FCP 6/7. What's more, they are also not available for Premiere Pro, Sony Vegas or Avid, etc. To smoothly import Sony PMW-500 XDCAM MXF in Final Cut Pro 6/7 for editing, the easy workaround is to transcode MXF to Apple ProRes encoded MOV format, which is natively supported by Final Cut. Along with some help from a professional Mac MXF to MOV Converter. it can be done. Via Google and compared with others, we found the Pavtube Video Converter for Mac c ( Win )an be the best choice! More details you can read the related review. Here is the step-by-step we need to learn to convert Sony PMW-500 MXF to ProRes 422/4444/LT for editing in FCP 6/7.
Step 1. Run the MXF to FCP converter and open the main interface o your computer, we can directly drop the files in or with another way, 'Add video' or Add from folder' can both be the available importing ones.  Step 2. Select the suitable ones as your favorite. click the "Format" option, choose the Final Cut Pro > Apple ProRes 422 video (*.mov). And navigate to the Final Cut Pro group, you will notice that there are profiles with Apple ProRes 422, Apple ProRes 422(HQ), Apple ProRes 422(LT), Apple ProRes 422(Proxy), etc.
  Step 3. (Optional) Merge Sony PMW-500 MXF files and Choose video size as original. Select all the files in the filelist, then click the Merge the Files, and the Mac Sony PMW 500 1920×1080 MXF converter will join and combine the video clips into a single file as output.
  As soon as you have finished the preparation job, it's time to go back to the main interface to hit the 'Convert' to start you version work. From Sony PMW-500 MXF to FCP supported ProRes codec, you won't wait for a long time. After transferring files to FCP, we are glad to enjoy ourselves! ******************************************************** More guides: Let's Ingest Panasonic AJ-PX800 H.264/AVC MXF to iMovie/FCE Discussion—iPad Air 2 Supported Audio and Video Formats Tips on Streaming Any Video Formats to Google Chromecast Good News: Never miss to get Saving up to $44.1, MXF/MTS/M2TS/MKV/FLV/MOV Converter.etc at Pavtube Bundles Deals, such as: HD Video Converter for Mac($35) + DVD Creator for Mac($35) = $39.9, Save $30.1 HD Video Converter for Mac Key Features: -Convert 1080p/720p MKV, MOV, MXF, MTS, M2TS, M2T, TS, M4V, MP4, AVI, MPG, VOB, WMV, 3GP, FLV videos for playing, editing, uploading or burning. -Support ProRes/DNxHD/DVCPRO/AIC and other codecs for NLEs on Mac. -Convert HD footages from Sony, Canon, Nikon, Panasonic, JVC, etc. -Convert any video and audio for multiple playback devices. DVD Creator for Mac: -Create playable DVD disc, DVD folder and DVD ISO from different file types. -Make DVDs from TiVo, MTS, MOV, WMV, AVI, MPEG, MP4, MKV and more. -Burn ISO image file and DVD folder/VIDEO_TS to a DVD disc directly. -Create DVD movies with NTSC or PAL video standard. Source: http://handycameratips.jimdo.com/2015/02/06/convert-pmw-500-mxf-to-prores-422/