2015年3月2日星期一

Import Sony CX220 1080/60p MTS to FCP Natively Editing

Import Sony CX220 1080/60p MTS to FCP Natively Editing 

Hey, how is your summer going, buddy? Did you enjoy lots wonderful moments and have you taken a camcorder to capture them? Did you encounter any program when try to edit these videos on Mac? 
It seems that Sony Handycam CX200 has become a popular choice for entry-level users for its good video quality and capacity of shooting 1920×1080 Full HD 60p footages in MTS. 


To edit MTS/M2TS footage from Sony Handycam HDR-CX220 camcorder, You might have thought of Final Cut Pro. Yes, it is an ideal app to edit videos. So, you can import MTS files from Sony CX220 to Final Cut Pro firstly. This is a tutorial which tells you how to import HD camcorder videos to FCP for editing on Mac OS X like Mavericks, Mountain Lion, Lion and Snow Leopard. 

When your camcorder video is compatible with Final Cut Pro 

1. Connect HD camcorder to your Mac, and it shows up as a drive on the desktop 
2. Hit Cmd-Shift-8 to open the Log and Transfer window (FCP 6 or above) 
3. The clips in HD camcorder will be ready for being imported to FCP for editing 


When your camcorder videos are not recognizable by Final Cut Pro 

If the MTS/M2TS files grey out when you try to import them to FCP, you need to convert MTS format to FCP friendly formats. Of course, to do the MTS video conversion, you need a professional app. Here the professional MTS to FCP Video Converter for Mac ( Win ) is strongly recommended. With it, just in a few clicks you could successfully edit Sony CX220 MTS videos in FCP.

Note: Pavtube MTS/M2TS Converter for Mac Supports MTS/M2TS files from a variety of HD camcorders like:
  • Sony: HDR-AX2000, HDR-PJ260V, HDR-PJ380, HDR-CX230, HDR-CX230, HDR-CX430V, HDR-XR520V, HDR-CX730, HDR-PJ780/790V, HDR-PJ650V, DSC-WX80, HDR-PJ580V, SLT-A99, FS700U, NEX-VG30, HDR-CX700V, SLT-A65, NEX-5N, etc.
  • Panasonic: Lumix DMC-LX7, DMC-G5, DMC-FZ200, DMC-FX700, DMC-GF6, DMC-G6, DMC-GF3/GF2, DMC-GH1, HC-V720K, HC-X900M, HC-X800, HC-V707, HC-X920M, HDC-HS900, HDC-TM900, HDC-SDT750, HDC-TM90, HDC-HS80, HDC-TM700, DMC-GH2, etc.
  • Canon: VIXIA XA20, XA25, HF G30, HF G20, HF S100, HF R40/R42/R400, HF R306, HF R21, HF M300, HF M500, Vixia HF200, HF S200, HF S21, EOS C100 etc.
  • JVC: GZ-HD10, GZ-HD30/GZ-HD40, GZ-HD320, GZ-HD300, GZ-HM200, GZ-X900, GZ-HM300, GZ-HM400, GZ-HD620, GZ-HM1, GZ-HM30, etc.

The best way we tested to import MTS to FCP natively without log and transfer is to convert MTS to Apple ProRes codec, which is native codec for FCP, once you converted MTS to Apple ProRes, you can import MTS to FCP X without any problems, and you don't need to render, you can edit the video natively in FCP on Mac. 

Follow this guide, you will be able to accomplish this easily and efficiently. 

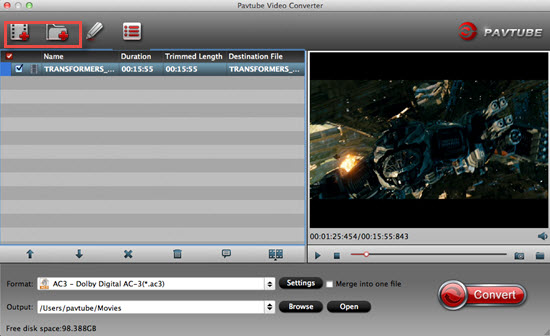
First, let's get this Pavtube MTS/M2TS Converter for Mac installed; and connect your camera to Mac. Click the top left two icons to import the M2TS/MTS files you want to add: 


(If you want to merge several mts video clips into one video, just check "Merge into one file".) 

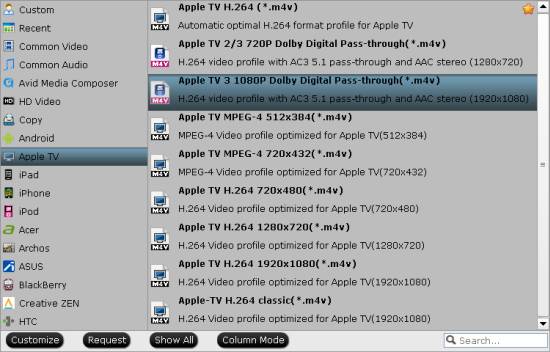
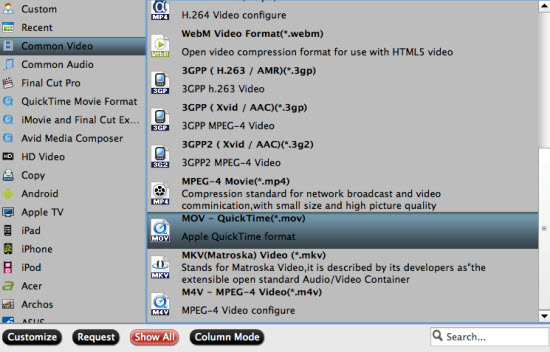
Secondly, Click "Format" and choose "Final Cut Pro > Apple ProRes 422 MOV" as the preferred video codec for Final Cut Pro 6/7 on Mac. 


Here you can click the pencil-like icon on the top to trim, crop, add 3D effect, add subtitles or edit audio before conversion. 

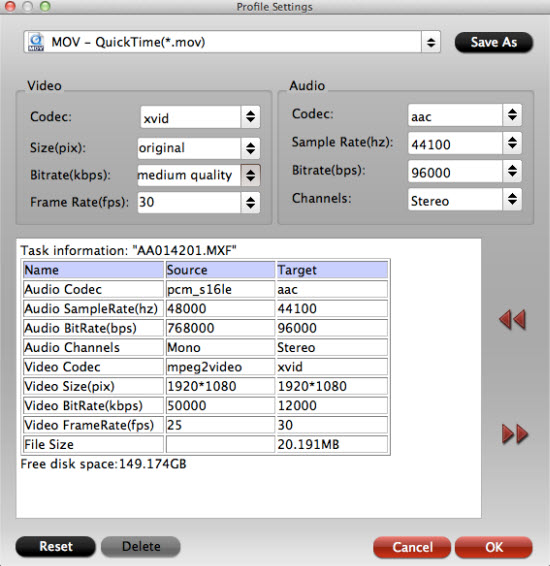
Or click "Settings" on the bottom to customize output video sample rate, size, bitrate, frame rate and so on. 


Now just click the big red "Convert" to start converting Sony CX220 1080/60p MTS to ProRes 422 for FCP. This program supports batch conversion and will let you choose to "shut down computer after conversion" automatically. 

Good news! Pavtube Bundles Deals are coming! It's a time for taking a break from work and relaxing. And now you can enjoy your colorful time with good featured products at"Pavtube Bundles Deals". Go ahead and click the link to get your coupon. Save up to $44.1!Never miss!!! 
  • MTS/M2TS Converter for Mac($29) + MXF Converter for Mac($29) = Only $29.9 
  • MTS/M2TS Converter for Mac($29) + MKV Converter for Mac($29) = Only $29.9 
  • MTS/M2TS Converter for Mac($29) + FLV/F4V Converter for Mac($29) = Only $29.9 
  • iMixMXF($45) + HD Video Converter for Mac($35) = Only $54.9 .....
 

source: http://camcordervideoshare.altervista.org/blog/import-sony-cx220-mts-to-fcp-natively/

2015年2月27日星期五

Importing Sony A7s 50p/100p XAVC S Footage into FCP 7

XAVC S FCP 7 Workflow Guide: Encode A7s XAVC S to ProRes for FCP 7 

Do you have any good solutions to the problems of importing Sony A7s 50p/100p XAVC S files to Final Cut Pro 7 for nice editing? If not, why not be a good reader to follow the article below to know more details? This guide can teach you how to convert your Sony XAVC S to ProRes for smoothly editing in FCP 7. 


'Hi, anyone worked with media from the Sony A7S camera. especially convert files XAVS 100p/50p to Apple ProRes because the few times I tried the resulting file does not match the original file, that the file should slow motion (100p/50p) but became normal 25fps not slow-motion (I use HD video converter Acrok) Is there a workflow solution for me to do the settings file XAVCS especially for 100p / 50p to Apple ProRes.' 

The sensor of Sony A7S is big, the 35mm sensor with large pixels is good for high ISO and dynamic range, 12.2MP sensor optimized for 4K and low light video recording, with this excellent device you can get uncompressed 4:2:2 full HD in XAVC S format. While for some popular editing tools, you will find the XAVC S is not supported for popular editing apps, Final Cut Pro is such a typical one. So what's the available workflow for Sony A7S and FCP? 

XAVC S, which as the newest one, if you are a professional video editor or photographer, it is not so widely supported for editing tools. Except for FCP 7, such as iMovie/FCEPremiere ProPremiere Elements,Avid/Sony Vegas, etc. Today here, in order to match the XAVC S recordings to FCP 7 well, we highly recommend you a XAVC S to FCP 7 Converter called Pavtube XAVC S Video Converter for Mac orWindows, which has the ability of handling HD videos with all popular editors or media players nicely. 


Detailed steps we should know well how to convert XAVC S to ProRes for nice editing in FCP 7: 

Step 1. Load our XAVC S source files. 

Install and open the program correctly, the main interface will pop up there in front of you. With two buttons we can import our source recordings right well. 'Add video' can help you load your videos individually with clips or with 'Add from folder', we can easily import files in a complete folder. This program can support the batch conversion well 


Step 2. Choose right one for FCP 7 

Just come to the output list, drop down the list, what we can see here are so many various output formats for editing tools, like FCP, iMovie, Premiere, or some media players, etc. Here for FCP 7, let's select the original "Final Cut Pro -> Apple ProRes Codec 422(*.mov)" as the best. Additionally, several other types of codec you can also have a try if you like 


Step 3. Adjust your Video Audio settings 

Click the "Settings" button and customize proper video/audio parameters including Video size, bitrate and fame rate and mroe. Usually 1920*1080 video size and 30fps video frame rate are recommended for FCP editing. Well, if you prefer to work with 4K video, you can adjust video size to get 4K ProRes for FCP. 


Finally, I almost forget to remind you that this program can work well with the latest Mac OS X operation Yosemite after tested so you will get no worries. What's more if you are the first time to work with FCP 7, you must be confused with the transferring files to FCP, right, Here is the related reference article you can read more. At the end of this page, click the 'Convert' button , you can get your conversion job started. 

Read more: 

Good News: Never miss to get Saving up to $44.1, MXF/MTS/M2TS/MKV/FLV/MOV Converter.etc at Pavtube Bundles Deals
such as: HD Video Converter for Mac($35) + DVD Creator for Mac($35) = $39.9, Save $30.1 

Source: http://handycameratips.jimdo.com/2014/12/23/workflow-from-a7s-xavc-s-to-fcp-7/

XAVC S and iMovie: iMovie won't recognize Sony AX1 XAVC S files

Sony AX1 Workflow for Getting 4K XAVC S Into iMovie 8,9,11 
 
Summary: The latest high definition Sony XAVC S video format is still not supported well by iMovie so far. If you want to edit Sony AX1 4K XAVC S files in iMovie, a wise solution is to convert AX1 XAVC S to AIC .mov for using in iMovie program flawlessly.

Aiming to make public access to the 4K video resolution a bit more affordable (though not for lack of quality in hardware), Sony has this week announced the Sony FDR-AX1 4K Handycam.


With FDR-AX1, you'll be working with XLR terminals for professional audio, XAVC S formatting for long 4K recording without trouble, and support of 4K/60p recordings right out of the box. XAVC S is adopted in the Sony 4K Handycam with full 3840 x 2160p resolution and an MP4 wrapper.

However, a video without post production is like a diamond in the rough. It may be a happy story for most Windows users who can run Vegas Pro 12 smoothly, but it is not the case for the users running Mac. The latest high definition XAVC S video format introduced by Sony—is not supported by iMovie 8,9,11 so far. To edit Sony AX1 4K XAVC S footage in iMovie smoothly, the easy workaround is to change the file extention from "XAVC" to "AIC", which is a friendly format supported by iMovie. Here is an easy and efficient solution for you.

First of all, free download Pavtube Video Converter for Mac here (Note: Click here for OS X 10.5).

Pavtube XAVC S Video Converter for Mac (Review) makes it feasible to edit FDR AX1 footage in iMovie (iMovie 8, iMovie 9, iMovie 11) easily. It works by converting the XAVC S footage to iMovie acceptable format AIC MOV without quality loss, so that the format restriction is eliminated. hit Add files button to import videos to the app.


Sony AX1 Workflow for Getting 4K XAVC S Into iMovie 8,9,11. 

Step 1: Load Sony XAVC S files to the program 

Run the program you just set up. Drag and drop the XAVC S footage from Sony AX1 to the Converter. 

Step 2: Select output format 

You just need to go to iMovie and Final Cut Express column by choosing "Apple InterMediate Codec(AIC) (*.mov)" as best video format for editing Sony AX1 XAVC S in iMovie 8, 9, 11 as well as good video quality.


Tips:

You can also click "Settings" which is marked as step 3 to fix the frame rate, bitrate and video quality to your needs.

1. For FCP and Aperture 3: Click and choose "Final Cut Pro -> Apple ProRes 422(*.mov)" as the output format. FCP 6 only can support ProRes 422 and ProRes 422(HQ) codec.

Explore Sony AX-1 4K XAVC S in FCP X or Other NLEs

2. For Avid Media Composer and Xpress Pro: Click and choose "Avid Media Composer ->Avid DNxHD(*.mov)" as the best output codec.

Workflow: XAVC S to Avid Media Composer for Further Dispose?

3. For Adobe Premiere Pro and After Effects: Click "Adobe Premiere/Sony Vegas", choose "MPEG-2 (*.mov)" or "MOV(AVC)(*mov)" or "WMV (VC-1)(*.wmv)" as the best video format.

How to Import and Edit Sony DSC-RX100 III XAVC S raw video into Premiere Pro?

4. For playing XAVC video on QuickTime: Choose "Common Video -> MOV-QuickTime(*.mov)" as the best video format.

Play Sony XAVC video with QuickTime on Mac


Step 3: Start Converting XAVC S to AIC MOV 

Now click "Convert" and let it go. The XAVC S to iMovie Converter for Mac supports batch conversion, so if you have lots of xavc videos to convert, check ‘Shut down computer after conversion', and you can go away without keeping an eye on it.

When the conversion is done, you can find the output files by clicking "Open" button on the main interface, then you can transfer the files to your iMovie 8,9,11 to edit with ease.

PS: You can also learn about burning XAVC to DVD on Mac.


Good News: Never miss to get Saving up to $44.1, MXF/MTS/M2TS/MKV/FLV/MOV Converter.etc at Pavtube Bundles Deals, such as: HD Video Converter for Mac($35) + DVD Creator for Mac($35) = $39.9, Save $30.1

Source: http://lovecamcorder.tumblr.com/post/65422564346/sony-ax1-workflow-for-getting-4k-xavc-s-into 

How to Add MKV to Apple TV with Dolby Digital 5.1

Easiest way to playback 1080p MKV on Apple TV with 5.1 

When try to play 1080p or 720p MKV movies on Apple TV, iTunes will not even import MKV? Just find a step by step guide on how to convert MKV to Apple TV M4V format with Dolby Digital 5.1 for streaming and playing on Apple TV. 

"Hi guys! Ineed some help! I got some 1080p MKV recordings and now I wanna play them on my Apple TV and then edit for sharing them with my working partners, but it seems Apple TV cannot work it well. For more, I also wanna preserve the Dolby Digital 5.1. Any good suggestions there?" 


MKV is similar in conception to other multimedia containers like AVI, MP4 or MOV. It's more flexible in compression and usually renders in a smaller size with same quality video/audio output, especially for HD videos. Nicely enjoy MKV 5.1 files on VLCHDTV, etc has become the hottest avtivity for us to take part in, right? Great-quality movies are increasingly seen being delivered over the internet via MKV format. However, it's a pity that many popular devices have no sight for providing support for this format, including Apple TV

See Also: Differences among Pavtube Various Video Converters 

How to Stream 1080p/720p MKV files to Apple TV? 

In order to watch the MKV movies on Apple TV and also with the Dolby Digital 5.1 channels preserved, we here highly recommend the Pavtube Video Converter for Mac to you guys! Strongly supports the various output video and audio formats, it has a good reputation among our users' hearts. 


Guide on converting MKV to M4V for playback on Apple TV with 5.1 channels: 

Step 1. As soon as we have installed the program, we need to open it and tap the "Add video" and "Add from folder" to load our original MKV files in. 


Step 2. Click on Format > Apple TV. From the drop down menu, select the "Apple TV 3 1080P Dolby Digital Pass-through(*.m4v)" which will be better to keep the videos in HD. 


Step 3. Preserve the 5.1 channels? Go to the "Settings" button on the main interface and then , we can set the "Audio channel" as "5.1", that's what we want there. 

Finally, after you have done all the preparation work, we need to hit the "Convert" icon to start our job! Then, do you still have issues of converting MKV files for playing on Apple TV with 5.1 channels? (Learn How to set up Apple TV for streaming HD videos with Dolby Digital 5.1 sounds?

PS: Here we offer two easy ways to stream videos from Mac to Apple TV for displaying your media files on big screen TV directly. 

Future Reading: 

Good News! Pavtube Bundles Dealsare coming! If you want to import multi-track MXF in MKV/MP4/MOV formats, get multi-track Apple Prores MOV for further editing in Final Cut Pro (X), the following bundled software is your best choice:? 
Video Converter($35) + MXF MultiMixer($45) = $54.9, Save $25.1 (buy link

Source: http://1080p-video-tool.blogspot.com/2015/02/stream-mkv-to-apple-tv-with-5.1-channels.html

How to play Sony XDCAM EX MP4 files on QuickTime Player?

Convert Sony XDCAM EX MP4 to QuickTime mov on Mac Yosemite 

Description: QuickTime player wont play Sony XDCAM EX MP4 files? OK, you can try Pavtube XDCAM EX MP4 Video Converter to convert Sony XDCAM EX HD MP4 files to QuickTime MOV files, so that you can playback it on Mac with no jerky. 

Sony XDCAM EX is one of the high-end professional camcorders series which can shot stunning-quality HD images. XDCAM EX camcorders are able to capture very high HD footages at data rate of up to 50 Mbps, and these videos are wrapped in MP4 format. 

See also: Best Codec for Video Playing, Editing and Uploading 


Playing back these footages in camcorder is really an enjoyment, but it becomes a pain if people want to playback or edit Sony XDCAM EX footage on Mac. For Mac users, the most widely used video playback program should be QuickTime Player, however the MP4 format is not supported. Besides, videos encoded with XDCAM in MP4 format always take up too much storage, which is not convenient for video preservation. 

Therefore, it's a good idea to convert Sony XDCAM EX MP4 to common MOV files for QuickTime player on Mac. To accomplish this, you need to get help of a professional converter program; here thePavtube HD Video Converter for Mac (Review) is highly recommended for it's easy-to-use and able to convert quickly, as well as efficiently. 


How to Convert Sony XDCAM EX MP4 to QuickTime MOV for playback on Mac? 

Step 1. Import footages to Sony footage Converter。 

Get this Sony XDCAM EX MP4 to QuickTime Converter installed, connect you camcorder to mac and keep it on; click the top left icon to load footages to HD Video Converter. 


Step 2. Choose QuickTime Player compatible MOV profile 

Click Format and choose Common Video > MOV-QuickTime(*.mov), or you can search for quicktime at the bottom right searching box. 

It has many other profiles so that you can choose to output in various formats. 


Step 3. Fix output video settings. 

You can fix the output video size, bitrate, frame rate by clicking Settings


Step 4. Start converting XDCAM EX MP4 to Quicktime MOV. 

Ok now click the big red circle to start converting Sony XDCAM EX MP4 files to Quicktime MOV on Mac OS X Yosemite. 

Wait for a while, the quicktime mov files are ready for playing back in QuickTime Player. 

Read more guides: 

Good News: Never miss to get Saving up to $44.1, MXF/MTS/M2TS/MKV/FLV/MOV Converter.etc at Pavtube Bundles Deals
such as: HD Video Converter for Mac($35) + DVD Creator for Mac($35) = $39.9, Save $30.1 
Source: http://lovecamcorder.tumblr.com/post/54582863655/can-i-play-sony-xdcam-ex-mp4-video-with-quicktime