2015年2月14日星期六

Sync Canon C300 24p MXF to Premiere Pro with Audio Missed

Have you ever got the trouble in importing Canon C300 24P MXF files in Premiere Pro with the audio out of sync? Here we are talking about it. 


For all the amateurish camera lovers or professional photographers, even for those video editors, have you ever been confused in importing recorded footages in media players or editing software? With video or audio out of sync after imported? Actually, this kind of situation has been appeared frequently around us, just for example: 

'Need help! I shot a project with the Canon C300 in 24p mode. I uploaded the files on my hard drive, the raw files play fine with the VLC player. But when I drag a clip to Premiere Pro the audio is out of sync with the footage. Is there any way to fix?' 

According to the help above, just for Premiere Pro, when you have an idea of transferring files in Premiere Pro, we should know first that VLC has the automatic settings for most video files while Premiere Pro not (Adobe Premiere Pro Support File Formats). So here due to the limitation of this editor, we need to change the MXF footage to compatible format with a MXF to Premiere Pro Converter for Mac/Windows. Follow the guide to know how it works. 


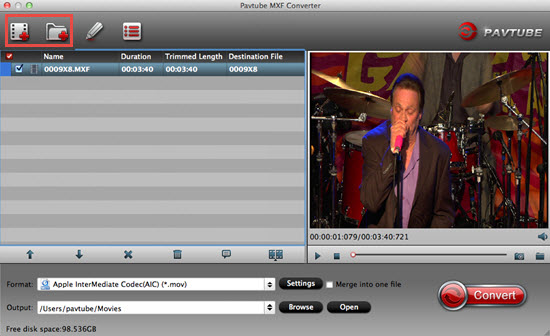
Step 1. Load MXF files 

Download the MXF to Premiere Pro program for a first step and load your mxf files in a correct way. Either 'Add video' or 'Add from folder' can do you a big favor. 


Step 2. When you get into the 'Format' bar list: 

Output 1. select the 'Final Cut Pro -> Apple ProRes 422 (*.mov) as your first choice. 


Output 2. At the bottom of the list, find the 'Adobe Premiere Pro -> MPEG-2 (*.mpg), WMV (VC-1) (*.wmv) or MOV (AVC)(*.mov). Both output video formats are available for Premiere Pro. 


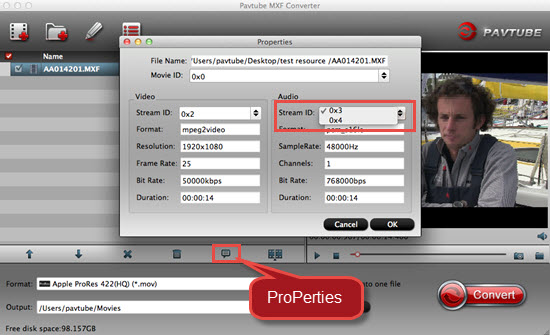
Note: To ensure your output videos with audio, we must come to 'Settings' item for 'Audio', 'Streaming ID', just select one that can play audio normally. 

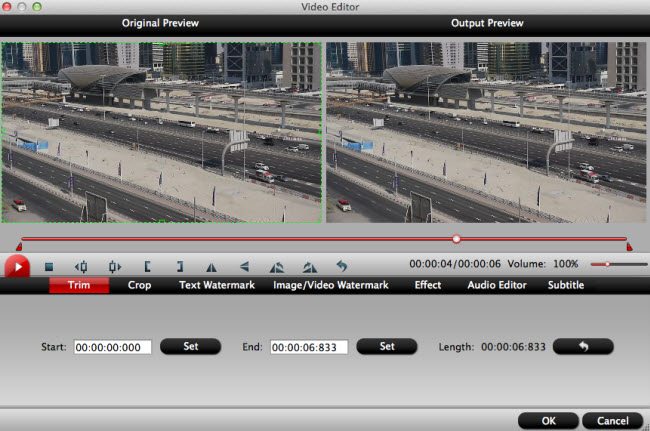
While in 'Editor' interface, for those advanced users, just adjust your personal settings with 'Trim', 'Crop', 'Effects' or 'Subtitles'. Everybody can arrive here find the items you like. 


Additionally Tips: 
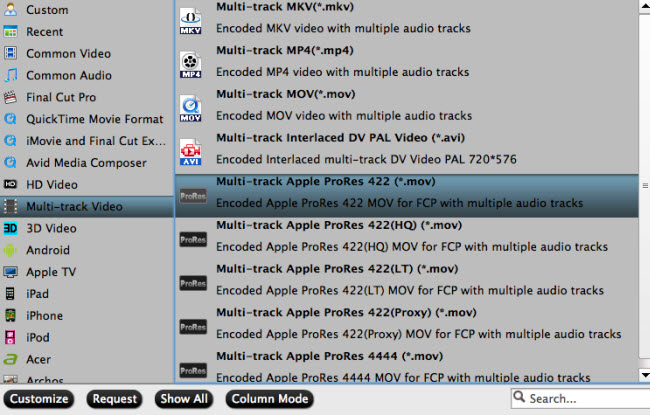
1. For those who want to choose multi-track video or 3D video as the output formats, in 'Format' list, Pavtube iMixMXF is your best choice. You can export Apple ProRes with multiple audio tracks kept, you may You're advised to take the article


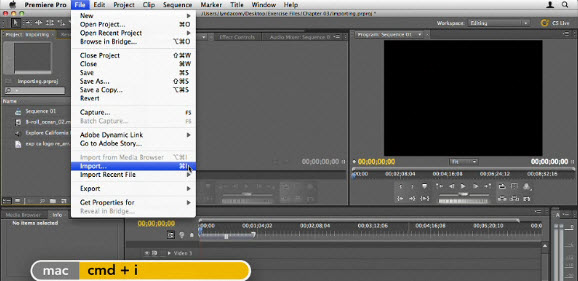
2. If you do not know how to import video to Adobe Premiere Pro on Mac, please reference the following guide: 


3. More output formats are supported, you can also read more guides about video importing workflow as below: 

4. Why choose Pavtube MXF Converter for Mac? 

Pavtube MXF Converter for Mac is an easy-to-use and intuitive Mac tool for camcorder users. It is good at converting MXF recordings shot by Panasonic P2 camcorders, Canon XF series camcorders, Sony XDCAM camcorders, JVC camcorders, etc. to formats compatible with your video editing software like Final Cut Pro (X), iMovie, FCE, Avid Media Composer, Adobe Premiere Pro CC/CS, After Effects CC, DaVinci Resolve, iPhoto, Kdenlive, Keynote and more. It can convert (P2) MXF files to Premiere Pro CS6 supported format with best audio & video quality and the conversion speed is very fast. 

Never miss to get Saving up to $44.1, MXF/MTS/M2TS/MKV/FLV/MOV Converter.etc at Pavtube Bundles Deals


Source: http://pc-mac-compatibility-issues.blogspot.com/2013/04/Canon-EOS-C300-to-Premiere-Pro.html 

XAVC S Avid: Can Avid MC import XAVC-S MP4 from Sony AX100

Description: As far as I know the latest 4k XAVC S video format introduced by Sony is still not supported well by Avid Media Composer so far. If you want to import Sony FDR-AX100 4K XAVC S files to Avid for editing with native Avid DNxHD format, Pavtube XAVC S Video Converter provides a brief instruction. 

Now Sony has launched the first consumer camcorder to shoot 4K (Ultra HD) footage – the Sony FDR-AX100. It captures this in Sony's own XAVC-S file format. This uses an MP4 container and H.264 video, along with 2-channel PCM audio. The format is widely supported by the usual video editors, but it looks like you'll need top-end software to handle it – such as Avid Media Composer – rather than the more downmarket options. 


Sony FDR-AX100's XAVC S codec video is MP4 format. The Mac editor Avid Media Composer support MP4 video importing although, the XAVC S video codec is still a new one for Avid MC. 

Hi, I have Sony FDR-AX100 camera for 4K recordings. I cant AMA link to any of my footage as the format is not supported by Avid. And the AX100 which my friends planned to buy also uses this XAVC-S codec. So I'm confused by the XAVC-S/Avid AMA workflow. 

Since you will have problem for importing Sony XAVC-S videos into Avid MC even with the AMA Plug-in, to make things easier, you had better to transcode Sony FDR-AX100 XAVC-S footage to a more editing-friendly format, such as Avid Media Composer's DNxHD .mov. 

To convert Sony AX100 4K XAVC S MP4 to Avid DNxHD MOV on Mac OS X Yosemite, Pavtube (Sony XAVC S) Video Converter for Mac is highly recommended for its simplicity, efficiency and reliable workflow

Just free download or buy Pavtube XAVC S Video Converter for Mac, and install on your Mac: 


Note: If you're running Avid Media Composer on your Windows, pls try XAVC S Video Converter 

Step 1. Import XAVC S MP4 files to the Mac XAVC S Video Converter. 

Install the best Mac XAVC S Video Converter on your Mac. Hook your Sony AX100 to Mac and keep it on; click the two icons which are marked as 1 to load XAVC-S footage from Sony FDR-AX100 to Mac XAVC S Video Converter like this: 


Step 2. Trim out a few clips before converting XAVC-S to Avid. 

Now click the pencil-like icon (Edit) and locate the Trim icon: 


Drag the small triangle icons to locate the opening and ending; or click the icons in blue to adjust frame by frame. It also supports setting "Start" and "End" point-in-time. 

Step 3. Choose output video format for Avid Media Composer. 

Click the drop-down list and choose "Avid Media Composer -> Avid DNxHD(*.mov)" as the most compatible format/codec for AMC editing. 


You can free choose the output video quality, size, frame rate by clicking the "Settings". 


4. Convert Sony AX100 XAVC S MP4 files to Avid DNxHD MOV. 

Now hit "Convert" and let it running; you can easily locate the converted video by clicking "Open" at the bottom. 

You may want to read How to import video file to Avid Media Composer? 


Related Articles: 
Importing Sony AX100 XAVC-S videos in iMovie/FCE 
Convert Sony AX1 4K XAVC S to QuickTime MOV for playing 
Convert AVCHD/AVCHD Lite MTS/M2TS files to QuickTime MOV 
Make Sony PXW-Z100 XAVC Videos Compatible with FCP X on Mac Yosemite 
Convert Apple ProRes video to M4V for streaming to Apple TV 3 


Good News! Pavtube Bundles Dealsare coming! If you want to import/preserve/mix multi-track MXF in MKV/MP4/MOV formats, get multi-track Apple Prores MOV for further editing in Final Cut Pro (X), the following bundled software is your best choice:? 

Video Converter($35) + MXF MultiMixer($45) = $54.9, Save $25.1 (buy link
Video Converter for Mac($35) + iMixMXF($45) = $54.9, Save $25.1 (buy link

Source: http://digitalmediasolution.altervista.org/blog/import-sony-ax100-xavc-s-in-avid-mc/

Import Sony AX1 4K XAVC S to FCP and Burn to DVD

Summary: Follow this guide to know how to convert Sony AX1 4K XAVC S to Prores for editing in FCP 6/7 and burn to DVD on Mac. 

Playing with 4K videos is no longer a pie in the sky. It is the Sony FRD AX1, the first 4K Handycam that makes most consumers' dream come true. Upon looking through the introduction of this newest gadget, we cannot help but wow on the tangible cutting-edge technology. It can not only shoot videos at a resolution of 3840 x 2160 in 60p, but also adapts the latest storage standard and Sony's newest format called XAVC S (MPEG4-AVC/H264). To provide a happy post production to the users, a Sony Vegas Pro 12 Edit will be bundled. Have to admit that, the FDR AX1 is the Sony's first all-in-one solution for 4K content production with a price tag less than $5,000. 

The FDR-AX1 records 150Mb/s and for 1920x1080 at 60p you'll get 50Mb/s. But the editing workflow on Mac with AX1 4K XAVC S files is not so fluent. You may encounter problems when you want ot import Sony AX1 XAVC S files to Final Cut Pro 6/7 for editing. It takes long time to render, and you can't edit the AVCHD footages smoothly in Final Cut Pro 6/7. 


In order to edit Sony AX1 4K XAVC S clips in FCP 6/7 without crashing problem and avoid rendering, you'd better transcode Sony XAVC S footages to FCP native format, say, Apple ProRes Codec. This article will share the way to convert Sony AX1 4K XAVC S footages to Apple ProRes 422 encoded MOV file for FCP 6/7 and burn to DVD on Mac. 
 

*****************************************************************

Part 1: Convert Sony AX1 4K XAVC S to FCP 6/7

Best Software choice:

Pavtube's HD Video Converter for Mac - a top XAVC S Video Converter for Mac.

The Mac XAVC S Video to FCP Converter is an easy to use yet professional Converter on Mac OS X which can not only transcode Sony AX1 4K XAVC S videos to Apple ProRes codec for Mac editing, but also provide simple video editing functions for you. Besides, the program can also convert HD videos from HD camcorders or DVs (like JVC, Panasonic, Sony and Cannon) for editing in Final Cut Pro, Final Cut Pro X, Final Cut Express, iMovie, Avid, Adobe Premiere etc. Below is how.


Solve problem about editing Sony AX1 4K XAVC S footage in Final Cut Pro 6/7

Step 1. Import Sony AX1 AVCHD videos to the best Mac Sony AX1 Video Converter for FCP 6/7.


Step 2. Click the Format bar, and move mouse cursor to "Final Cut Pro > Apple ProRes 422 (*.mov)" as output format.


Step 3. Click "Convert" button to start transcoding Sony AX1 4K XAVC S files to Apple ProRes Codec for Final Cut Pro under Mac OS.

Tips: Before you try to do the conversion, if you are also a FCP X user, please make sure that you have installed the Apple ProRes Codec manually since the FCP X asks users to install it by themselves.

After a shot conversion, you will be able to get/transfer Sony AX1 XAVC S videos into Final Cut Pro 6 and Final Cut Pro 7 for editing without rendering. (Read FCP File Importing Guide)


*****************************************************************

Part 2: How to burn AX1 XAVC S to DVD on Mac

Now Pavtube DVD Creator for Mac adds support for XAVC S files burning, it can burn single file or folder structure videos, you can burn Sony AX1 XAVC S to DVD in few steps, just follow it:

1. Install the best XAVC S to DVD Creator on your Mac, connect your DVD Writer and insert a blank DVD. Add your videos into the DVD Creator for Mac.


2. Edit movie clip and Customize your DVD menu. You can edit your videos with trim, crop, watermark, effect settings, audio replacing settings features.


3. Preview Created DVD-Video and click burn button to start your marvelous burning process from Sony AX1 4K XAVC S files into DVD on Mac.


*****************************************************************

Good News: Never miss to get Saving up to $44.1, MXF/MTS/M2TS/MKV/FLV/MOV Converter.etc at Bundles Deals,

such as: HD Video Converter for Mac($35) + DVD Creator for Mac($35) = $39.9, Save $30.1

HD Video Converter for Mac Key Features:
-Convert 1080p/720p MKV, MOV, MXF, MTS, M2TS, M2T, TS, M4V, MP4, AVI, MPG, VOB, WMV, 3GP, FLV videos for playing, editing, uploading or burning.
-Support ProRes/DNxHD/DVCPRO/AIC and other codecs for NLEs on Mac.
-Convert HD footages from Sony, Canon, Nikon, Panasonic, JVC, etc.
-Convert any video and audio for multiple playback devices.

DVD Creator for Mac:
-Create playable DVD disc, DVD folder and DVD ISO from different file types.
-Make DVDs from TiVo, MTS, MOV, WMV, AVI, MPEG, MP4, MKV and more.
-Burn ISO image file and DVD folder/VIDEO_TS to a DVD disc directly.
-Create DVD movies with NTSC or PAL video standard.


Source: http://handycameratips.jimdo.com/2013/10/29/convert-sony-ax1-4k-xavc-s-to-fcp-and-dvd/ 

2015年2月12日星期四

Canon C500 MXF read errors in Premiere Pro CS6/CS5/CS4

Summary: If you get the importing error message while importing Canon C500 MXF files to Adobe Premiere Pro CS6, CS5 or CS4, Pavtube MXF Converter will be the best MXF to Adobe Premiere Pro solution for you. 

Canon has officially announced the EOS C500, the professional 4K video camera output that it promised at the NAB trade show in April. A continuation of the concept of the C500, it can capture Raw 4K video footage and offers frame rates of up to 120fps in compressed 4K. It also captures 2K footage (2,048 x 1,080 pixels) at 12-bit, with 4:4:4 Y'CbCr chroma sub-sampling for high colour resolution. For 4K and 2K recording, uncompressed output is delivered to external recording systems via built-in dual 3G SDI ports. Dual HD-SDI monitor outputs support external live monitoring. Simultaneously, HD content can be written to dual onboard CF cards to provide proxy video for offline NLE systems. 


Read More: XF200/XF205 | C300 | XF305 | Canon XF300 | Canon XF105 | Canon XF100 

Canon C500 is very excellent, you may have bought a C500 camcorder and need to edit C500 files in Premiere Pro CS 4/5/6, but C500 MXF files are not well supported by Premiere Pro CS6, as you may encounter many audio and video problems, such as bitrate unsupported, and synchronization program. 

We did a test, we had only been able to get 35Mbps and 25Mbps files to work in PPro CS4, we have to use CS5 or above to edit natively 50MBPS 422HD recordings with AMA MXF or Canon XF Plugin. To edit C500 MXF videos, you'd better upgrade to CS5/CS6. But some users can't upgrade to CS5/CS6, what will you do? 

In fact, it is an easy solution for many users, it can save money and same time. The most importnat is that the conversion won't reduce the video qaulity. Here we run Pavtube MXF to Premiere Pro Converterto take an example. Below is the simple guide on how to convert C500 MXF movies to Premiere Pro CS4/CS5/CS6 supported formats. 

Just free download or buy Pavtube MXF Converter for Mac, and install on your Mac: 


Step 1. After downloading, install and run this Mac MXF Converter for Premiere Pro, just copy the MXF files from the CF cards right to your hard drive, import the files to the software. 


Step 2. Click "Format" bar to choose the output format. Click "Format > Adobe Premiere/Sony Vegas > MOV (AVC)(*.mov) or MPEG-2 Video (*.mpg)" as output format. The MXF to Premiere CS Converter for Mac will convert Canon C500 MXF videos to MOV/MPG with the original video resolution. 


Step 3. You can click "Settings" button to adjust the parameters, such as resolution, bitrate, etc. 

Step 4. Click "Convert" button to start converting Canon C500 MXF to MOV/MPG for importing to Premiere Pro CS4/5/6 on Mac. 

After the conversion is finished, just run Adobe Premiere Pro CS4/5/6 and import the .mpg or .mov files for editing. You will find the output video work perfectly on Adobe Premiere Pro CS. 

PS. If you do not know how to import video to Adobe, please reference the following guide: 

Adobe Premiere Pro workflow: How to import Media Files to Premiere Pro on Mac 

Read more 


Good news! Pavtube Bundles Deals are coming! It's a time for taking a break from work and relaxing. And now you can enjoy your colorful time with good featured products at"Pavtube Bundles Deals". Go ahead and click the link to get your coupon. Save up to $44.1!Never miss!!! 
  • MTS/M2TS Converter for Mac($29) + MXF Converter for Mac($29) = Only $29.9 
  • iMixMXF($45) + HD Video Converter for Mac($35) = Only $54.9 .....


Source: http://pc-mac-compatibility-issues.blogspot.com/2013/05/Transfer-Canon-C500-MXF-to-Adobe-Premiere-CS-4-5-6.html 

Streaming Any Video Formats to Google Chromecast

Have you ever tried to stream videos and movies to Google Chromecast for playing on your HDTV? I have tested Videostream for Chromecast with FLV, AVI, MKV, MP4, WMV, MTS, M2TS, Tivo, MPEG and VOB files. This article tells you how to stream Chromecast supported and upsupported media videos to Google Chromecast. 

See also: Google Chromecast Column 


It requires a wireless connection using the Internet or a network connected computer, tablet, or smart phone. You can play various multimedia content, but only Google Cast supported formats can be streamed directly. According to this way, in order to smoothly watch HD movies on HD TV via Google Chromecast, we should know more details on Chromecast Supported and Unsupported Video Formats below. 

Part 1.Introduction of Chromecast Supported and Unsupported Video Formats: 

A: Standard supported Chromecast Video Formats include: 
  • MP4 - MPEG 4 or MP4 video files uses the standard .mp4 extension. It is most commonly used to store video and audio files. 
  • WebM – An open video format for the web that allows everyone to stream video and audio codecs.

B: Some unsupported video formats include: 
  • AVI – AVI (Audio Video Interleave), the most common format for audio/video data on the PC, is a multimedia container format with video and audio. 
  • MKV – The Matroska Multimedia Container holds video, audio, picture, or subtitle tracks in one file. 
  • FLV – Flash video formats are video files that are streamed over the Internet using the Adobe Flash Player. 
  • MOV – MOV is a multimedia file format that contains one and more tracks of data, such as audio, video or text. 
  • VOB – VOB (Video object) files are DVD-Video file formats that contain digital video audio, audio, and subtitles relevant to DVDs. 
  • 3G2 – This is video container file for audio, video, and text that is an extension of MP4.

See also: Best Codec for Video Playing, Editing and Uploading 

Part 2.How to stream your supported video formats to Google Chromecast? 

Method 1.Connect with your Mobile device 
To stream videos using your mobile device, you will need to download and open the Chromecast app on your Android or iOS smartphone or tablet using Google Play or the App store. The Chromecast app is available for Android tablets and smartphones through Google Play and for iPhones and iPads in the App store. 

Note: You should ensure that your mobile device is connected to your Wi-Fi and not your mobile network. Also, you must have the latest app installed and be on the same network as your Chromecast digital media player. 

Method 2.Connect with your computer 

Chromecast allows you to stream videos on your TV using your Mac or PC running the Chrome browser. This is the only browser that Chromecast is compatible with. Follow the instructions below to connect with your computer: 
Step 1. Open the Chrome browser on your computer and then navigate to this page to see how to setup Chromecast. 
Step 2. Dwnload the Chromecast app to your computer. 
Step 3. Select the instruction below that is applicable to your computer. 
  • I. On your Windows computer, Save the file, Run the Chromecast app and follow the prompts to complete setting up Chromecast. 
  • II. On your Mac OS X computer, drag and drop the Chromecast app into your Applications folder. You will need to open the folder, run the application, and then select the Chromecast device. Follow the instructions to complete the setup process.

Method 3. Connect with YouTube: 
Step 1. Connect your Chromecast device to an available HDMI slot on your HDTV. 
Step 2. When your Chromecast digital media player is securely connected to your TV you will see the Chromecast Home screen with your Wi-Fi name at the bottom of the screen. 
Step 3. Now, download the YouTube app on your Android or Apple tablet or smartphone. 
Step 4. Connect your Android or Apple device to the same Wi-Fi network as your Chromecast device. 
Step 5. Open the YouTube app on your Android or Apple device and click the Cast button to start streaming videos/ 

Part 3. How to stream those unsupported video formats to Google Chromecast? 

Since we know the MP4 and WebM can be the two best ones for watching on Google Chromecast, what we need here is a professional Chromecast Video Converter for us to smoothly work the original any Video formats with Google Chromecast. Fortunately, Pavtube Video Converter for Windows / Mac is such a good choice for us to enjoy any videos and movies on Google Chromecast well. 

Just free download or buy Pavtube Chromecast Video Converter, and install on your Windows or Mac: 


How to convert any Videos to Chromecast supported formats? 

Step 1. Add your video files 

Launch the program and open the main interface, we'd better to click the 'Add video' or 'Add from folder' to let our original files in. 


Step 2. Choose suitable one for Google Chromecast 

Come to the output list by hitting the 'Format' bar on the left of the preview window, here we suggest you to select the 'HD Video'>>'H.264 HD Video (*.mp4)' as the best output one. 


Step 3. As the additional functional button, on the main interface we can get into the 'Edit' button to adjust our output videos such like the video length with 'Trim', get rid of the edges with 'Crop', or even add some subtitles with 'Subtitle', etc. Just be a good editor here. 

Notes: More talking on this professional Chromecast Video Converter, we have to tell you with the latest upgrade version, it can support the H.265/HEVC videos encode and decode, with the higher quality and smaller size, do you wanna a try? 

Step 4. Click "Convert" button to begin to convert videos to Chromecast at 6x fast speed. 

Then you can stream local videos to Chromecast now. You can freely start to stream any videos on chromecast for sharing with your family or friends on TV, Youtube, iPad, iPhone, Xbox, etc. (How to Setup and Use Chromecast to stream your content to TV

Now, do you still find it is hard for us to watch FLV/F4V movies on HD TV via Google Chromecast? Just have a try! 

See also: 

Good News! Pavtube Bundles Dealsare coming! If you want to import/preserve/mix multi-track MXF in MKV/MP4/MOV formats, get multi-track Apple Prores MOV for further editing in Final Cut Pro (X), the following bundled software is your best choice: 
Video Converter($35) + MXF MultiMixer($45) = $54.9, Save $25.1 (buy link
Video Converter for Mac($35) + iMixMXF($45) = $54.9, Save $25.1 (buy link

Source: http://www.video-pedia.com/2015/02/03/stream-video-formats-to-google-chromecast/