Using a top MXF to ProRes Converter for Mac, you can easily convert Canon XF MXF files to Final Cut Pro X native Apple ProRes 422 for editing flawlessly.
Below are several disscussions about looking for the way importing Canon MXF files to the Final Cut Pro X:
Q1: Canon MXF files into FCP X
I'm interested in the new Canon XF300 camera, but I'm still working on an Apple G5 with FCP X. Is there an application, plug-in, etc. for the new FCP X to take in MXF files? [G5, Mac OS X (10.4.11)]
Q2: importing Canon .MXF files to Final Cut Pro X
What plug-in do I need to install so i can import and edit .MXF video files in Final Cut. The suggestion of doing Log and Transfer doesn't work (the .MXF files are gray out not allowing me to select it.) [Final Cut Pro X, Mac OS X (10.5.8)]
Q3: Support for Canon MXF from XF100 in FCP X?
How do I import .mxf files into Final Cut Pro X? This is the latests and greatests software right? There must be a way. Help Please.
 Here many folks are talking about how to import Canon MXF files into Final Cut Pro X for editing without rendering time. Well, don't blame to the Final Cut Pro X, the "Import from Camera…" option works just like "Log and Transfer". The thing is, even FCP X does not work with the Canon MXF files.
As far as i know, to solve those problems, the most important piece of the equation is that transcoding Canon MXF files to Final Cut Pro X native formats(e.g. Apple ProRes encoded mov format) along with some help from the third-party software. To help those who wanna import/edit MXF files in Final Cut Pro X flawlessly, I'm sharing my experience to convert Canon MXF files to Apple ProRes Codec for Final Cut Pro X.
As a professional MXF video converter, Pavtube iMixMXF provides your requirements for preserving and mixing MXF multi-tracks/channels, converting your Canon MXF video files to Apple ProRes codec, which is the best format for FCP (X)) output. The great MXF Converter for Mac also transcode MXF from HD camcorders (like JVC, Panasonic, Sony and Canon) to multi-track MKV/MP4/MOV or popular HD & Common video formats for professional editing in editing programs (e.g. FCE, iMovie, Avid Media Composer, Adobe Premiere Pro CC/CS, After Effects CC/CS, Premiere Elements, Creative Suite 6/5, Aperture 3, DaVinci Resolve, iPhoto, Kdenlive, Keynote) and free playback on iOS/Android/Windows devices, HDTV, Media Players and more. Apart from **multi-track preserving**, Pavtube iMixMXF can also mix multi tracks into one track. This feature help you mix the audios of interviewer, interviewee, surroundings, or editors/directors comments into one.
____________________________________________________________________________________
Mac OS X 10.10 Yosemite, Mavericks 10.9 are supported now. Below is how.
Guide: How to Transcode Canon MXF footage to Final Cut Pro X editable format?
Step 1. Import MXF files to the top Mac MXF to FCP X Converter.
(Before conversion, you need to transfer MXF files from your camcorder or camera to Mac Hard Drive, then click the "add" button to browse to import Canon MXF videos)
Step 2. Click the format bar, and move mouse cursor to "Final Cut Pro > Apple ProRes 422 (*.mov)" as output format.
Here many folks are talking about how to import Canon MXF files into Final Cut Pro X for editing without rendering time. Well, don't blame to the Final Cut Pro X, the "Import from Camera…" option works just like "Log and Transfer". The thing is, even FCP X does not work with the Canon MXF files.
As far as i know, to solve those problems, the most important piece of the equation is that transcoding Canon MXF files to Final Cut Pro X native formats(e.g. Apple ProRes encoded mov format) along with some help from the third-party software. To help those who wanna import/edit MXF files in Final Cut Pro X flawlessly, I'm sharing my experience to convert Canon MXF files to Apple ProRes Codec for Final Cut Pro X.
As a professional MXF video converter, Pavtube iMixMXF provides your requirements for preserving and mixing MXF multi-tracks/channels, converting your Canon MXF video files to Apple ProRes codec, which is the best format for FCP (X)) output. The great MXF Converter for Mac also transcode MXF from HD camcorders (like JVC, Panasonic, Sony and Canon) to multi-track MKV/MP4/MOV or popular HD & Common video formats for professional editing in editing programs (e.g. FCE, iMovie, Avid Media Composer, Adobe Premiere Pro CC/CS, After Effects CC/CS, Premiere Elements, Creative Suite 6/5, Aperture 3, DaVinci Resolve, iPhoto, Kdenlive, Keynote) and free playback on iOS/Android/Windows devices, HDTV, Media Players and more. Apart from **multi-track preserving**, Pavtube iMixMXF can also mix multi tracks into one track. This feature help you mix the audios of interviewer, interviewee, surroundings, or editors/directors comments into one.
____________________________________________________________________________________
Mac OS X 10.10 Yosemite, Mavericks 10.9 are supported now. Below is how.
Guide: How to Transcode Canon MXF footage to Final Cut Pro X editable format?
Step 1. Import MXF files to the top Mac MXF to FCP X Converter.
(Before conversion, you need to transfer MXF files from your camcorder or camera to Mac Hard Drive, then click the "add" button to browse to import Canon MXF videos)
Step 2. Click the format bar, and move mouse cursor to "Final Cut Pro > Apple ProRes 422 (*.mov)" as output format.
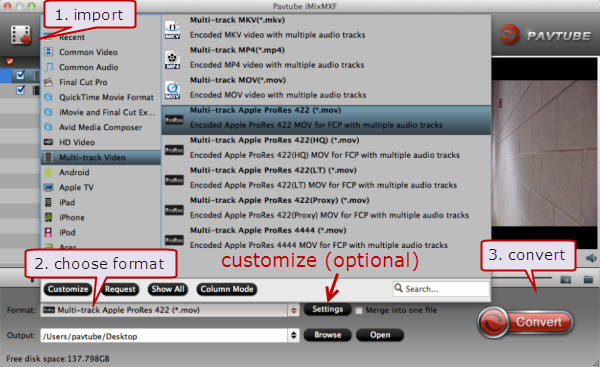 Step 3. Click "Convert" button to start transcoding Canon MXF files to Apple ProRes Codec.
Once the conversion is 100% completed, you can smoothly import the converted Canon MXF files to FCP X for further editing without hassle.
Some more helpful features of the app:
1. Settings- click to set video resolution(1920×1080/1440×1080/1280×720/720×480), bitrate (from 1Mbps to 20Mbps), frame rate (24p/30p)
2. Editor (next to "Add" icon)- click to set deinterlace, denoise, mute, volume up, trim, crop, etc.
______________________________________________________________________________
Read more:
Step 3. Click "Convert" button to start transcoding Canon MXF files to Apple ProRes Codec.
Once the conversion is 100% completed, you can smoothly import the converted Canon MXF files to FCP X for further editing without hassle.
Some more helpful features of the app:
1. Settings- click to set video resolution(1920×1080/1440×1080/1280×720/720×480), bitrate (from 1Mbps to 20Mbps), frame rate (24p/30p)
2. Editor (next to "Add" icon)- click to set deinterlace, denoise, mute, volume up, trim, crop, etc.
______________________________________________________________________________
Read more:
Can't find a program like WinFF for Mac. Now get this WinFF Converter for Mac Alternative to batch convert any video or audio on Mac OS X. WinFF Alternative for Windows also available.
WinFF is a cross platform batch GUI for FFmpeg. It will convert most any audio or video file that FFmpeg will convert. Software includes presets for most common file conversions with the option to add advanced conversion options supported by FFmpeg to one or more files in a batch. WinFF converts multiple files in a batch, with support for multiple formats output in the same batch. For example, you can FLV, WMV, AVI and WAV simultaneously.
Though WinFF is one of the well known video converter apps, it only has Windows and Linux version, there *****is still no WinFF for Mac version.Ever dream to get a WinFF for Mac to convert any video or audio on Mac OS X**** (Mavericks included)? This article just aims to introduce an ideal WinFF Alternative for Mac or Windows as well as describe an easy guide on how to use this WinFF Mac version.
 Here, we highly recommend you to try Pavtube Video Converter for Mac, which works as the best WinFF Alternative for Mac. With this best Video Converter and Editor for Mac, users can finish SD/HD video converting and editing process with fast speed and high video qualtiy.
Get Pavtube Special offer Here !
Here, we highly recommend you to try Pavtube Video Converter for Mac, which works as the best WinFF Alternative for Mac. With this best Video Converter and Editor for Mac, users can finish SD/HD video converting and editing process with fast speed and high video qualtiy.
Get Pavtube Special offer Here !
This app offers an easy way to transcode virtually all video and audio types, camcorder HD footages and TiVo recordings to desired video/audio format for portable multimedia devices, HD media players or video editing software, such as:
* ** Devices: iPad Air, iPad Mini 2, iPhone 5S, iPhone 5C, iPhone 5, iPad 4, iPad 3, iPad Mini, iPod 5, etc.
* ** Players: Apple TV 3, WD TV, PS3, Xbox 360, Popcorn Hour, Xtreamer Ultra, Dune HD Base 3D, Iomega ScreenPlay MX HD Media Player, NETGEAR NeoTV Max Streaming Player(NTV300SL), Asus O!Play Mini Plus, etc.
* ** Video Editing Softwares: FCP, iMovie, Avid Media Composer, Premiere Pro, etc. Plus, you are allowed to freely customize and personalize the conversion files through its settings and options in order to get an individual output in your own way.
__________________________________________________________________________________________________
Not all video tools like Pavtube Video Converter for Mac offer so many video editing options in this full-features and powerful video converter. It edits videos by ****trimming, cropping, splitting videos, add text/image/video watermark as copyright protection, and attach external *.srt, *.ass, or *.ssa subtitles into source media for entertainment. Support perfect audio and video synchronization. ****
The conversion speed is --------------very fast and it supports batch conversion. It converts --------------multiple video clips at the same time, moreover it can shut down computer after the process is complete, so run the app overnight and you could enjoy the created videos next morning when you are up.
 __________________________________________________________________________________________________
Windows Version: Video Converter
Free Download the Mac Version here
Tutorials: Converting videos on Mac OS X Yosemite/Mavericks/Mountain Lion with ease
Step 1: Load video files to this WinFF Converter for Mac Alternative
Download the Pavtube Video Converter for Mac on your computer, install and run the program, add videos.You can choose to import videos or the entire folder by clicking the top left two icons.
__________________________________________________________________________________________________
Windows Version: Video Converter
Free Download the Mac Version here
Tutorials: Converting videos on Mac OS X Yosemite/Mavericks/Mountain Lion with ease
Step 1: Load video files to this WinFF Converter for Mac Alternative
Download the Pavtube Video Converter for Mac on your computer, install and run the program, add videos.You can choose to import videos or the entire folder by clicking the top left two icons.
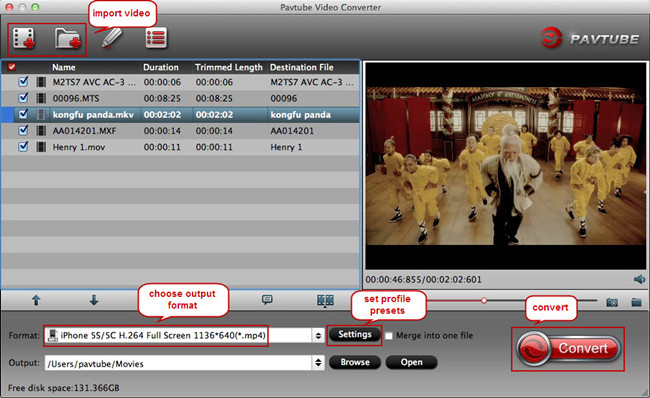 Step 2. Choose a proper format.
Click "Format" drop-down list and choose the best preset for you portable device with best video quality. Plenty of presets that can be customized as necessary.
For iPad 3, iPad 4, iPad Mini, iPad Air or iPad Mini 3, the video formats from "iPad" option will meets your demand; (Transfer Canon video to iPad on Mac)
For iPhone, iPhone 4, iPhone 4S, iPhone 5, iPhone 5S/5C, iPhone 5S, iPhone 6, iPhone 6 plus, the preset from "iPhone" option is able to work well.
Step 2. Choose a proper format.
Click "Format" drop-down list and choose the best preset for you portable device with best video quality. Plenty of presets that can be customized as necessary.
For iPad 3, iPad 4, iPad Mini, iPad Air or iPad Mini 3, the video formats from "iPad" option will meets your demand; (Transfer Canon video to iPad on Mac)
For iPhone, iPhone 4, iPhone 4S, iPhone 5, iPhone 5S/5C, iPhone 5S, iPhone 6, iPhone 6 plus, the preset from "iPhone" option is able to work well.
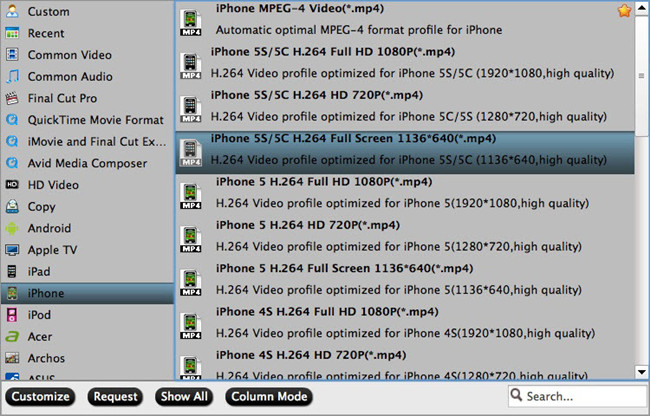 For those who in demands of playing videos on Android devices, you can always find the one you want in Android preset.
Step 3. Customize video specs(Optional).
You could also click the "Settings" to adjust the video and audio parameters of output files.
In the Video Settings, you can select Encoder, Frame Rate, Resolution (you could define it yourself according to your device) and Bitrate for your movie.
In the Audio Settings, you can select Encoder, Channels, Bitrate and Sample Rate for your movie.
Step 4. Start Videos Conversion on Mac.
You can hit the big red "Convert" to start converting MKV, AVI, VOB, WMV, MPG, Tivo, M4V, FLV, F4V, MTS to MP4 with best video settings on Mac. After the conversion, click "Open output folder" in the conversion window, or "Open" in main interface to quick locate the converted video.
Now, you can transfer these videos to your portable Android/Window 8/Apple device on Mac for smooth playback without any problem. Enjoy your digital life!
________________________________________________________________________________________________________________________
Related Guide:
Get the Best Handbrake Equivalent for Win/Mac
Play iMovie Video in Windows Media Player or Edit in Windows Movie Maker
Record Classical Music Videos on QuickTime for a Playback
Nicely Encode Sony F5/F55 XAVC to FCP X for Editing
Ingest Panasonic PX270 AVC-LongG MXF to Adobe After Effects CC/CS6
Receive 4:3 H.264 HD MP4 Videos from Panasonic Mini DV on Windows/Mac
Make it posssible to work with Avid DNxHD MXF in Premiere Pro CC
Source: http://compatibleformat.snappages.com/blog/2013/12/20/winff-alternative-for-mac-convert-any-video-or-audio-files-on-mac
For those who in demands of playing videos on Android devices, you can always find the one you want in Android preset.
Step 3. Customize video specs(Optional).
You could also click the "Settings" to adjust the video and audio parameters of output files.
In the Video Settings, you can select Encoder, Frame Rate, Resolution (you could define it yourself according to your device) and Bitrate for your movie.
In the Audio Settings, you can select Encoder, Channels, Bitrate and Sample Rate for your movie.
Step 4. Start Videos Conversion on Mac.
You can hit the big red "Convert" to start converting MKV, AVI, VOB, WMV, MPG, Tivo, M4V, FLV, F4V, MTS to MP4 with best video settings on Mac. After the conversion, click "Open output folder" in the conversion window, or "Open" in main interface to quick locate the converted video.
Now, you can transfer these videos to your portable Android/Window 8/Apple device on Mac for smooth playback without any problem. Enjoy your digital life!
________________________________________________________________________________________________________________________
Related Guide:
Get the Best Handbrake Equivalent for Win/Mac
Play iMovie Video in Windows Media Player or Edit in Windows Movie Maker
Record Classical Music Videos on QuickTime for a Playback
Nicely Encode Sony F5/F55 XAVC to FCP X for Editing
Ingest Panasonic PX270 AVC-LongG MXF to Adobe After Effects CC/CS6
Receive 4:3 H.264 HD MP4 Videos from Panasonic Mini DV on Windows/Mac
Make it posssible to work with Avid DNxHD MXF in Premiere Pro CC
Source: http://compatibleformat.snappages.com/blog/2013/12/20/winff-alternative-for-mac-convert-any-video-or-audio-files-on-mac
If you have any problem when importing JVC GY-HM650U MXF, MOV, AVCHD, MP4 files on PC/Mac, jsut follow this simple guide to transcode JVC videos to to PC/Mac native format for editing smoothly.
 The GY-HM600 is the new ProHD camcorder from JVC, a camcorder for next generation newsgathering. Light, versatile and extremely easy to use, this camera is designed for fast paced ENG delivering exceptional imagery and features for news, sports, and independent production. It supports
Multiple encoding formats:
The GY-HM600 is the new ProHD camcorder from JVC, a camcorder for next generation newsgathering. Light, versatile and extremely easy to use, this camera is designed for fast paced ENG delivering exceptional imagery and features for news, sports, and independent production. It supports
Multiple encoding formats:
- HD MPEG2 (35/25/19Mbps)
- AVCHD 1920×1080 60i
- SD H.264
- 480×270 H.264 (web)
- 960×540 H.264 mode
Wide media format compatibility:
- MXF with rich Metadata (optimized for asset management)
- MOV (Final Cut Pro)
- MP4 (XDCAM EX?)
- AVCHD with additional lower bitrate AVCHD modes
JVC GY-HM650U is good enough to most photographers, however, you may have ***found the MXF, MOV, AVCHD, MP4 video it records can't be imported in many editors on PC/Mac successfully. ***
I'm basically going to be mainly filming me doing downhill mountain biking, and also some other sports with the JVC GY-HM650U. And later I did some editing work with the mxf recordings, first it was fine but then very choppy. How can I get the problem fixed? Wanting suggestions on what video editing software to pick up to start making my own videos smoothly.
Why does it happen? This is because the MXF video as well as MOV, AVCHD, MP4 files it shoots are not a supported file format for import by the time-line based video editing application. To natively import JVC GY-HM650U MXF, MOV, AVCHD, MP4 video, the best method is convert these JVC video to PC/Mac with best codec for editing software. (Analysis on HD Camcorder Supported Video Formats AVCHD DV MPEG2)
Then what software can help with the workflow for editing JVC GY-HM650U MXF, MOV, AVCHD, MP4 video on PC/Mac without rendering?
Here Pavtube HD Video Converter or HD Video Converter for Mac is a top JVC GY-HM650U Video Converter which can transcode JVC GY-HM650U MXF, MOV, AVCHD, MP4 recordings to best format for Sony Vegas, Pinnacle, Premiere, Avid, Cyberlink, Windows Movie Maker, etc on Windows PC and FCP X, FCP 6/7, Avid, iMovie and Final Cut Express, etc on Mac. Now you can follow the steps below to convert JVC GY-HM650U videos on PC/Mac for editing.
See also:
Top 5 Best HD Video Converter for Mac Review
1.Install Pavtube JVC Video Converter for Mac/Win, and then load the MXF, MOV, AVCHD, MP4 files from JVC GY-HM650U. You can drag several files to the program directly.
 2.Choose output format for editing on PC and Mac.
Hit the Format box, on the dropdown menu
For Mac users:
For example, select "Final Cut Pro"->"Apple ProRes 422(*.mov)". for editing in FCP 6/7/X.
2.Choose output format for editing on PC and Mac.
Hit the Format box, on the dropdown menu
For Mac users:
For example, select "Final Cut Pro"->"Apple ProRes 422(*.mov)". for editing in FCP 6/7/X.
 If you need to edit in iMovie, please choose iMovie and Final Cut Express -> Apple InterMediate Codec (AIC) (*.mov).
 And for Avid MC, please choose Avid Media Composer -> Avid DNxHD (*.mov).
 For Windows users:
you can choose "AVI/WMV/MPEG-2" as output format for editing with Sony Vegas/Pinnacle/Premiere/Avid/Cyberlink/Windows Movie Maker.
3. Do some settings as you want, like output resolution and bitrate.
4.Transcode JVC GY-HM650U videos to compatible format for editing.
At last, hit the "Convert" button to transcode GoPro Hero MXF, MOV, AVCHD, MP4 clip on PC/Mac.
With this JVC GY-HM650U video converter, you can easily change JVC GY-HM650U MXF, MOV, AVCHD, MP4 video files to PC/Mac in Sony Vegas, Pinnacle, Premiere, Avid, Cyberlink, Windows Movie Maker, FCP X, iMovie or Avid MC for editing. This software runs fast, so you can convert your JVC footages in less time, video and audio synchronization are perfectly guaranteed.
Related video transferring guides:
Import media to FCP X.
Best workflow to import videos and projects into iMovie
Manage videos, projects, and media onto Avid Media Composer
More related tips:
Transcode JVC GY-HM650U ProHD MXF to ProRes 422 LT for FCP 6/7
Encode JVC GY-HM650U ProHD MXF to Multi-track MOV for Sony Vegas Pro 12
How to edit JVC GY-HM650U MXF, MOV, AVCHD, MP4 on Mac?
Making Nature Film from Canon Camera and Upload on Youtube and Vimeo
Share ALS Ice Bucket Challenge videos on Youtube/Vimeo
Upload MXF/MTS/MOV Videos from Cameras for TV channel
Source: http://digitalmediasolution.altervista.org/blog/import-jvc-gy-hm650u-video-to-pc-mac/
For Windows users:
you can choose "AVI/WMV/MPEG-2" as output format for editing with Sony Vegas/Pinnacle/Premiere/Avid/Cyberlink/Windows Movie Maker.
3. Do some settings as you want, like output resolution and bitrate.
4.Transcode JVC GY-HM650U videos to compatible format for editing.
At last, hit the "Convert" button to transcode GoPro Hero MXF, MOV, AVCHD, MP4 clip on PC/Mac.
With this JVC GY-HM650U video converter, you can easily change JVC GY-HM650U MXF, MOV, AVCHD, MP4 video files to PC/Mac in Sony Vegas, Pinnacle, Premiere, Avid, Cyberlink, Windows Movie Maker, FCP X, iMovie or Avid MC for editing. This software runs fast, so you can convert your JVC footages in less time, video and audio synchronization are perfectly guaranteed.
Related video transferring guides:
Import media to FCP X.
Best workflow to import videos and projects into iMovie
Manage videos, projects, and media onto Avid Media Composer
More related tips:
Transcode JVC GY-HM650U ProHD MXF to ProRes 422 LT for FCP 6/7
Encode JVC GY-HM650U ProHD MXF to Multi-track MOV for Sony Vegas Pro 12
How to edit JVC GY-HM650U MXF, MOV, AVCHD, MP4 on Mac?
Making Nature Film from Canon Camera and Upload on Youtube and Vimeo
Share ALS Ice Bucket Challenge videos on Youtube/Vimeo
Upload MXF/MTS/MOV Videos from Cameras for TV channel
Source: http://digitalmediasolution.altervista.org/blog/import-jvc-gy-hm650u-video-to-pc-mac/
MXF files cannot work with FCP? Don't worry about it! In the following page, you can get a fixer as a good assistant.As we all know that due to the video codec limitation, for the container format MXF, it is not so suitable with the FCP. So for our Mac users, how could we make it possible to smoothly import MXF files in FCP for a nice editing? Firstly, you can take the third-party plug-in as a try, or the second method could be your favorite. With a goos repuatation online, the program we introduced below can make you work MXF files well with Final Cut Pro X. Why not have a try?  Fixer One. Canon FCPX plug-in---Only for Canon users Canon provide a free plug-in to enable the C300's MXF files to import directly into FCPX without the need to transcode to ProRes. Many users report that they have no problems with the installation and it 'just works'. However, other users with similar setups report that they cannot import C300 rushes in FCP X, though it works through Log and Capture in FCP7, additionally Adobe Premiere successfully imports C300 MXF. Only FCP X seems affected, and for a limted subset of FCP X users.
  Here's the typical scenario: having run the xpfm211 installer. FCPX sees the folder structure, even the MXF files themselves, but does not recognise either. This is as far as some users get. For some reason, the installer has completed successfully, we are seeing files, but nothing imports. De-installing and re-installing brings the user back to this situation. Very frustrating.
  Trying to track the activity of the installer, we see two new plug-ins highlighted in the MIO/RAD/Plugins folder – CanonE1.RADPlug and CanonXF.RADPlug. The latter would appear to be the 'magic smoke' for the MXF format. However, this isn't working. There's a second empty RADPlugins folder below – should the plugins be in there?
  Here's where it got interesting. I was able to confer with another editor who had a system that did import MXF successfully. The key difference was that he had a CanonXF64.RADPlug folder – not an XF, an XF64. I could not find a similar folder, nor could I make the installer create one. In the end, he just sent me a copy of that folder, and I dragged and dropped it into the same folder I had.
  And it worked! It's pretty obvious because you can see the clips, but also note that the MXF folder heirachy has gone, replaced simply with the usual list of clips on a card or archive.
  Fixer Two. Pavtube MXF Converter for Mac/iMixMXF --- for other users As a professional kind of MXF to FCP converter, this program has a good reputation on the Internet. ***With the easy operation, concise interface, various output choices, it can handle all the MXF files well in FCP.*** (to get more coupons, you can view here) Tips: iMixMXF is a MXF converting tool that can output multiple audio tracks if you need. Especially for MXF file folder, it indeed has the unique function. (Learn more>>) Follow my steps here, we can learn the main tips on how to make MXF converted to ProRes .mov for FCP with this MXF Converter for Mac. When you install it correctly on your computer, With 'Add video' you can load MXF files in this program. There are several types of ProRes Codec on the output list, 'Apple ProRes Codec 422 HQ (*.mov) can hold your quality well. Then in the 'Settings' item, we can set our personal video size, bitrates, frame rate or even audio channel, etc. (Learn Types of Apple ProRes Codecs)
  Back to the main interface, hit the 'Convert' to start your conversion, Screen shot below can show you the more details. Any other advice and suggestion you can reflect to us. See Also:
Source: http://mediaconverting.blogspot.com/2014/11/work-mxf-files-in-fcp.html
Back to the main interface, hit the 'Convert' to start your conversion, Screen shot below can show you the more details. Any other advice and suggestion you can reflect to us. See Also:
Source: http://mediaconverting.blogspot.com/2014/11/work-mxf-files-in-fcp.html
From memory card and Hard Drive, how could we import AVCHD MTS files to Final Cut Pro X?
Part 1. Some tips to make it smoother to get those .MTS files off of a memory card or hard drive – and without the need to connect the camera to your Mac.
Just for Premiere Pro CS5 or CS5.5's liberal file support, you know that it's easy to simply import an AVCHD .MTS file from any location by simply using the "Import…" dialog – or even just dropping the file into the Project window.
 When working with AVCHD footage in FCP X, the key to importing .MTS files is to use the "Import from camera…" dialog and NOT the "Import…" dialog. This is true when using either a memory card or importing the footage from your hard drive.
 Whenever I import media into a non-linear editor, I have already put it onto a hard drive (usually an external drive). When working with AVCHD footage and FCP X, it is important to copy the entire file structure to your hard drive. You don't want to just grab the .MTS files and put them in another folder for later work in FCP X.
 Now, you can navigate to the folder containing your footage and choose the top level file folder. You can choose other folders down to the folder named "AVCHD" (going down to the "STREAM" folder won't work). If you want to only import some of the files, you can select your clips in and even selected portions of the clips and choose "Import Selected."
 Unfortunately, troubles you will meet here: It is not so easily to import multiple sub-clips from a single clip. If you select a range (i.e., mark in/out points) within one clip, any attempt to select another range from that same clip (or any other clip, for that matter) will deselect the first range.
 Part 2. Pavtube MTS/M2TS Converter for Mac, which is a nice assistant can make up the shortage. (To get more coupons, you can view here.)
See also: Top 5 MTS/M2TS Converter for Mac Reviewed
Part 2. Pavtube MTS/M2TS Converter for Mac, which is a nice assistant can make up the shortage. (To get more coupons, you can view here.)
See also: Top 5 MTS/M2TS Converter for Mac Reviewed
 With the easy operation and strong function of supporting abundant files imported at the same time,**** it can handle all AVCHD files well. ****More typical features you can follow here or some conversion steps you can take a reference.-------- No matter for memory card or hard drive, you can smoothly import them into FCP X with this program. --------
More:
Source: http://handycameratips.jimdo.com/2014/12/03/move-avchd-from-memory-card-to-fcp-x/
With the easy operation and strong function of supporting abundant files imported at the same time,**** it can handle all AVCHD files well. ****More typical features you can follow here or some conversion steps you can take a reference.-------- No matter for memory card or hard drive, you can smoothly import them into FCP X with this program. --------
More:
Source: http://handycameratips.jimdo.com/2014/12/03/move-avchd-from-memory-card-to-fcp-x/