2015年10月14日星期三

Will the Xbox One/360 receive H.265 4K support? Not Yet!


“Would it be possible for Microsoft to release a software update that would give the Xbox One the capability to play HEVC (H.265) 4K video, or would I have to wait for the ninth generation of video game consoles to be able to do that?” – From answers.microsoft.com


4K resolution is widely predicted to be the main development trend of video resolution, which is on the way to all of us. While, High Efficiency Video Coding is the latest video compression standard that promises to deliver visual quality equivalent to H.264 with up to 50% bitrate savings (H.265 vs H.264). In most cases, to get higher video quality and definition for playback via Xbox One/Xbox 360. 

I would love the ability of being able to play H.265 encoded media through my Xbox One. Do you have the similar ideas? Fine, according to the Xbox’s supported formats limitation, it seems a little important to find some H.265/HEVC to Xbox converters to solve the issues, right? 

Fortunately, you can depend on Pavtube Video Converter since Xbox One/Xbox 360 is included in its output. Why we called this program as the Xbox video converter? Because it can convert those Xbox unsupported video formats for playback smoothly.


Steps on How to play H.265 4K videos on Xbox One/Xbox 360

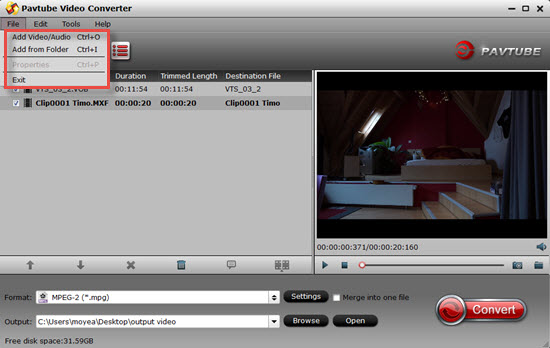
Step 1: Add H.265 videos to the H.265 to Xbox converter

Download, install and launch the Xbox Video Converter. When the main interface pops up, you can see some buttons also with a preview window on the right. Click “Add video” button to load your H.265 4K videos or directly drag the footage to the program. If you want to load H.265 4K files at once, you can click “Add from folder” to meet your needs. You should wait a little longer if you got large files.


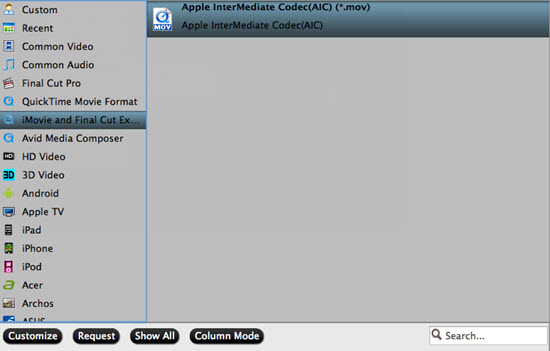
Step 2: Choose output format

Go to the format bar to select the “Zune/Xbox 360 Device -> Xbox 360 HD Video (*.wmv)” as your output format. From H.265/HEVC to HD WMV, that’s the key to play H.265 movies on Xbox.


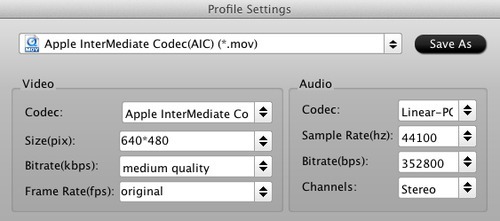
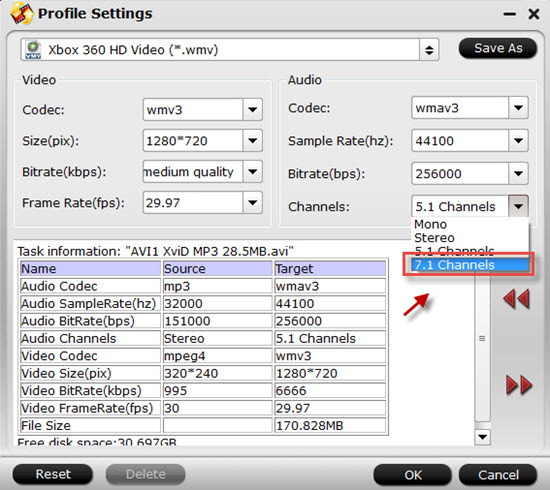
Step 3: Custom Video or Audio Settings for Xbox One/360

If the default A/V settings cannot fit your needs, you can click “Settings” button to custom the output video and audio settings by yourself. But if you are not good at it, you’d better use the default parameters, they will ensure you a good balance between file size and image quality basically.


Step 4: Convert H.265 4K video for Xbox One/360

The built-in editing function provided by H.265 to Xbox Video Converter is something worth trying. To trim the video, add artistic effects, adjust audio, add watermark, customize video parameters and so on. You can get the work done splendidly. Of course, if you don’t think it’s a necessary to do, you can skip it and move onto the next step directly.

Step 5: Press the “Convert” button on the bottom-right corner of this H.265/HEVC to Xbox One Video Converter to start performing video conversion.

Now, you can see the conversion progress. And the conversion speed is mainly affected by the size of files that you’re converting and your computer’s performance. Once the conversion process shows in 100%, click “Open” to get the output videos. In addition, check “Shut down computer after conversion” and you can go away without keeping an eye on it.

Tips:

1. For Mac users, Pavtube Video Converter for Mac can run on Mac OS X 10.10 Yosemite system smoothly.

2. Maybe you are a newbie to this Xbox One or Xbox 360, how to stream files into Xbox 360 or Xbox One may shed some light on your using progress.Further Reading:
More 

How to Watch ISO Movies in 3D With Nvidia 3D Vision 
How-To: Get TiVo shows onto your Android for on-the-go viewing 
H.265 to PPro: Edit Samsung NX1 H.265 in Premiere Pro CC on Mac Yosemite 
Best Canon MXF Converter : Ingest Canon MXF into FCE 
Convert DJI Inspire 1 4K Files to 1080p for Editing on Mac/PC 
Convert and Transfer Sony XDCAM footage to QuickTime MOV on Mac 
Can I play Sony XDCAM EX MP4 video with QuickTime 
Merge/Join hard drive camera recored MTS videos into one with no conversion 

Src 

How to Play H.265 4K Videos on Xbox One/Xbox 360?

Is it possible to import Zenmuse X5 and X5R 4K videos to iMovie?


DJI recently announced their new ZENMUSE X5 and ZENMUSE X5R of Micro Four Thirds Cameras for the Inspire 1 drone system. Featuring increased dynamic range, interchangeable lens compatibility, remote focus and aperture control, and lossless RAW 4K video recording, the ZENMUSE X5 series is ready to take on the high-performance world of aerial photography with two distinct models. 


After recording 4K video footage with the two aerial cameras, you may wish to polish the video with some NLE editing program such as iMovie on Mac. But iMovie doesn’t read 4K video with H.265/4K MXF/RAW/XAVC codec perfectly, you may encounter video disordered, picture stunning and some other problems. What should we do to edit Zenmuse X5 X5R 4k video in iMovie smoothly? 

The easiest workaround is to convert Zenmuse X5 and X5R 4K footage to a more editing-friendly format, such Apple InterMediate Codec for iMovie. The process is surprisingly easy and can be done with the help of Pavtube 4K Video Converter for Mac. The program lets you convert Zenmuse X5 X5R 4k video to AIC encoded MOV, which ensures maximum editing quality and efficiency when importing videos to iMovie (no matter iMovie HD, iMovie 08, iMovie 09, or iMovie 11) in a few clicks.


Other Download:


Transcode Zenmuse X5/X5R 4k video to AIC for iMovie on Mac 

Step 1. Add your raw Zenmuse X5/X5R 4K videos 

Run the program you just set up. Drag and drop Zenmuse X5/X5R 4K video files to the converter. You can also hit “Add video” and “Add from folder” buttons to import videos to the app. If you wanna combine several videos into one file, you can click the “Merge into one” beside the preview window. 


Step 2: Choose the right one for iMovie 

Follow my steps to come to the output list, here we can find the suitable one for iMovie. As we mentioned above, we can select the “Apple InterMediate Codec (*.mov)” from the “iMovie/Final Cut Express” item. 


Step 3. Adjust settings (Optional) 

Before conversion, you can click the “Settings” icon to customize the video/audio settings including the Bitrate of Video and Audio, Audio, Video Size, Sample Rate, Frame Rate, Audio Channels, etc for iMovie. Such a nice functional feature we cannot miss it! 

Step 4. Start conversion 

In the end, when you finish the preparation work it’s time to hit the “Convert” to get our work ended. After the conversion, click “Open” to locate the result videos and then launch iMovie, choose “File > Import > Movies…”, to import the converted 4K video into iMovie; prepare for editing. You will find that it’s just a piece of cake to edit Panasonic Zenmuse X5/X5R 4K files in iMovie. 

More 

How to Watch ISO Movies in 3D With Nvidia 3D Vision 
How-To: Get TiVo shows onto your Android for on-the-go viewing 
H.265 to PPro: Edit Samsung NX1 H.265 in Premiere Pro CC on Mac Yosemite 
Best Canon MXF Converter : Ingest Canon MXF into FCE 
Convert DJI Inspire 1 4K Files to 1080p for Editing on Mac/PC 
Convert and Transfer Sony XDCAM footage to QuickTime MOV on Mac 
Can I play Sony XDCAM EX MP4 video with QuickTime 
Merge/Join hard drive camera recored MTS videos into one with no conversion 

Src 

Import Zenmuse X5 and X5R 4K videos to iMovie on Mac 

Upgrade! Pavtube Mac Now Support El Capitan


The newly arrived Mac OS X El Capitan featuring the ability to run multiple apps is fantastic. But people are out of luck to entertain themselves with various media files on the new operating system since most Mac video conversion application are not updated with support for El Capitan. To get all those issues fixed up, Pavtube Studio 
Pavtube Sutio has recently updated all its Mac Blu-ray/DVD/Video products with perfect support for Mac’s new operating system - Mac OS X El Capitan. Products that works compatible well with El Capitan including: Pavtube Video Converter for MacPavtube HD Video Converter for MacPavtube MTS/M2TS Converter for MacPavtube MXF Converter for MacPavtube iMixMXFPavtube BDMagic for MacPavtube ByteCopy for MacPavtube DVDAid for MacPavtube iMedia Converter for Mac


Copy/Backup Blu-ray/DVD on El Capitan 
Have problem to copy/backup Blu-ray/DVD disc on Mac OS X El Capitan, never mind, with Pavtube newly upgraded Blu-ray/DVD products, you will get no difficulty to make a full disc copy or the main movie copy of the original 2D/3D Blu-ray/DVD disc on Mac OS X El Capitan. Besides that, the program also enables you to rip/convert Blu-ray/DVD disc to various different file formats on El Capitan platform for playing on iPhone/iPad/iPod, Android phone and tablets, Windows phones or tablets, game consoles, HD media players, streaming to Apple TV/Amazon Fire TV/Roku, etc. 

Play and edit videos on El Capitan 
Play and edit any video files on Mac OS X El Capitan can also be easily achieved with Pavtube upgraded Mac Video Converter applications. You can effectively convert virtually any file formats including AVI, WMV, MP4, MOV, FLV, VOB, MKV, MKV, MTS, M2TS, Tivo, H.265 in SD, HD, 2K, 4K videos to your desired file formats or devices and programs optimized file formats for better viewing. For camera and camcorder users, you will have a fast and fluid workflow on Mac OS X El Capitan with our program by exporting professional video editing codec such as Apple Prores Codec for Final Cut Pro 6/7/x, Apple Intermediate Codec(AIC) for iMovie/Final Cut Express, DNxHD MOV for Avid Media Composer, After Effects CC/Adobe Premiere Pro/Adobe Premiere Elements/Sony Vegas specially optimized file formats, etc. 

Other downloads: 

BDMagic for Mac 
- Pavtube old official address: http://www.pavtube.cn/blu-ray-ripper-mac/ 
- Cnet Download: http://download.cnet.com/Pavtube-BDMagic/3000-7970_4-76177782.html 

ByteCopy for Mac 
- Pavtube old official address: http://www.pavtube.cn/bytecopy-mac/ 
- Cnet Download: http://download.cnet.com/Pavtube-ByteCopy/3000-7970_4-76177783.html 

iMedia Converter for Mac 
- Pavtube old official address: http://www.pavtube.cn/imedia-converter-mac/ 
- Cnet Download: http://download.cnet.com/Pavtube-iMedia-Converter/3000-2194_4-76177788.html 

Video Converter for Mac 
- Pavtube old official address: http://www.pavtube.com/video-converter-mac/ 
- Amazon Store Download: http://www.amazon.com/Pavtube-Video-Converter-Mac-Download/dp/B00QIBK0TQ 
- Cnet Download: http://download.cnet.com/Pavtube-Video-Converter/3000-2194_4-76179460.html 

HD Video Converter for Mac 
- Pavtube old official address: http://www.pavtube.com/hd-video-converter-mac/ 
- Amazon Store Download: http://www.amazon.com/Pavtube-Video-Converter-Mac-Download/dp/B00QI9GNZS 
- AppStore Download: https://itunes.apple.com/de/app/pavtube-hd-video-converter/id502792488?mt=12 
- Cnet Download: http://download.cnet.com/Pavtube-HD-Video-Converter/3000-2194_4-76177786.html 

MTS/M2TS Converter for Mac 
- Pavtube old official address: http://www.pavtube.com/mts-converter-mac/ 
- Amazon Download: http://www.amazon.com/Pavtube-MTS-M2TS-Converter-Download/dp/B00QIE3U0Y 
- Cnet Download: http://download.cnet.com/Pavtube-MTS-M2TS-Converter/3000-2194_4-76177029.html 

MXF Converter for Mac 
- Pavtube old official address: http://www.pavtube.com/mxf-converter-mac/ 
- AppStore Download: https://itunes.apple.com/us/app/pavtube-mxf-converter/id502807634?mt=12 
- Amazon Download: http://www.amazon.com/Pavtube-MXF-Converter-Mac-Download/dp/B00QID8K28 
- Cnet Download: http://download.cnet.com/Pavtube-MXF-Converter/3000-2194_4-76177789.html 

iMixMXF 
- Pavtube old official address: http://www.pavtube.com/imixmxf-mac/ 
- Amazon Download: http://www.amazon.com/Pavtube-Studio-iMixMXF-Download/dp/B00QI7MY4Y 
- Cnet Download: http://download.cnet.com/Pavtube-iMixMXF/3000-2194_4-76171460.html 

Further Reading: 

2015年10月12日星期一

Load Video Recording by Sony PXW-FS5 4K XAVC to Premiere Pro CC on Mac for editing


Summary: Due to the Video Recording by Sony PXW-FS5 4K XAVC can’t uploading to Premiere Pro CC on Mac for editing? here we give some simple tips to solve this unhappy things. 

Hot SearchCompress 4K Videos to 1080p | 4K Videos to Apple TV | PXW-FS5 4K XAVC to FCP X 

“I have captured some videos clips about 20 or so with my new Sony PXW-FS5, the recordings are in XAVC format with 4K resolution. I would like to uploading them to Premiere Pro CC on Mac for editing. But the problem is, there is a pop-up window indicate that the video format may not supported right now, I want to find some apps can import the Sony PXW-FS5 4K XAVC/AVCHD to Premiere Pro CC. Can anyone suggest something to help me out?” 

As for Sony PXW-FS5, here is a closer look at the frame rates and resolutions: 


Recording from above, the video format recorded by Sony PXW-FS5 are not supported by Premiere Pro CC. We should make video formats most suitable for uploading to Premiere Pro CC with best effects. Here I recommend you a professional software to handle this issue–Pavtube HD Video Converter for Mac, It can easily make the video recording by Sony PXW-FS5 converted to Premiere Pro CC suitable format like the common .mpg-2 format. 


Other Download: 
- Pavtube old official address: http://www.pavtube.com/hd-video-converter-mac/ 
- Amazon Store Download: http://www.amazon.com/Pavtube-Video-Converter-Mac-Download/dp/B00QI9GNZS 
- AppStore Download: https://itunes.apple.com/de/app/pavtube-hd-video-converter/id502792488?mt=12 
- Cnet Download: http://download.cnet.com/Pavtube-HD-Video-Converter/3000-2194_4-76177786.html 

Load Video Recording by Sony PXW-FS5 4K XAVC to Premiere Pro CC on Mac for editing 

Step 1: Transfer Sony PXW-FS5 4K XAVC/AVCHD video footage to Mac hard drive. 

The Sony PXW-FS5 camera store recorded H.265 video on external SD card, you can remove the card out of your camera and insert the SD card into an SD card reader and then connect the card reader to your computer. The card reader will appear on your Mac desktop, double click on the card reader icon and a window will open to show all the files stored on the card. 

Step 2: Import Sony PXW-FS5 4K XAVC/AVCHD files. 

Start and open the program on your Mac computer, from “File” menu drop-down options, select “Add Video/Audio” or “Add from folder” to import your source camera files to the computer. 


Step 3: Select Adobe Premiere Pro CC optimized output file format. 

Click “Format” drop-down bar, from its extended list, select “Adobe Premiere/Son…” > “MPEG-2 (*.mpg)” as the output file format, you can also select to output Adobe Premiere Pro WMV or MOV file format according to your own preference. 


Step 4: Convert Sony PXW-FS5 4K XAVC/AVCHD to Premiere Pro CC MPEG-2. 

Go back to the main interface, tap the right-bottom “Convert” button to start the Sony PXW-FS5 4K XAVC/AVCHD video to Adobe Premiere Pro conversion process. 

When the conversion is completed, import converted media files to Adobe Premiere Pro CC for further professional post-production with no limitation. 


2015年10月9日星期五

Best Canon MXF Converter : Ingest Canon MXF into FCE


Summary: If you are facing problems with Canon XF305/XF105/XF100/XF300/C300/C500 MXF when importing to Final Cut Express, you can follow this article to find the solution and solve it. 


Canon MXF high-end camcorders, Canon C300, C500 and XF series, like XF305, XF100, XF105, XF300, are more and more popular for photographer, cameraman and other people thanks to its high quality videos. These excellent camcorders record high-definition video footages in .mxf format. It’s good to maintain the high quality of the video by using MXF format, but this format is not compatible with editing software and other portable devices. 

For example, you may encounter many problems when you want to import MXF to Final Cut Express on Mac. To get those MXF files work normally in FCE without rendering time, the best solution here is to encode MXF to something that FCE can read easily. 

After googling, we will get that Apple InterMediate Codec is the one that can be supported by FCE. So you will need a professional MXF Converter for Mac to help you to convert Canon MXF files to AIC MOV for FCE . 

Here Pavtube MXF Converter for Mac is highly recommended as it is an easy-to-use and intuitive Mac tool for camcorder users. It is good at converting MXF recordings shot by Panasonic P2, Canon XF series and Sony XDCAM camcorders to formats compatible with your video editing software like Final Cut Express, iMovie, Final Cut Pro (X), Avid Media Composer, Adobe Premiere, and more. Below is a brief guide for you. 

Step-by-step guide- Convert Canon MXF files to AIC for FCE editing 

Step 1: Import Canon MXF files to the top MXF to AIC Converter. 

Launch the MXF to FCE Converter. Click the button “File” to add Canon MXF files to it or directly drag and drop the files your MXF files. If it is necessary, you can double click the each file to have a preview. 


Tips: If you have multiple Canon MXF files, you can select the “Merge into one” box to merge the files into one single file for FCE so that you can play these files without interruption. 

Step 2: Select an output format for FCE and set the output folder. 

Click on the “Format” and you will get a dropdown menu. Move you pointer to iMovie and Final Cut Express > Apple Intermediate Codec(AIC) (*.mov). It is the compatible format for FCE. Then you can set the output folder by clicking “Browse” icon as you need. 


Step 3: Click “Settings” icon to adjust audio and video parameters. 

Click the “Settings” icon and you will go into a new interface named “Profile Settings”. You can adjust codec, bit rate, frame rate, sample rate and audio channel in the interface according to your needs and optimize the output file quality. 


Note 1
: You’d better set the video frame rate as 30fps, video size as 1920*1080 to keep the best quality for editing in FCE. If you want to have a smaller file size but keep the good quality, you can change the video size to 1440*1080. 

Note 2: You can customize the defaults and save them as custom conversion settings without affecting the original default selection. 

Step 4: Start to convert Canon MXF files to AIC for Final Cut Express. 

Click the “Convert” button, it will convert Canon MXF files to AIC for FCE on Mac immediately. You can find the process in the “Conversion” interface. 

When the MXF to AIC conversion process is 100% completed, you will be able to get the output files for FCE by clicking on “import” button effortlessly. 

Now you can easily import Canon MXF files to FCE for editing with high quality without any trouble. 

How to import the converted files into FCE to do post-production?
  • Run Final Cut Express, follow File > Import > Files…


More 

Turn MKV Files to MP4 into Sony TV 
Transcode MPEG-2 to Windows Media Player for Editing 
H.265 to PPro: Edit Samsung NX1 H.265 in Premiere Pro CC on Mac Yosemite 
Importing Canon T4i/650D h.264 footage in iMovie Mac 
Convert TiVo to H.265 for Playback on Windows 10/Mac OS X El Capitan 
Insert 3D M2TS to SBS/Red-cyan MP4 for Sharing 
Get mts Videos from JVC Everio GZ-HM330SAA into FCP 
Transcode MOV to Samsung LED/LCD/3D Sm 


Src 
Best Canon MXF Converter