Summary: If you are facing problems with Canon XF305/XF105/XF100/XF300/C300/C500 MXF when importing to Final Cut Express, you can follow this article to find the solution and solve it. Canon MXF high-end camcorders, Canon C300, C500 and XF series, like XF305, XF100, XF105, XF300, are more and more popular for photographer, cameraman and other people thanks to its high quality videos. These excellent camcorders record high-definition video footages in .mxf format. It’s good to maintain the high quality of the video by using MXF format, but this format is not compatible with editing software and other portable devices. For example, you may encounter many problems when you want to import MXF to Final Cut Express on Mac. To get those MXF files work normally in FCE without rendering time, the best solution here is to encode MXF to something that FCE can read easily. After googling, we will get that Apple InterMediate Codec is the one that can be supported by FCE. So you will need a professional MXF Converter for Mac to help you to convert Canon MXF files to AIC MOV for FCE . Here Pavtube MXF Converter for Mac is highly recommended as it is an easy-to-use and intuitive Mac tool for camcorder users. It is good at converting MXF recordings shot by Panasonic P2, Canon XF series and Sony XDCAM camcorders to formats compatible with your video editing software like Final Cut Express, iMovie, Final Cut Pro (X), Avid Media Composer, Adobe Premiere, and more. Below is a brief guide for you. Step-by-step guide- Convert Canon MXF files to AIC for FCE editing Step 1: Import Canon MXF files to the top MXF to AIC Converter. Launch the MXF to FCE Converter. Click the button “File” to add Canon MXF files to it or directly drag and drop the files your MXF files. If it is necessary, you can double click the each file to have a preview.  Tips: If you have multiple Canon MXF files, you can select the “Merge into one” box to merge the files into one single file for FCE so that you can play these files without interruption. Step 2: Select an output format for FCE and set the output folder. Click on the “Format” and you will get a dropdown menu. Move you pointer to iMovie and Final Cut Express > Apple Intermediate Codec(AIC) (*.mov). It is the compatible format for FCE. Then you can set the output folder by clicking “Browse” icon as you need.
  Step 3: Click “Settings” icon to adjust audio and video parameters. Click the “Settings” icon and you will go into a new interface named “Profile Settings”. You can adjust codec, bit rate, frame rate, sample rate and audio channel in the interface according to your needs and optimize the output file quality.
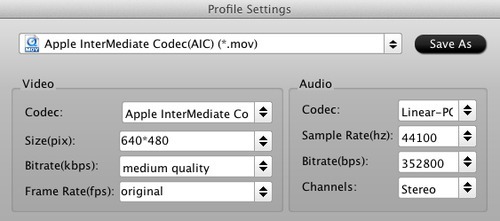
Note 1: You’d better set the video frame rate as 30fps, video size as 1920*1080 to keep the best quality for editing in FCE. If you want to have a smaller file size but keep the good quality, you can change the video size to 1440*1080. Note 2: You can customize the defaults and save them as custom conversion settings without affecting the original default selection. Step 4: Start to convert Canon MXF files to AIC for Final Cut Express. Click the “Convert” button, it will convert Canon MXF files to AIC for FCE on Mac immediately. You can find the process in the “Conversion” interface. When the MXF to AIC conversion process is 100% completed, you will be able to get the output files for FCE by clicking on “import” button effortlessly. Now you can easily import Canon MXF files to FCE for editing with high quality without any trouble. How to import the converted files into FCE to do post-production?
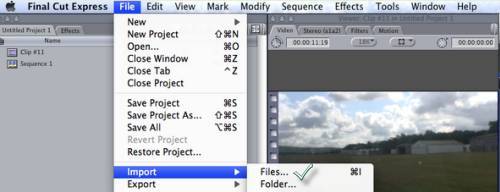
- Run Final Cut Express, follow File > Import > Files…
More Turn MKV Files to MP4 into Sony TV Transcode MPEG-2 to Windows Media Player for Editing H.265 to PPro: Edit Samsung NX1 H.265 in Premiere Pro CC on Mac Yosemite Importing Canon T4i/650D h.264 footage in iMovie Mac Convert TiVo to H.265 for Playback on Windows 10/Mac OS X El Capitan Insert 3D M2TS to SBS/Red-cyan MP4 for Sharing Get mts Videos from JVC Everio GZ-HM330SAA into FCP Transcode MOV to Samsung LED/LCD/3D Sm Src Best Canon MXF Converter
Summary: This step-by-step tutorial shows you how to convert MKV to Sony TV best accepted format with MKV to Sony TV Converter.  The MKV is an open standard free container format, a file format that can hold an unlimited number of audio, video, subtitle tracks or picture in one file. This format offers a richer media experience than any other current format, this makes MKV a popular choice for making back-ups of DVD and Blu-ray discs that you could also play on a computer connected to a TV. "I have bought a brand new Sony TV. The problem is that it does not recognize MKV video files. I’m able play AVI and MP4 formats, but not MKV videos. Can anyone help?" According to Sony's official site, Sony TV support MKV format. However, in most cases, you'll find your MKV files can't be played on Sony TV. It's so strange, isn't it? There is a strong possibility that your MKV files contains DTS audio (Different MKV files are with different audio codecs). Sony TV has poor compatibility with DTS audio. In a case like this, you have to make audio stream in MKV files compatible with Sony TV. It sounds a bit complicated. Actually, it's very easy as long as you have a professional MKV to Sony TV converter. Here, you can turn to Pavtube Video Converter, which is just the top MKV to Sony TV converter to convert MKV to Sony TV format. It can also convert other videos like MOV, FLV, Xvid, AVI, RMVB, RM, TS, VOB, 3GP, 3G2, OGV, MVC, DV, MXF, and etc to Sony TV. If you are running on Mac operating system, you can refer to the equivalent version-Pavtube Video Converter for Mac. This program ensures maximum editing quality and efficiency. What’s more, the additional video editor enables you to personalize videos before conversion.
 Other Download: - Pavtube old official address: http://www.pavtube.com/video_converter/ - Amazon Download: http://download.cnet.com/Pavtube-Video-Converter/3000-2194_4-75734821.html - Cnet Download: http://download.cnet.com/Pavtube-Video-Converter/3000-2194_4-75734821.html How to watch MKV files on Sony TV? Step 1: Download and have a quick installation. The trial version will have a watermark on your converted files. Except for that, there are no time limitation, no virus, and no unnecessary bundle apps while downloading. After that, click "Add Video" button to load MKV files. You can load several files at once thanks to "Add from folder" button.
  Step 2: Here, you need to choose what you want the output to be. Click "Format" drop-down list, and then select output video format from the powerful converter. Here, you’d better choose "TVS>>SONY TV (*.mp4)".
  Step 3: Adjust video and audio parameters, including the bit rate of video and audio, the codec of video and audio, video size, sample rate, frame rate, audio channels, etc., in the Profile Settings by hitting "Settings" button. Step 4: Click "Convert" button to start the conversion work. You can get the generated files by clicking "Open" button. Conclusion: If you don’t want to wait for the entire conversion process, you can tick off "Showdown computer when conversion completed" and go away to do other things. Further Reading:
Facebook Weekend Promotion Here : Learn More: http://bit.ly/1hmOn34 Source: http://bestvideoking.blogspot.com/2015/09/watch-mkv-files-on-sony-tv.html
Step 3: Adjust video and audio parameters, including the bit rate of video and audio, the codec of video and audio, video size, sample rate, frame rate, audio channels, etc., in the Profile Settings by hitting "Settings" button. Step 4: Click "Convert" button to start the conversion work. You can get the generated files by clicking "Open" button. Conclusion: If you don’t want to wait for the entire conversion process, you can tick off "Showdown computer when conversion completed" and go away to do other things. Further Reading:
Facebook Weekend Promotion Here : Learn More: http://bit.ly/1hmOn34 Source: http://bestvideoking.blogspot.com/2015/09/watch-mkv-files-on-sony-tv.html
Summary: Having troubles when importing Sony PXW-X70 XAVC MXF files to Premiere Elements for a nice editing? Want to know the best way to import Sony PXW-X70 XAVC MXF files to Premiere Elements and edit with Premiere Elements native codec? You may have interest to read this article.  Whatever for Mac users or Windows users, some popular editing software may be taken as good assistants if you are a professional video editor. As Mac users have FCP, Windows users always take Premiere as their favorite. With hundreds of features worthy of listing, some problems or unwanted gaps may appear when editing. For example, Sony PXW-X70 XAVC MXF files to Premiere Elements importing issues. "Just got the Sony PXW-X70 and I can’t seem to open its XAVC MXF or even successfully transcode the video files into something that can be read by Premiere Elements. I downloaded several video tools and neither of them works. They just are able to import the audio but not the video portion. Very frustrated here, any advice?" "I have purchased Sony PXW-X70 camcorder last week. Since I got it I always take it when I go traveling. I have recorded several 1080p videos with Sony PXW-X70 and the recordings are in two video formats. One is XAVC and another is AVCHD, when I try to import the XAVC MXF files to Premiere Elements on my PC, the Premiere Elements says the video formats are not supported to import, can you help me?" To be frank, recently on some recording forums there are a few of Sony PXW-X70 users complained that Premiere Elements can’t recognize the Sony PXW-X70 recorded XAVC MXF files. If you read the detail description of Premiere Elements on official website, you will get the info that MPEG-2 is the native codec for Premiere Elements. Once you convert Sony PXW-X70 XAVC MXF files to Premiere Elements best accepted MPEG-2, your importing and editing problem will be solved. Here we recommend you to take a free try on Pavtube Video Converter, which is an all-in-one video program. Other Download: - Pavtube old official address: http://www.pavtube.com/video_converter/ - Amazon Download: http://download.cnet.com/Pavtube-Video-Converter/3000-2194_4-75734821.html - Cnet Download: http://download.cnet.com/Pavtube-Video-Converter/3000-2194_4-75734821.html How to import Sony PXW-X70 XAVC MXF files to Premiere Elements for editing? Step 1: Download and have a quick installation. The trial version will have a watermark on your converted files. Except for that, there are no time limitation, no virus, and no unnecessary bundle apps while downloading. After that, click "Add Video" button to load your XAVC MXF files. You can load several files at once thanks to "Add from folder" button. Step 2: Click the "Format" bar to get the drop-down menu and you can get "Adobe Premiere/Sony Vegas", we suggest you to choose "MPEG-2 (*.mpg)" as the best output format.
  Step 3: Click "Settings" button to customize the output video and audio settings by yourself. But if you are not good at it, you’d better use the default parameters, they will ensure you a good balance between file size and image quality basically. You can change the resolution, bit rate, frame rate as you need. Step 4: When everything is done, you can take a preview by hitting "Play" button. If you are satisfied with the final result, you can click "Convert" button to finish the conversion work. Conclusion: When the conversion is done, you can click "Open" to get your generated files. Now, you can edit Sony PXW-X70 XAVC MXF files in Premiere Elements without any hassles. More related tips:
Facebook Weekend Promotion Here : Learn More: http://bit.ly/1hmOn34 Source: http://mxfworld.jimdo.com/2015/09/17/import-sony-xavc-mxf-files-to-premiere/
Step 3: Click "Settings" button to customize the output video and audio settings by yourself. But if you are not good at it, you’d better use the default parameters, they will ensure you a good balance between file size and image quality basically. You can change the resolution, bit rate, frame rate as you need. Step 4: When everything is done, you can take a preview by hitting "Play" button. If you are satisfied with the final result, you can click "Convert" button to finish the conversion work. Conclusion: When the conversion is done, you can click "Open" to get your generated files. Now, you can edit Sony PXW-X70 XAVC MXF files in Premiere Elements without any hassles. More related tips:
Facebook Weekend Promotion Here : Learn More: http://bit.ly/1hmOn34 Source: http://mxfworld.jimdo.com/2015/09/17/import-sony-xavc-mxf-files-to-premiere/
Summary: Problems occurred when importing H.264 files to Pinnacle Studio. You can fix importing issues by reading the following guide.  H.264 is not a stranger to most people, essentially all of the electronic digital products now support this encoding format. And various extensions of its capabilities have been added in subsequent. The intent of the H.264 project was to create a standard capable of providing good video quality at substantially lower bit rate than previous standards, without increasing the complexity of design so much that it would be impractical or excessively expensive to implement. Pinnacle Studio supports a wide rang video formats although. It is pretty picky with the codec of what it’ll accept. As far as I know Pinnacle Studio doesn’t like H.264 files. If you want to import H.264 to Pinnacle Studio flawlessly, I recommend you to convert H.264 to a more editable format for Pinnacle. The video format that Pinnacle Studio support: AVI File–(.avi) MPEG Files–MPEG-1, MPEG-2 SD & HD, and MPEG-4 – (.mpg, .mpeg, .mod, .mp2, .mp4, .m2ts, .mts, .m1v, m2v. mpv) WMV Files- (.wmv) DIVX–(.avi) MOD (JVC Everio cameras)–(.mod) 3GPP Files–(.3gp) TOD Files–(*.tod) AVCHD–(.m2ts, .mts)–Requires Ultimate or Ultimate Collection Comparing with others, Pavtube Video Converter has the strong ability of transcoding all different videos. With a faster conversion speed and easy operation, it can support most hot media devices and editing programs. Also, I’m sure you’ll be satisfied with some other functional items there. Other Download: - Pavtube old official address: http://www.pavtube.com/video_converter/ - Amazon Download: http://download.cnet.com/Pavtube-Video-Converter/3000-2194_4-75734821.html - Cnet Download: http://download.cnet.com/Pavtube-Video-Converter/3000-2194_4-75734821.html How to import H.264 files to Pinnacle Studio 14/15/16 for editing? Step 1: Download and install the program. Click "Add video" on the main interface to load H.264 files to the program. You can also drag the files to the program’s window list directly. This program can also support the batch video clips. Step 2: Select the right formats for editing in Pinnacle Studio. Here we suggest you to go to the "HD Video" list, you will get the "AVI HD Video (*.avi)"as the best output.
  Step 3: Click "Settings" button to customize the output video and audio settings by yourself. But if you are not good at it, you’d better use the default parameters, they will ensure you a good balance between file size and image quality basically. You can change the resolution, bit rate, frame rate as you need. Step 4: With all the preparations work done? Why not go back to the main interface to click the "Convert" button to get the work started? Conclusion: Once the conversion is finished, click "Open" to quickly find the converted files. Then, Pinnacle Studio 14/15/16 will recognize, catalog, play and stream them just fine. Facebook Weekend Promotion Here : Learn More: http://bit.ly/1hmOn34 More related tips:
Source: http://pc-mac-compatibility-issues.blogspot.com/2015/09/import-h264-to-pinnacle-studio.html
Step 3: Click "Settings" button to customize the output video and audio settings by yourself. But if you are not good at it, you’d better use the default parameters, they will ensure you a good balance between file size and image quality basically. You can change the resolution, bit rate, frame rate as you need. Step 4: With all the preparations work done? Why not go back to the main interface to click the "Convert" button to get the work started? Conclusion: Once the conversion is finished, click "Open" to quickly find the converted files. Then, Pinnacle Studio 14/15/16 will recognize, catalog, play and stream them just fine. Facebook Weekend Promotion Here : Learn More: http://bit.ly/1hmOn34 More related tips:
Source: http://pc-mac-compatibility-issues.blogspot.com/2015/09/import-h264-to-pinnacle-studio.html
Summary: If you have Panasonic FZ300 4K to FCP/Premiere/Avid importing issues, this article will shed you some lights on how to make NLEs work with FZ300 4K recordings. 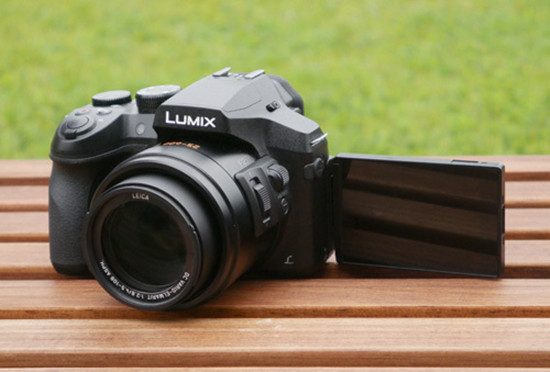 Panasonic FZ300 is a new 4K camcorder for us, which can shoot high-resolution 4K QFHD video in MP4 format. As new to Panasonic FZ300, you may concern the Panasonic FZ300 4K workflow like how to import Panasonic FZ300 4K video to FCP/Premiere/Avid for editing. Generally, Final Cut Pro, Adobe Premiere Pro, Avid Media Composer can’t support MP4 format well which is not an ideal format for editing. Plus, expect for Final Cut Pro X, Adobe Premiere Pro CC, the old version FCP 6/7, Premiere Pro CS4/CS5/CS6 can’t support 4K video. To edit FZ300 4K video in FCP/Premiere/Avid flawlessly, an ultimate solution is to convert FZ300 4K MP4 files to ProRes MOV for FCP, MPEG-2 MPG for Premiere, DNxHD MOV for Avid. To convert FZ300 4K MP4 to FCP/Premiere/Avid friendly format quickly and easily, a professional and easy-to-use 4K video converter is the key. Here you can depend on Pavtube Video Converter for Mac(review). It provides hundreds of output format presets for 4K videos, such as DNxHD for Avid, Apple ProRes for Final Cut Pro, MPEG-2 for Adobe Premiere, Apple InterMediate Codec for iMovie, etc. Besides, this 4K converter is also available to customize the output resolutions to any size like 1080p, 2K, 4K as users want. It will save you both time and trouble, and all you need to do is to drag the result videos for prompt editing.
 Other Download: - Pavtube old official address: http://www.pavtube.com/video-converter-mac/ - Amazon Store Download: http://www.amazon.com/Pavtube-Video-Converter-Mac-Download/dp/B00QIBK0TQ - Cnet Download: http://download.cnet.com/Pavtube-Video-Converter/3000-2194_4-76179460.html How to convert FZ300 4K videos to FCP/Premiere/Avid? Step 1: Download and have a quick installation. The trial version will have a watermark on your converted files. Except for that, there are no time limitation, no virus, and no unnecessary bundle apps while downloading. After that, click "Add Video" button to load your FZ300 4K MP4 videos. You can load several files at once thanks to "Add from folder" button.
  Step 2: Click the "Format" bar to get the drop-down menu and you can get "Final Cut Pro>>Apple ProRes codec", including ProRes 422, ProRes 422 (HQ), ProRes 422 (LT), ProRes 422 (Proxy) and ProRes 4444. Choose the proper one you want. Here, we suggest you to choose "Apple ProRes 422 (*.mov)" as the best output format.
  Tips: For editing FZ300 4K MP4 in Premiere, choose "Adobe Premiere/Sony Vegas>>MPEG-2 (*.mpg)".
For editing FZ300 4K MP4 in Avid, choose "Avid Media Composer>>Avid DNxHD (*.mov)". Step 3: Click the "Settings" button and set proper video/ audio parameters. My advice is to set the video size, bit rate and fame rate to be exactly as the footages so that you will suffer least quality degradation. If you would like to use default settings, simply skip this step. Step 4: After all necessary settings, hit the "Convert" button to start the conversion work. Conclusion: After conversion, you can get the generated files by clicking "Open" button. Then, you can transfer FZ300 4K videos to FCP/Premiere/Avid without any hassles. If You Want to Get Our Weekend Pavtube Special offer,You can Click Here: http://bit.ly/1hmOn34 More related tips:
Source: http://mediaconverting.blogspot.com/2015/09/import-fz300-4k-videos-to-fcp-premiere-avid.html