Summary: As a consumer-based non-linear video editing software designed for the PC, Sony Movie Studio may be a good choice. This article aims to give you an easy solution to convert Canon C100 Mark II AVCHD MTS to Sony Movie Studio for further editing without hassles. Hot search: Canon Videos on Windows Media Player | Canon MOV to Final Cut Studio | Canon C100 AVCHD to Avid MC | Canon C100 to iMovie | Canon C300 MXF to PowerDirector | Canon C100 to Sony Vegas Pro  The Canon C100 Mark II Cinema EOS Camera with Dual Pixel CMOS AF is Canon's updated version of the C100 designed for event videographers, documentarians, and independent filmmakers. In addition to improved RGB video processing, the camera's dual codec capability supports simultaneous AVCHD and MP4 recording, including 59.94P capture along with slow and fast motion recording. However, due to different reasons, people sometimes may encounter incompatibility issues one or another while importing and editing Canon C100 Mark II footage in Sony Movie Studio. "Not long ago, I purchased the C100 Mark II camcorder. This device has helped me to record a lot of videos since I got it. Today I need to edit few of the videos in Sony Movie Studio, so I tried to import the footages into it, but it is disappointed to find that Sony Movie Studio can"t recognize the AVCHD MTS files recorded by C100 Mark II. It is said the video format is not supported." As we know AVCHD MTS format is great for recording footage from the camera, but it can be a challenge for editing. To solve those problems, the quick workaround is to convert Canon C100 Mark II AVCHD MTS to Sony Movie Studio best accepted format. You can refer to detailed Sony Movie Studio supported formats below: Import: AAC, AA3, AIFF, AVI, BMP, CDA, FLAC, GIF, JPEG, MP3, MPEG-1, MPEG-2, MPEG-4, OGG, PCA, PNG, QuickTime, SND, SFA, W64, WAV, WDP, WMA, WMV Export: AAC, AIFF, AVC, AVI, BMP, FLAC, JPEG, LPEC, MP3, MPEG-2, MPEG-4, OGG, PCA, PNG, TIFF, QuickTime, W64, WAV, WDP, WMA, WMV To achieve the goal, you can use Pavtube Video Converter, which can help you convert AVCHD MTS to Sony Movie Studio compatible video with original quality. Besides, this software can also convert MTS files for editing in FCP, iMovie/FCE, Avid Media Composer, Adobe Premiere, and etc. In addition, you can convert MTS files for playing on VLC, QuickTime and more.
 Other Download: - Pavtube old official address: http://www.pavtube.com/video_converter/ - Amazon Download: http://download.cnet.com/Pavtube-Video-Converter/3000-2194_4-75734821.html - Cnet Download: http://download.cnet.com/Pavtube-Video-Converter/3000-2194_4-75734821.html How to convert Canon C100 Mark II AVCHD MTS to Sony Movie Studio? Step 1: Download and install the program. Click "Add video" on the main interface to load AVCHD MTS videos to the program. You can also drag the files to the program"s window list directly. This program can also support the batch video clips.
  Step 2: Select the right formats for Sony Movie Studio. Here we suggest you to go to the "Adobe Premiere/Sony Vegas" list, you will get the "MPEG-2 (*.mpg)" as the best output.
  Step 3: By clicking the "Settings" button, you can adjust the output video/audio resolution, frame rate, bit rate, etc. to customize the output files to get the best quality you want. Step 4: At this point, you can change the output filename or output path if you wish. If you feel satisfied with your options, Just hit the "Convert" button to activate MTS file to Sony Movie Studio MPEG-2 conversion. Conclusion: This program is highly efficient because it"s boosted with CPU and GPU (30X faster). And a neat process bar will show the percentage and remaining time. When all conversions completed, you"ll get a pop-up notice. Just click "Open Folder", you can fast find where your converted files are saved. Pavtube has summer sale provided for you. The expire date is Aug 7th. Go ahead and seize the chance! More related tips:
Source: Convert Canon C100 Mark II AVCHD MTS to Sony Movie Studio
Step 3: By clicking the "Settings" button, you can adjust the output video/audio resolution, frame rate, bit rate, etc. to customize the output files to get the best quality you want. Step 4: At this point, you can change the output filename or output path if you wish. If you feel satisfied with your options, Just hit the "Convert" button to activate MTS file to Sony Movie Studio MPEG-2 conversion. Conclusion: This program is highly efficient because it"s boosted with CPU and GPU (30X faster). And a neat process bar will show the percentage and remaining time. When all conversions completed, you"ll get a pop-up notice. Just click "Open Folder", you can fast find where your converted files are saved. Pavtube has summer sale provided for you. The expire date is Aug 7th. Go ahead and seize the chance! More related tips:
Source: Convert Canon C100 Mark II AVCHD MTS to Sony Movie Studio
Summary: You may find that Premiere Pro won't import Sony PXW-X320 XAVC clips smoothly. The easy workaround to import and edit Sony PXW-X320 XAVC with Premiere Pro is to convert Sony XAVC to Premiere Pro compatible MPEG-2 .mpg format. Just get the read on to find out more details.  Hot search: Sony PXW-X320 XAVC to FCP | Sony PXW-X320 XAVC to Avid Media Composer | Sony PMW-400 to Adobe Premiere Pro CC | Sony PXW-FS7 to ProRes | Sony Z100 to Sony Vegas 13 | Sony DSC-WX500 to DaVinci Resolve Lite The PXW-X320 supports XAVC offering high quality content creation in the HD domain. In addition to XAVC, MPEG HD422, MPEG HD, MPEG IMX, and DVCAM are supported. Two HD/SD-SDI, HDMI, i.LINK, and composite outputs provide a wide range of AV and IT interfaces. However, if we want to import the XAVC videos from Sony PXW-X320 to Premiere Pro for editing, you may find the high quality XAVC files are not recognized by Premiere Pro. While enjoying the stunning video quality, many folks are having problems when importing Sony PXW-X320 XAVC to Premiere Pro like the below: "We shot a video using PXW-X320 and now when we are trying to import the XAVC files into Premiere Pro, but we are getting an error that says that there may be no codec for Premiere Pro." "Importing Sony PXW-X320 XAVC to Premiere Pro isn't working, it gives us an error." Well, in fact, it's not a "fresh" problem we've met when getting XAVC clips into Premiere Pro. So what's the available workflow for Sony PXW-X320 and Premiere Pro? Although Sony itself generates plug-ins like XAVC/XDCAM Plug-in to enable Premiere Pro ingest Sony XAVC files correctly. However, the plug-in requires the latest version of Premiere. Besides, you'll need to a powerful Mac to edit the highly-compressed XAVC footage in Premiere Pro. So to transfer XAVC files from Sony PXW-X320 to Premiere Pro, a suggestion is to convert XAVC to MPEG-2 .mpg which Premiere Pro works best with. Pavtube HD Video Converter for Mac (review) is the solid tool to help users achieve the goal, applying which you are capable of converting XAVC to MPEG-2 .mpg format with lossless quality at faster speed so that you can edit Sony X320 XAVC in Premiere Pro without any problem. Besides, the program is developed with some useful editing features. It's really an all-in-one and affordable tool for you.
 Other Download: - Pavtube old official address: http://www.pavtube.com/hd-video-converter-mac/ - Amazon Store Download: http://www.amazon.com/Pavtube-Video-Converter-Mac-Download/dp/B00QI9GNZS - AppStore Download: https://itunes.apple.com/de/app/pavtube-hd-video-converter/id502792488?mt=12 - Cnet Download: http://download.cnet.com/Pavtube-HD-Video-Converter/3000-2194_4-76177786.html How to import Sony PXW-X320 XAVC to Premiere Pro for further editing? Step 1: Download and have a quick installation. The trial version will have a watermark on your converted files. Except for that, there are no time limitation, no virus, and no unnecessary bundle apps while downloading. After that, click "Add Video" button to load XAVC video. You can load several files at once thanks to "Add from folder" button.
  Step 2: Click the "Format" bar to get the drop-down menu and you can get "Adobe Premiere/Sony Vegas>>MPEG-2 (*.mpg)" as output format.
 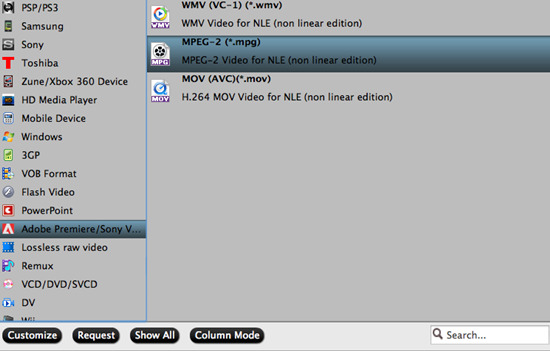 Step 3: Click "Settings" button to customize the output video and audio settings by yourself. But if you are not good at it, you'd better use the default parameters, they will ensure you a good balance between file size and image quality basically. You can change the resolution, bit rate, frame rate as you need. Step 4: Click "Convert" button on the bottom of the screen to start XAVC to MPEG-2 .mpg conversion process. The amount of time it takes will vary based on your system's hardware and the quality settings you selected. Conclusion: When the conversion is done, you can click "Open" button to get the generated video files. Now, you can edit Sony PXW-X320 XAVC in Premiere Pro freely. More related tips:
Source: Workaround for Editing Sony PXW-X320 XAVC in Premiere Pro
Step 3: Click "Settings" button to customize the output video and audio settings by yourself. But if you are not good at it, you'd better use the default parameters, they will ensure you a good balance between file size and image quality basically. You can change the resolution, bit rate, frame rate as you need. Step 4: Click "Convert" button on the bottom of the screen to start XAVC to MPEG-2 .mpg conversion process. The amount of time it takes will vary based on your system's hardware and the quality settings you selected. Conclusion: When the conversion is done, you can click "Open" button to get the generated video files. Now, you can edit Sony PXW-X320 XAVC in Premiere Pro freely. More related tips:
Source: Workaround for Editing Sony PXW-X320 XAVC in Premiere Pro
Summary: Having "unrecognized format" issue while importing Canon C100 Mark II AVCHD to iMovie? If you are looking for a way to make the workflow between Canon C100 Mark II and iMovie more smoothly, you may have interest in this article.  Hot search: C100 Mark II AVCHD to FCP X | C100 Mark II AVCHD to Premiere | C100 Mark II AVCHD to Avid MC | Canon C100 MTS to iMovie/FCE | Canon C100 MTS to Sony Vegas | Canon C100 to DaVinci Resolve Canon's second-generation C100 Mark II digital video camera is being positioned as an affordable solution for video and film production, featuring dual codec capability to process simultaneous AVCHD and MP4 recording, including 59.94P capture along with slow and fast motion recording. Most consumers are happy with the C100 Mark II for its new design and performance upgrades, but for some reason people may run into unexpected incompatibility issues while editing C100 Mark II AVCHD footage on Mac through iMovie or FCE. "As a Mac lover and user I appreciate iMovie and would use it to edit footage downloaded from a Canon C100 Mark II digital video camera. My problem is that, my colleague shot video files in both MP4 mode and AVCHD mode. I have no problem with MP4 recordings, but have issues while using C100 Mark II AVCHD footage in iMovie, especially files at 60p (59.94 fps). They are very buggy. Do I need to convert these files to another format or how do I import them to iMovie so I can edit them flawlessly? Can anyone give me some suggestions if you are using a similar (or same) Canon video camera? Video specs are 1920*1080, 28 Mbps at 59.94p and 1920 *1080, 24 Mbps at 23.98p. Many thanks in advance." In fact, AVCHD is a high compressed codec and it's not a good editing format for many video editing software, including iMovie. iMovie and FCE are pretty picky about the video they use, and they cannot handle 60p AVCHD files well. If you want to bring in 60p AVCHD clips that you've got from Canon C100 Mark II, you need to first convert AVCHD to Apple InterMediate Codec (AIC) MOV, a format that is full compatible with iMovie/FCE on your Mac. Some main formats that iMovie supported are allowed below:
  List of iMovie exported video formats:
  It's clearly that AIC is iMovie's favorite editing codec, which iMovie will read and handle well. In this way, you can expect a fast and fluid workflow between C100 Mark II AVCHD and iMovie. The process is surprisingly easy and can be done with the help of Pavtube MTS/M2TS Converter for Mac. By running it, there's no need to set the codec by yourself; the Mac program has optimized presets for iMovie. Besides, the program is developed with some useful editing features, including merging several clips into one for easy importing, downsizing the files for editing and storage, adding text/image/video to original files,adding subtitles, replacing original audio tracks, etc. Other Download: - Pavtube old official address: http://www.pavtube.com/mts-converter-mac/ - Amazon Download: http://www.amazon.com/Pavtube-MTS-M2TS-Converter-Download/dp/B00QIE3U0Y - Cnet Download: http://download.cnet.com/Pavtube-MTS-M2TS-Converter/3000-2194_4-76177029.html Here is a step-by-step tutorial for you to figure out your AVCHD MTS footage to iMovie problem: Step 1: Import Canon C100 Mark II files to Mac MTS Converter. Run it as the best Mac MTS Converter, and click the "Add video" button to load your original files. You may also directly drag and drop files to application UI for importing files.
  Step 2: Click the "Format" bar to get the drop-down menu and you can get "iMovie and Final Cut Express>>Apple InterMediate Codec (AIC) (*.mov)" as the best output format.
  Step 3: Click "Settings" button to customize the output video and audio settings by yourself. But if you are not good at it, you'd better use the default parameters, they will ensure you a good balance between file size and image quality basically. You can change the resolution, bit rate, frame rate as you need. Step 4: When everything is ready, click "Convert" to start converting C100 Mark II AVCHD MTS to AIC MOV. This Mac MTS/M2TS Converter supports batch conversion so you may load multiple files and convert them at one time. Conclusion: After converting, you can get the generated files by clicking "Open" button. Now, you can edit Canon C100 Mark II AVCHD footage in iMovie freely. Good news! Pavtube Bundles Deals are coming! It's a time for taking a break from work and relaxing. And now you can enjoy your colorful time with good featured products at"Pavtube Bundles Deals". Go ahead and click the link to get your coupon. Save up to $44.1!Never miss!!!
- MTS/M2TS Converter for Mac($29) + MXF Converter for Mac($29) = Only $29.9
- MTS/M2TS Converter for Mac($29) + MKV Converter for Mac($29) = Only $29.9
- MTS/M2TS Converter for Mac($29) + FLV/F4V Converter for Mac($29) = Only $29.9
- iMixMXF($45) + HD Video Converter for Mac($35) = Only $54.9 .....
 More related tips:
Source: http://mediaconverting.blogspot.com/2015/07/work-with-avchd-in-imovie.html
More related tips:
Source: http://mediaconverting.blogspot.com/2015/07/work-with-avchd-in-imovie.html
Canon C300 Mark II is a very hot camcorder on the market now. A lot of users choose to buy this excellent camcorder. It is a new camcorder with 4K internal video recording, which is aimed at beginners and semi-professionals who would want to upgrade to shooting 4K video without spending the big bucks for it. While as we often mentioned, as the incompatible one, MXF cannot be one of the best supported video formats for iMovie. Hot search: 4K MXF to YouTube/Vimeo/Facebook | 4K MXF to DaVinci Resolve | 4K MXF to Sony Vegas | 4K MXF to After Effects | MXF to Avid Media Composer | MXF to Apple Aperture 3  Though Canon C300 Mark II camcorder can help you to record high quality 4K MXF footages, but usually it can make video editing a real nightmare. "I’ve got a ton of Canon C300 Mark II footage that I’m trying to import the C300 Mark II 4K MXF files to iMovie for further editing. Since the files come out natively as MXF, iMovie couldn’t recognize these files at all, let alone do the polishing work. What should I do?" Some main formats that iMovie supported are allowed below: List of iMovie exported video formats: iMovie supports Apple InterMediate Codec (AIC) natively although, it is pretty picky with the codec of what it’ll accept. For those who need to edit Canon C300 Mark II 4K MXF in iMovie on Mac, we would recommend converting 4K MXF to AIC MOV before editing. As we mentioned above, AIC is iMovie’s favorite editing codec, which iMovie will read and handle well. In this way, you can expect a fast and fluid workflow between C300 Mark II 4K MXF and iMovie. How could we remove the troubles when editing C300 Mark II 4K MXF in iMovie? The process is surprisingly easy and can be done with the help ofPavtube iMixMXF. With this program, you can effortlessly encode/re-encode Canon C300 Mark II 4K MXF footage for smoothly importing and editing in various NLEs.
 Other Download: - Pavtube old official address: http://www.pavtube.com/imixmxf-mac/ - Amazon Download: http://www.amazon.com/Pavtube-Studio-iMixMXF-Download/dp/B00QI7MY4Y - Cnet Download: http://download.cnet.com/Pavtube-iMixMXF/3000-2194_4-76171460.html Hot News!!! Pavtube Summer Promotion has become something of a tradition, and it's back for 2015. Giveaway and Save up to 50% OFF for new Pavtube Software owners, this sale runs until Aug 7, 2015.
  How to import Canon C300 Mark II 4K MXF to iMovie for further editing on Mac? Step 1: Download and install the program from the website or click the free trial icon. Then, launch the best iMixMXF and load your original MXF files in with "Add video" or "Add from folder". Directly drag files in is available.
 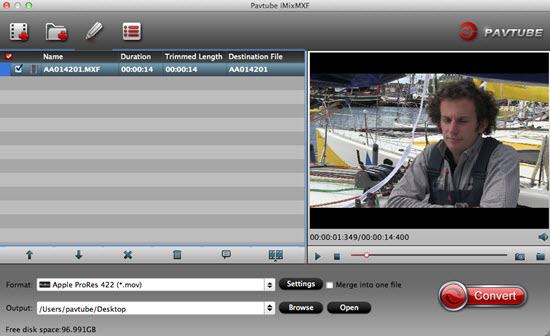 Step 2: Click the "Format" bar to get the drop-down menu and you can get "iMovie and Final Cut Express>>Apple InterMediate Codec (AIC) (*.mov)".
  Step 3: Click "Settings" button to customize the output video and audio settings by yourself. But if you are not good at it, you’d better use the default parameters, they will ensure you a good balance between file size and image quality basically. You can change the resolution, bit rate, frame rate as you need. Step 4: Click the "Convert" button on the main interface if you have done all the preparation work. This is the workflow that we need to convert 4K MXF to AIC MOV. Conclusion: OK, everything is ready, you can get the generated files by clicking "Open" button and instantly edit Canon C300 Mark II 4K MXF files in iMovie. More related tips:
Source: http://digisns.com/2015/07/edit-4k-mxf-in-imovie/
Step 3: Click "Settings" button to customize the output video and audio settings by yourself. But if you are not good at it, you’d better use the default parameters, they will ensure you a good balance between file size and image quality basically. You can change the resolution, bit rate, frame rate as you need. Step 4: Click the "Convert" button on the main interface if you have done all the preparation work. This is the workflow that we need to convert 4K MXF to AIC MOV. Conclusion: OK, everything is ready, you can get the generated files by clicking "Open" button and instantly edit Canon C300 Mark II 4K MXF files in iMovie. More related tips:
Source: http://digisns.com/2015/07/edit-4k-mxf-in-imovie/
The newly released Samsung NX500 has the ability to support both 4K and UHD video recording. The built-in H.265/HEVC codec, the most advanced compression technology available, brings efficiency to the storage of video clips by compressing high quality video to half the size and the bit rate of H.264 footage without any compromise on quality. Hot search: NX500 to DaVinci Resolve Lite | NX500 to QuickTime | NX500 to AE CC | NX500 to Ultra HDTV | NX500 to Sony Vegas Pro | NX500 to iMovie/FCE  The H.265/HEVC used by those HD Camcorder or Camera would be the best solution to compress those high resolution video into small size while maintain the sharp quality. But the step of relevant support software can’t catch this fast digital speed. So users have find that if there is no proper tools, they cannot do anything with NX500 H.265 videos , for the lack of codec among most NLEs or media player and devices. There’s no doubt nonlinear editors will eventually support the H.265 codec, but if you’re like us, you may have to convert NX500 videos to a usable codec before you can import and edit your footage. Comparing with others, Pavtube Video Converter for Mac has the strong ability of transcoding all different videos. With a faster conversion speed and easy operation, it can support most hot media devices and editing programs. Also, I’m sure you’ll be satisfied with some other functional items there. If you are running on Windows operating system, you can choose the equivalent version- Pavtube Video Converter. Other Download: - Pavtube old official address: http://www.pavtube.com/video-converter-mac/ - Amazon Store Download: http://www.amazon.com/Pavtube-Video-Converter-Mac-Download/dp/B00QIBK0TQ - Cnet Download: http://download.cnet.com/Pavtube-Video-Converter/3000-2194_4-76179460.html How to convert and edit NX500 videos? Step 1: Download and have a quick installation. The trial version will have a watermark on your converted files. Except for that, there are no time limitation, no virus, and no unnecessary bundle apps while downloading. After that, click "Add Video" button to load your original NX500 video files. You can load several files at once thanks to "Add from folder" button.
  Step 2: You can choose the output format in the "Format" drop-down list according to your needs. If you are planning to transfer the output videos to portable devices, media players, video sharing websites, NLEs and etc. for enjoyment, playing and editing, you can choose the optimized presets. More than 160 formats to export is available for you and it can meet your needs fully. For instance, if you want to edit NX500 videos in iMovie, choose "iMovie and Final Cut Express>>Apple InterMediate Codec (AIC) (*.mov)" as output format. Step 3: This best program offers some editing functions. You can tick "Merge into one file" under the preview window. And click "Edit" button, you can make changes to the video effects as you wish. In the editing window, you can trim your favorite part from the video, crop the frame size, adjust the visual effects, or add watermarks and more. For inserting subtitles, click "Edit" to choose the "Subtitle" to check "Enable" to select your subtitle paths. After completing, hit "OK" to return to the main interface. If you want to change the video parameters, go back to the main interface and click "Settings" button, you can select the video encoder, resolution, audio channel and more. This function is something worth trying. You can get the work done splendidly. Step 4: After all preparation work done, click "Convert" button to start the edit and conversion work. Conclusion: When the conversion is done, you can click "Open" to get your generated files. With this program, you can convert and edit NX500 videos seamlessly. More related tips:
Source: http://ivideo-home.jimdo.com/2015/07/23/convert-edit-nx500-h265-videos/
Step 2: You can choose the output format in the "Format" drop-down list according to your needs. If you are planning to transfer the output videos to portable devices, media players, video sharing websites, NLEs and etc. for enjoyment, playing and editing, you can choose the optimized presets. More than 160 formats to export is available for you and it can meet your needs fully. For instance, if you want to edit NX500 videos in iMovie, choose "iMovie and Final Cut Express>>Apple InterMediate Codec (AIC) (*.mov)" as output format. Step 3: This best program offers some editing functions. You can tick "Merge into one file" under the preview window. And click "Edit" button, you can make changes to the video effects as you wish. In the editing window, you can trim your favorite part from the video, crop the frame size, adjust the visual effects, or add watermarks and more. For inserting subtitles, click "Edit" to choose the "Subtitle" to check "Enable" to select your subtitle paths. After completing, hit "OK" to return to the main interface. If you want to change the video parameters, go back to the main interface and click "Settings" button, you can select the video encoder, resolution, audio channel and more. This function is something worth trying. You can get the work done splendidly. Step 4: After all preparation work done, click "Convert" button to start the edit and conversion work. Conclusion: When the conversion is done, you can click "Open" to get your generated files. With this program, you can convert and edit NX500 videos seamlessly. More related tips:
Source: http://ivideo-home.jimdo.com/2015/07/23/convert-edit-nx500-h265-videos/