Convert H.265 Movie from Samsung NX1 to H.265/HEVC Higher quality smaller size---that's the biggest highlight that brought by the new video codec H.265/HEVC. On the other hand, someone now are confused with the issues of playing H.265/HEVC movies on VLC player. It seems that we should have an intensive talking on H.265/HEVC to know how to make H.265 movies smoothly played on VLC player.  MediaCoder H.265 encoding is open for beta testing, this is also one of the best codec features that loved by almost all users. While as someone there said' I shot some H.265 gathering videos by Samsung NX1 4K camcorder and now I want to further editing them in Sony Vegas and then for a better enjoyment on VLC player on Windows with my family members. 'Unsupported Error' happened there. I think I have to ask for some help.' Though H.265/HEVC can support 8K UHD with a resolution of 7680×4320 and it would become the best codec in the future. So how could we edit and play our videos with no difficulties? Again the Pavtube studio has brought us the good news! With the latest upgraded version, all windows programs can support the H.265/HEVC movies encode and decode. Thus in this page, efficient solutions are offered here to play your H.265 recordings on VLC player with Pavtube Video Converter for Windows.
Tips on converting Samsung NX1 H.265/HEVC videos to MP4 for playback on VLC: Step 1. Download and install the program from the website, load your original 4K source in with 'Add video' directly drag files in is available.  Step 2.Choose the right output for VLC. As we mentioned above, we would like to introduce you to select the 'HD Video'>>'H.264 HD Video(*.mp4)' as your best choice. Surely you can choose other suitable ones as you like.
  Step 3. Any interests in adjusting your output videos? Additionally in the 'Edit' button on the main interface, we can 'Trim', 'Crop' to decide the video length or something else there. Do you have any interests there to have a try?
  Conclusion: Tap the 'Convert' on the main interface if you have done all the preparation work. This is the workflow that we need to transcode H.265 to H.264, which could make the original Samsung NX1 files accepted by popular media or editing devices. What's more, let's looking forward that the news of Mac products' upgraded version coming soon! More:
Good News! Pavtube Bundles Dealsare coming! If you want to import/preserve/mix multi-track MXF in MKV/MP4/MOV formats, get multi-track Apple Prores MOV for further editing in Final Cut Pro (X), the following bundled software is your best choice:? Video Converter($35) + MXF MultiMixer($45) = $54.9, Save $25.1 (buy link) Video Converter for Mac($35) + iMixMXF($45) = $54.9, Save $25.1 (buy link) Source: http://mediaconverting.blogspot.de/2015/02/watch-nx1-h.265-on-vlc-player.html
Conclusion: Tap the 'Convert' on the main interface if you have done all the preparation work. This is the workflow that we need to transcode H.265 to H.264, which could make the original Samsung NX1 files accepted by popular media or editing devices. What's more, let's looking forward that the news of Mac products' upgraded version coming soon! More:
Good News! Pavtube Bundles Dealsare coming! If you want to import/preserve/mix multi-track MXF in MKV/MP4/MOV formats, get multi-track Apple Prores MOV for further editing in Final Cut Pro (X), the following bundled software is your best choice:? Video Converter($35) + MXF MultiMixer($45) = $54.9, Save $25.1 (buy link) Video Converter for Mac($35) + iMixMXF($45) = $54.9, Save $25.1 (buy link) Source: http://mediaconverting.blogspot.de/2015/02/watch-nx1-h.265-on-vlc-player.html
How to Convert Sony PMW-500 MXF to FCP Converter 'What plug-in do I need to install so I can import and edit .MXF video files in Final Cut. The suggestion of doing Log and Transfer doesn't work (the .MXF files are gray out not allowing me to select it.). So what does this situation exactly mean?' In the following article, we are glad to introduce you some efficient ways to solve the problems when editing Sony PMW-500 MXF recordings in FCP 6/7 with ProRes 422/4444/LT Notes: Final Cut Pro supported video formats we should know for a first step.  The PMW-500 is Sony Professional's first XDCAM HD422 Camcorder with solid state recording. It supports full-HD 422 50-Mbps MXF record and playback based on highly developed MPEG-2 Long GOP compression technology. So it would be not strange that it will be hard to directly to import Sony PMW-500 MXF to FCP 6/7. What's more, they are also not available for Premiere Pro, Sony Vegas or Avid, etc. To smoothly import Sony PMW-500 XDCAM MXF in Final Cut Pro 6/7 for editing, the easy workaround is to transcode MXF to Apple ProRes encoded MOV format, which is natively supported by Final Cut. Along with some help from a professional Mac MXF to MOV Converter. it can be done. Via Google and compared with others, we found the Pavtube Video Converter for Mac c ( Win )an be the best choice! More details you can read the related review. Here is the step-by-step we need to learn to convert Sony PMW-500 MXF to ProRes 422/4444/LT for editing in FCP 6/7.
Step 1. Run the MXF to FCP converter and open the main interface o your computer, we can directly drop the files in or with another way, 'Add video' or Add from folder' can both be the available importing ones.  Step 2. Select the suitable ones as your favorite. click the "Format" option, choose the Final Cut Pro > Apple ProRes 422 video (*.mov). And navigate to the Final Cut Pro group, you will notice that there are profiles with Apple ProRes 422, Apple ProRes 422(HQ), Apple ProRes 422(LT), Apple ProRes 422(Proxy), etc.
  Step 3. (Optional) Merge Sony PMW-500 MXF files and Choose video size as original. Select all the files in the filelist, then click the Merge the Files, and the Mac Sony PMW 500 1920×1080 MXF converter will join and combine the video clips into a single file as output.
  As soon as you have finished the preparation job, it's time to go back to the main interface to hit the 'Convert' to start you version work. From Sony PMW-500 MXF to FCP supported ProRes codec, you won't wait for a long time. After transferring files to FCP, we are glad to enjoy ourselves! ******************************************************** More guides: Let's Ingest Panasonic AJ-PX800 H.264/AVC MXF to iMovie/FCE Discussion—iPad Air 2 Supported Audio and Video Formats Tips on Streaming Any Video Formats to Google Chromecast Good News: Never miss to get Saving up to $44.1, MXF/MTS/M2TS/MKV/FLV/MOV Converter.etc at Pavtube Bundles Deals, such as: HD Video Converter for Mac($35) + DVD Creator for Mac($35) = $39.9, Save $30.1 HD Video Converter for Mac Key Features: -Convert 1080p/720p MKV, MOV, MXF, MTS, M2TS, M2T, TS, M4V, MP4, AVI, MPG, VOB, WMV, 3GP, FLV videos for playing, editing, uploading or burning. -Support ProRes/DNxHD/DVCPRO/AIC and other codecs for NLEs on Mac. -Convert HD footages from Sony, Canon, Nikon, Panasonic, JVC, etc. -Convert any video and audio for multiple playback devices. DVD Creator for Mac: -Create playable DVD disc, DVD folder and DVD ISO from different file types. -Make DVDs from TiVo, MTS, MOV, WMV, AVI, MPEG, MP4, MKV and more. -Burn ISO image file and DVD folder/VIDEO_TS to a DVD disc directly. -Create DVD movies with NTSC or PAL video standard.
  Source: http://handycameratips.jimdo.com/2015/02/06/convert-pmw-500-mxf-to-prores-422/
Best Convert workflow for Sony PMW-300 XACAM to FCP Question: 'Hi, I am using a FCP 7 Studio. I recently bought a Sony PMW 300K1 camcorder. The MXF files coming out of this camera are not recognized by FCP 7. Is there a way to handle this without converting the files? Is it possible to edit MXF files on FCP X directly?' Answer: If you want to edit Sony PMW-300 MXF footage in FCP X, you will need to use the Sony XDCAM Transfer Utility to rewrap the PMW-300 XDCAM MXF into QuickTimes files. However, due to different computer environments, this would not always work as expected. In this case, you will need to convert Sony PMW-300 XDCAM MXF to Apple ProRes for FCP as we should know the best supported video formats fot FCP.  Due to the causes we metioned above, is there any good solutions we can take as the good reference? Fortunatedly, we still have the professional MXF to FCP converter called Pavtube MXF Converter for Mac ( Win ), which is a converter program designed for transcoding HD media, including camera and camcorder videos files to whatever format you need with best video and audio synchronization. With this little tool, you are able to convert some incompatible codec videos to FCP for editing, such as XAVC, MKV, etc. How to transcode Sony PMW-300 XDCAM MXF files for editing with FCP 6/7?
Step 1. Launch the program and click the "Add" button to load PMW-300 .MXF files for converting.  Step 2. Click on the "Format" and you will get a dropdown menu and then select Final Cut Pro > Apple ProRes 422 (*.mov), which is the best format for Final Cut Pro.
  Step 3. (Optional)Click "Settings" to set video resolution (1920×1080/1440×1080/1280×720/720×480), bitrate(from 1Mbps to 20Mbps), frame rate (24p/30p) as you like. To deinterlace, crop, trim XDCAM HD MXF video, click "Edit" menu.
  Finally after above settings, hit "Convert" button to start transcoding Sony PMW-300 MXF to ProRes for directly importing to FCP 6/7. Additionally, here is also the guide on how to transfer files into FCP 6/7 for editing yu can read more. Notes: If you wanna convert your MXF files with multiple audios preserved, why not take this iMixMXF as a try? ****************************************************** See Also: Convert MXF Videos for TV Broadcasting and Vimeo Sharing Audio Issues When Editing Sony PMW 150 MXF in FCP? Can Premiere Pro CS6 Work Friendly with Canon MXF Files? Good News! Pavtube Bundles Deals coming! If you want to import multi-track MXF in MKV/MP4/MOV formats, get multi-track Apple Prores MOV for further editing in Final Cut Pro (X), the following bundled software is your best choice:? Video Converter($35) + MXF MultiMixer($45) = $54.9, Save $25.1 (buy link) Video Converter for Mac($35) + iMixMXF($45) = $54.9, Save $25.1 (buy link) Source: http://handycameratips.jimdo.com/2015/02/21/edit-pmw-300-mxf-in-fcp-6-7/
Solve Panasonic Lumix DMC-GF7 and iMovie Incompatibility Issues This guide is written for people who are having issues editing Panasonic Lumix DMC-GF7 AVCHD MTS/M2TS video files on Mac Yosemite through iMovie. If you are confused with the problem that you can’t edit your AVCHD MTS footages from Panasonic Lumix DMC-GF7 in iMovie, you’d better transcode your Panasonic GF7 AVCHD files first to resolve the incompatible problem.  “I have recorded many footages from Panasonic Lumix DMC-GF7 camera that in AVCHD MTS video format, now I would like to import these projects to iMovie 11 for editing. What I want is to edit AVCHD files natively in iMovie 11 on Mac, what video codec should I use? Can you recommend some software which can help me import and convert AVCHD to iMovie 11 natively?” When it comes to iMovie, Apple claims that iMovie supports most commonly-used video codecs, including MPEG-4, DV, H.264, MPEG-2, AIC and AVCHD. However, users may find that MTS videos are grayed out when they are prepared to be linked into iMovie. The reason why you can't import Panasonic Lumix GF7 MTS files to iMovie can be various. On the one hand, iMovie cannot import raw MTS files moved from the private folder structure. On the other hand, iMovie hardly supports MTS footage recorded in 1080 50p or 60p. As far as we know and the feedback from the Panasonic GF7 users, many nonlinear video editing software on Mac like iMovie 8/9/11, Final Cut Pro 6/7/X, Adobe Premiere Pro, Avid Media Composer, etc. can’t perfectly import AVCHD .mts files from Panasonic Lumix DMC-GF7 directly. Well, if you make the recordings editable before taking to the program, the incompatible error won’t happen anymore. Here you can download and apply Pavtube MTS/M2TS Converter for Mac to achieve the goal in a fast way. This best Mac AVCHD Converter displays a way of transcoding Lumix GF7 AVCHD MTS video to a Mac friendly format for working with iMovie maintaining original quality.

How to convert Panasonic Lumix DMC-GF7 AVCHD MTS footage to iMovie?
Step 1: Download, install and run the Mac AVCHD Converter to load your AVCHD footages from Panasonic Lumix GF7 to the program by clicking “Add video” button. If you want to import several files at once, “Add from folder” button is available. Besides, drag and drop is also OK. 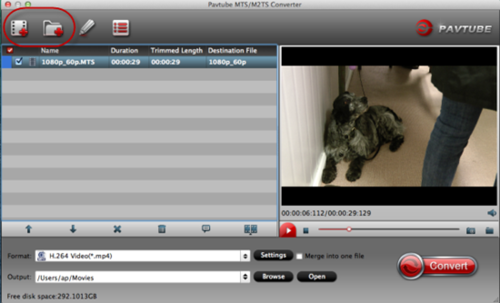 Step 2: Click “Format” bar and choose “iMovie and Final Cut Express>>Apple InterMediate Codec (AIC) (*.mov)” as output format. It’s the best format for editing Panasonic Lumix DMC-GF7 AVCHD MTS files in iMovie 11/9/8.
  Step 3: Why not take around the “Settings” button on the main interface? Here, we can adjust our video size, (just according to personal requirements), bitrates or frame rate, remember that you should set them in appropriate default or you might not get an ideal effect.
 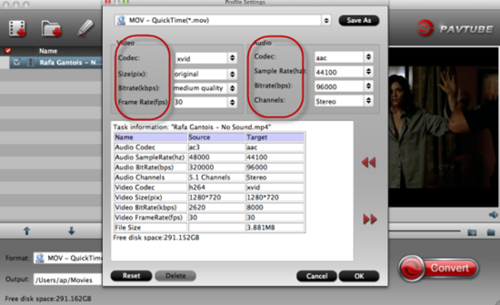 Tips: Click “Snapshot” button when previewing the video and click “Option” to set the image format of screenshots. Click “Edit selected task”, switch to “Effect” tab, you can tick off “Deinterlacing” box; switch to “Trim” tab, you can input time point in start and end box. Step 4: When ready, click “Convert” button under the preview window to start format conversion. If you don’t want to wait for the entire conversion process, you can tick off “Shut down computer after conversion” and go away to do other things. Conclusion: Once the conversion is 100% completed, you can hit “Open” button to locate converted video files and copy the converted files to iMovie for smooth and easier editing. The transfer on How to import video files or projects to iMovie 8/9/11 on Mac can do you a big favor about the next work. ************************************************* Further Reading: Insert any Videos into WordPress Blog for Playback with Mediaelement.js: By now it’s no secret how powerful videos have become in online marketing, and WordPress makes embedding videos hosted on external sites like YouTube or Vimeo extremely easy. But what about when you do not want to have a video publicly viewable, inside a membership area, or simply just want more control on how the player looks and works? Upload iPhone 6 Plus Recordings to YouTube/Vimeo or Burn into DVD on Yosemite: Before we talk about uploading iPhone 6 Plus recordings to YouTube/Vimeo or burn into DVD on Yosemite, maybe we should make it clear that why and how to share this idea, right? Let’s know more about it. Compare Pavtube MXF, MTS, HD Video and Video Converter Software for All Video Fans: When you make the conversion happen, you can make everything happen. With Pavtube, a professional and comprehensive video conversion processor integrating backup, conversion of video sources all in one step, it’s no big deal. Never miss to get Saving up to $44.1, MXF/MTS/M2TS/MKV/FLV/MOV Converter.etc at Pavtube Bundles Deals! source : http://lovecamcorder.tumblr.com/post/112123357757/edit-panasonic-gf7-avchd-files-in-imovie
Import Sony CX220 1080/60p MTS to FCP Natively Editing Hey, how is your summer going, buddy? Did you enjoy lots wonderful moments and have you taken a camcorder to capture them? Did you encounter any program when try to edit these videos on Mac? It seems that Sony Handycam CX200 has become a popular choice for entry-level users for its good video quality and capacity of shooting 1920×1080 Full HD 60p footages in MTS.  To edit MTS/M2TS footage from Sony Handycam HDR-CX220 camcorder, You might have thought of Final Cut Pro. Yes, it is an ideal app to edit videos. So, you can import MTS files from Sony CX220 to Final Cut Pro firstly. This is a tutorial which tells you how to import HD camcorder videos to FCP for editing on Mac OS X like Mavericks, Mountain Lion, Lion and Snow Leopard. When your camcorder video is compatible with Final Cut Pro 1. Connect HD camcorder to your Mac, and it shows up as a drive on the desktop 2. Hit Cmd-Shift-8 to open the Log and Transfer window (FCP 6 or above) 3. The clips in HD camcorder will be ready for being imported to FCP for editing
  When your camcorder videos are not recognizable by Final Cut Pro If the MTS/M2TS files grey out when you try to import them to FCP, you need to convert MTS format to FCP friendly formats. Of course, to do the MTS video conversion, you need a professional app. Here the professional MTS to FCP Video Converter for Mac ( Win ) is strongly recommended. With it, just in a few clicks you could successfully edit Sony CX220 MTS videos in FCP.
Note: Pavtube MTS/M2TS Converter for Mac Supports MTS/M2TS files from a variety of HD camcorders like:
When your camcorder videos are not recognizable by Final Cut Pro If the MTS/M2TS files grey out when you try to import them to FCP, you need to convert MTS format to FCP friendly formats. Of course, to do the MTS video conversion, you need a professional app. Here the professional MTS to FCP Video Converter for Mac ( Win ) is strongly recommended. With it, just in a few clicks you could successfully edit Sony CX220 MTS videos in FCP.
Note: Pavtube MTS/M2TS Converter for Mac Supports MTS/M2TS files from a variety of HD camcorders like:
- Sony: HDR-AX2000, HDR-PJ260V, HDR-PJ380, HDR-CX230, HDR-CX230, HDR-CX430V, HDR-XR520V, HDR-CX730, HDR-PJ780/790V, HDR-PJ650V, DSC-WX80, HDR-PJ580V, SLT-A99, FS700U, NEX-VG30, HDR-CX700V, SLT-A65, NEX-5N, etc.
- Panasonic: Lumix DMC-LX7, DMC-G5, DMC-FZ200, DMC-FX700, DMC-GF6, DMC-G6, DMC-GF3/GF2, DMC-GH1, HC-V720K, HC-X900M, HC-X800, HC-V707, HC-X920M, HDC-HS900, HDC-TM900, HDC-SDT750, HDC-TM90, HDC-HS80, HDC-TM700, DMC-GH2, etc.
- Canon: VIXIA XA20, XA25, HF G30, HF G20, HF S100, HF R40/R42/R400, HF R306, HF R21, HF M300, HF M500, Vixia HF200, HF S200, HF S21, EOS C100 etc.
- JVC: GZ-HD10, GZ-HD30/GZ-HD40, GZ-HD320, GZ-HD300, GZ-HM200, GZ-X900, GZ-HM300, GZ-HM400, GZ-HD620, GZ-HM1, GZ-HM30, etc.
The best way we tested to import MTS to FCP natively without log and transfer is to convert MTS to Apple ProRes codec, which is native codec for FCP, once you converted MTS to Apple ProRes, you can import MTS to FCP X without any problems, and you don't need to render, you can edit the video natively in FCP on Mac. Follow this guide, you will be able to accomplish this easily and efficiently. First, let's get this Pavtube MTS/M2TS Converter for Mac installed; and connect your camera to Mac. Click the top left two icons to import the M2TS/MTS files you want to add:  (If you want to merge several mts video clips into one video, just check "Merge into one file".) Secondly, Click "Format" and choose "Final Cut Pro > Apple ProRes 422 MOV" as the preferred video codec for Final Cut Pro 6/7 on Mac.
  Here you can click the pencil-like icon on the top to trim, crop, add 3D effect, add subtitles or edit audio before conversion. Or click "Settings" on the bottom to customize output video sample rate, size, bitrate, frame rate and so on.
  Now just click the big red "Convert" to start converting Sony CX220 1080/60p MTS to ProRes 422 for FCP. This program supports batch conversion and will let you choose to "shut down computer after conversion" automatically. Good news! Pavtube Bundles Deals are coming! It's a time for taking a break from work and relaxing. And now you can enjoy your colorful time with good featured products at"Pavtube Bundles Deals". Go ahead and click the link to get your coupon. Save up to $44.1!Never miss!!!
- MTS/M2TS Converter for Mac($29) + MXF Converter for Mac($29) = Only $29.9
- MTS/M2TS Converter for Mac($29) + MKV Converter for Mac($29) = Only $29.9
- MTS/M2TS Converter for Mac($29) + FLV/F4V Converter for Mac($29) = Only $29.9
- iMixMXF($45) + HD Video Converter for Mac($35) = Only $54.9 .....
source: http://camcordervideoshare.altervista.org/blog/import-sony-cx220-mts-to-fcp-natively/